 |
Introduction to Forms and Reports |
|
Forms Fundamentals
Introduction
As done for the tables and queries, Microsoft Access provides a central dialog box you can use to create forms: this is the New Form dialog box. To display the New Form dialog box, if no object is opened, on the main menu, you can click Insert -> Form. Alternatively, in the Database window, you can first click the Forms button. Then, on the toolbar of the Database window, you can click the New button.
As done for a query, before creating a form, you must decide where data would come from. If you are creating an independent form whose fields are made of Windows controls and whose contents would not depend on any field or data stored in another object, you can just proceed as you see fit, as if you were developing a regular Windows application. If you are creating a form meant for data entry for the database, you
should specify where its data would come from. The object can be a table, a combination of tables, a query, a combination of queries, or a combination of tables and queries. If the data of a form will be based on such an object or a group of objects, you must specify it, before or while creating the form.
AutoForm
The fastest means of creating a form is through a feature called
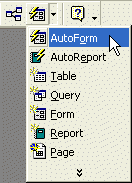
AutoForm. To use AutoForm, you can first select a table or a query on the Database window; you don't have to open the object. If the table or query is selected in the Database window, to create a form in one step, on the Database toolbar, either click the AutoForm button if it is already selected, or click the arrow of the New Object button and click AutoForm. Alternatively, while a table or a query is selected in the Database window but not opened, to
quickly create a form, on the main menu, you can click Insert -> AutoForm. If a table or a query is already opened and you want to create a form based on it, on the Table Databasheet toolbar, or on the Query Datasheet toolbar, you can click the
AutoForm button if it is already set as the New Object or you can click the arrow of the New Object button and click
AutoForm.
Another technique used to create a form using AutoForm consists of first displaying the New Form dialog box. From there you can click one of the three AutoForm options, select the object that holds data and click OK.
 Practical Learning: Using AutoForm
- Open the Rockville Techno database you created in the previous
lesson
- On the Database window, click the Queries button and click the Employees
Pay Information query to select it
- On the Database toolbar, position the mouse on the New Object button. If the tool tip displays
New Object: AutoForm,
 ,
then click it. If it displays something else, click the arrow of the New Object button and click AutoForm
- After viewing the form, on the Form View toolbar, click the Save
button

- Accept the suggested name for the form by clicking OK
- Then close the form
The Form Wizard
As far as users are concerned, the form is the central point of a database. It is used to view, enter, manipulate, and search data. Because users spend a great deal of their time looking at forms, you should create and make them as attractive and friendly as possible. Form design can take a long time in database development but Microsoft Access provides quick means to get around.
The Form Wizard provides an easy and fast means of creating a form. Like the other wizards we have used so far, this one also takes you step by step through creating the object. There are two main ways you can launch the Form Wizard: from the Database Window or from the New Form dialog box. On the Database Window, you can click the Forms button. Then double-click Create Form By Using Wizard. On the New Form dialog box, you can click Form Wizard and click OK.
The first page of the Form Wizard allows you to choose the originating table or query that will supply the necessary fields in the form. Once you have selected the object, its corresponding fields display in the Available Fields list
box. You can then select all fields or decide which ones you want to include in the form.
The 2nd page of the wizard allows you to select the desired layout of the form. Forms can be designed in various flavors:
Columnar, Datasheet, Tabular, Justified:
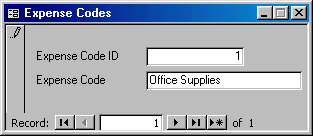
- A columnar form is used to display data one record at a time. This is a convenient display for data entry and analysis because the user is able to examine each piece of information for each one record:
- A tabular form displays its data in a table layout following a continuous series of records. All or almost all records are displaying in a single layout:

There are three main ways you can create a tabular form: from the New Form dialog box, using the Form Wizard, or designing it
- A datasheet form looks and behaves like a table, displaying all possible records at the same time instead of one record at a time:
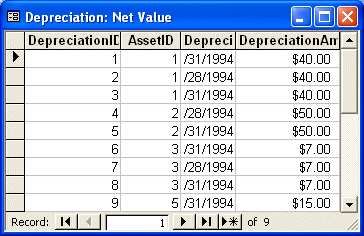
A datasheet form is mainly used in relationships to display another table's related records. It is also suitable for people who prefer to work in a spreadsheet environment. This display allows the database developer to provide a sheet view to the data entry personnel without making the table's design or formats available.
You can make the same form available in Form View and Datasheet View. In fact, most forms are.
Users can switch from Form View to Datasheet View by clicking the View menu. Unfortunately, this could also allow the users to get the form in Design View, and then they could modify it. If you do not want the users to have access to Design View but retain Form View and Datasheet View, you may have to create custom menus and toolbars.
There are two main ways you can create a Datasheet form: using the wizard or designing it.
- A Justified form provides a good and consistent look. When the form is created, borders are added to labels:
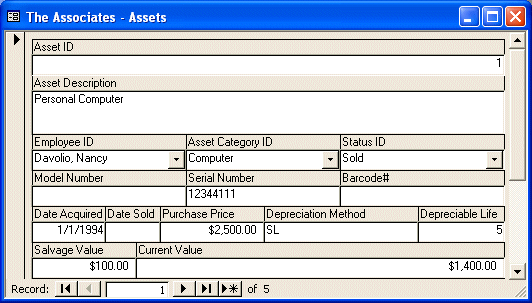
The 3rd page of the Form Wizard presents the forms designs you can choose from. These are the designs we saw when creating a database using the Database Wizard.
The 4th page allows you to name the form.
 Practical Learning: Form Wizard - Columnar
|
- The Rockville Techno database should still be opened
On the Database Window, click the Forms button
- On the Database Window’s toolbar, click New
- On the New Form dialog box, click Form Wizard
- From the combo box, select the CompanyAssets
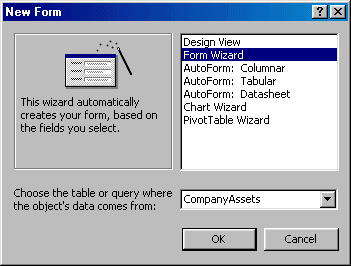
- Click OK
- Click the Select All Fields button

- Click Next
- Accept or choose the Columnar layout, then click Next
- Click the International style and click Next
- Accept the name of the form as CompanyAssets and click Finish
An automatic form is created for you
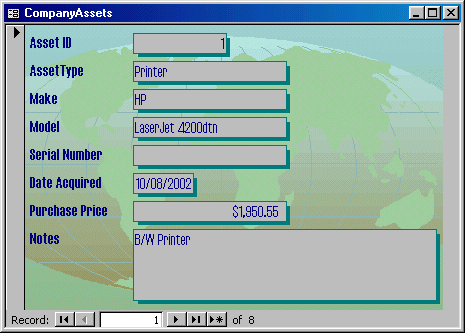
- To close the form, click its Close button

|
 |
Data entry of a database is mainly performed on forms as they provide the
friendliest display of information. Data entry on a form is performed using text boxes, combo boxes, and other controls. On text boxes, the user enters data by typing it. On a combo box, depending on how the object was configured by the database developer, the user may have to only select an item from the list. In some other cases, the user may be allowed to enter new data.
|
|
After entering or changing data on a control, to move from one field to the next, the surest way is to press Tab. On most occasions, the user can also press Enter. The Enter key may not move the cursor from a text box that allows multiple lines of text (such as a field created as Memo). If the user is simply reviewing data without performing data entry, the keyboard’s arrow keys can also be used to move among fields.
|
 Practical Learning: Form Data Entry
|
- The Rockville Techno database should still be opened and the Forms button should be selected. Otherwise, on the Database Window, click the Forms button
Double-click the Employees form to open it
- In the first record, for David Phillips, click Address and type
10048 Venice Drive
- Press Enter to move to the City field and type Bethesda
- Complete each record by clicking in the appropriate field and typing the corresponding data (after each record, click the Next Record button)
- Close the Employees form after performing data entry
- Double-click Expense Codes
- In the first Expense Code, type Office Supplies and press Enter
- Type Software and press Enter
- Type Printer and press Enter
- Type Computer Supplies and press Tab
- Type Car Rental and press Tab
- Type Air Fare and press Tab
- Type Meal
- To close the form, click its system Close button

- Double-click Work Codes
- In the first Work Code, type Regular and press Enter
- Type Web Design and press Enter.
- Type Data Entry and press Tab
- Type Database Design and press Tab
- Type Software Coding
- To close the form, click its close button

- Double-click Clients
- In the First Name text box, type Jose and press Enter
- In the Last Name text box, type Marillo and press Enter
- In the 8012 Herald Ave Suite 402 and press Enter
- In the City text box, type Alexandria and press Tab
- In the State/Province text box, type VA and press Tab
- In the Postal Code text box, type 22031 and press Tab
- In the Country text box, type USA
- Click in the Company Name text box and type PTN Investors, Inc.
- Click in the Contact Title text box and type Director of Investments and press Tab
- In the Phone Number text box, type 7038384422 and press Tab
- In the Fax Number, type 7038385035
- Click in the Notes text box and type PTN is an investment firm with offices in VA, MD, and
NY and is interested in network technology for its future activities
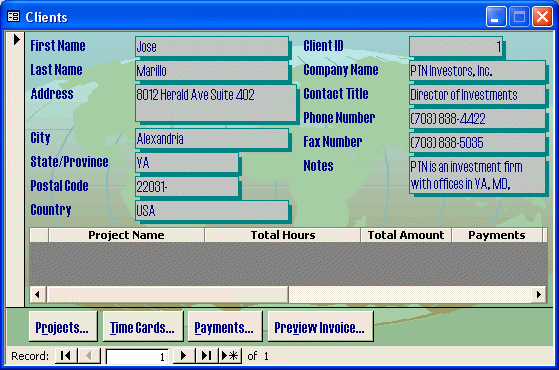
- Click the Projects button. This opens the form allowing to process projects related to this client
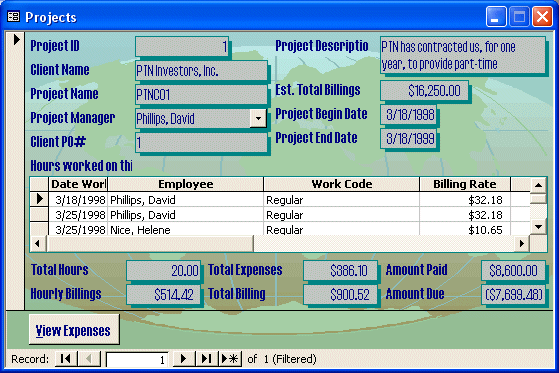
- In the Project Name text box, type PTNC01
- Click the arrow of the Project Manager combo box and select Phillips, David
- Click in the Client PO# text box and type 1
- In the Project Description text box, type PTN has contracted us, for one year, to provide
part-time technical support for its existing computer network. We will be in their office every Wednesday all day long
- In the Est. Total Billings text box, type 16250 and press Tab
- In the Project Begin Date, type 031898 and press Tab
- In the Project End Date, type 031899
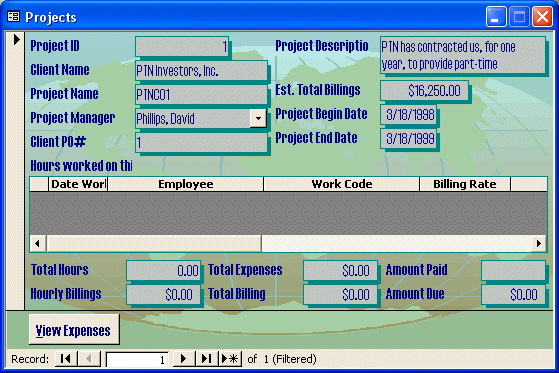
- To close the form, click its Close button

- On the Clients form, click the Time Cards button
- Click the arrow of the Employee combo box and select Phillips, David
- Select the date in the Date Entered text box, type 03/18/98 and press Tab.
- In the Date Worked text box, type 031898 and press Tab.
- Click the arrow of the Project combo box, select PTNC01 and press Tab.
- Click the arrow of the Work Code combo box, select Regular and press Tab twice.
- In the Billable Hours field, type 8
- In the Work Description field, type Besides regular work, we replaced 2 network cards on the receptionist and Ms. Maureen's workstations
- Press Tab to move to the next record of the subform
- For the next record, set the Date Worked to 032598 for the
PTNC01 project on Regular work billable for 6 hours. For the
Work Description, type Spent some time training employee on mild issues of computer networking.
- In the Expense subform, click the Date field
- Enter 031898 and press Enter
- On the Project combo box, select PTNC01 and press Enter
- Click the Expense Code combo box and select Computer
Supplies
- Click the Amount field and type 386.10
- Click the Description field and type I bought 5 network cards. Two were used right away. The spares are kept just in case
- Click the Next Record button

- On the Employee combo box, select Nice, Helene
- Replace the Date Entered with 032598
- In the Time Worked combo box, click the 1st empty field and type
03/25/98
- Select the Project Name as PTNC01
- Set the Work Code to Regular. Set the Billable Hours to
6
- In the Work Description, type We spent a couple of hours on site with Mr. Phillips.
- To close the form, click its Close button

- On the Clients form, click the Payments button
- Click the arrow of the Payment Method combo box, select Check and press Tab
- In the Payment Date, type 03/04/98 and press Tab
- In the Payment Amount text box, type 8600 and press Tab
- To close the Payments form, click its Close button

- On the Clients form, click Projects to review its form
- Close the Projects form.
|
|
Although not part of their primary role, forms provide a quick means of printing data, especially in the absence of desired reports. There are various issues related to printing forms, including printing all records or just some of them. |
 |
|
You can print a form without opening it. Once you know the form you would like to print, locate its name in the Database Window, right-click
it and click Print... All records on the form would be printed.
When a form is opened, you have the option of printing all of its records or the selected one. Once in Form View, you can click the Print button on the toolbar. To print just one record, navigate to the record you would like to print, click the Form Selection bar to select the record. On the Form View toolbar, click the Print button. |
 Practical Learning: Printing Forms
|
- The Clients form should still be opened.
Click the Projects button to open the associated projects. Since we have only one project from this client, we will just print that record
- On the Form View toolbar, click the Print button
 . Notice that the job goes straight to the printer and starts
printing . Notice that the job goes straight to the printer and starts
printing
- Close the Projects form and close the Clients form
- On the Database Window, double-click Employees
- To navigate to the 3rd employee, click the Next Record button
 twice
twice
- After making sure that the desired record is displaying, in this case, the 3rd record, on the main menu, click File -> Print…
- On the Print dialog box, click the Selected Record(s) radio button
- Click OK
- Verify that only the displaying employee's record was printed
- Now we will print records from 2 to 4
- Navigate to record No.2
- Click the Record Selector bar
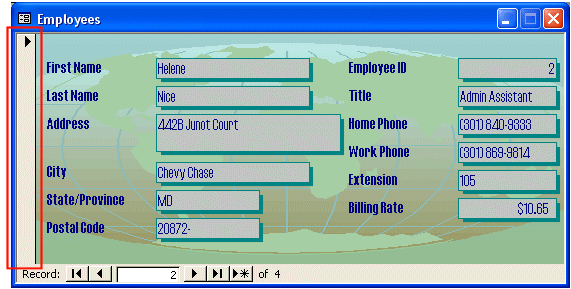
- Press and hold Shift. Click the Next Record button
 twice to display the record of Lester Vaughn (even though the record # still displays
2)
- Release Shift
- On the main menu, click File -> Print…
- On the Print dialog box, click the Selected Record(s) radio button and click OK
- Verify that records from 2 to 4 have been printed
- Close the Employees form
|


![]() Practical Learning: Using AutoForm
Practical Learning: Using AutoForm ,
then click it. If it displays something else, click the arrow of the New Object button and click AutoForm


![]() Practical Learning: Form Wizard - Columnar
Practical Learning: Form Wizard - Columnar
![]() Practical Learning: Form Data Entry
Practical Learning: Form Data Entry
![]() Practical Learning: Printing Forms
Practical Learning: Printing Forms