 |
Queries and Fields |
|
Introduction
 |
We previously learned that fields could be easily added to a query by using the Query Wizard. Fields can also be added while designing a query. To proceed with this approach, the query should be displayed in Design View.
To display a query in Design View, if you are using Microsoft Access 2000, from the Queries section of the Database Window, you can double-click Create Query in Design View. Alternatively, do one of the following:
|
- On the Queries section of the Database Window, you can click the New button
- On the main menu, you can click Insert -> Query
- On the Database toolbar, you can click the arrow of the New Object button and select Query
Any of these techniques would call the New Query dialog box where Design View is selected by default. Otherwise you can select Design View and click OK.
To start a fresh query, the database needs to know where data would come from. Therefore, the Design View displays a list of already existing tables and queries so you can choose which one(s) would provide the needed information:
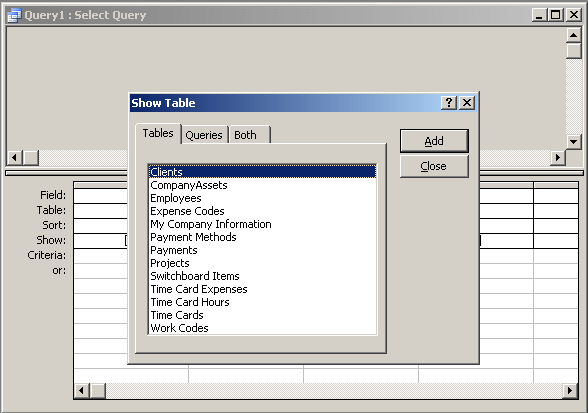
A simple query can have its data originate from a single table. Therefore, to choose the table that holds the information needed for this query, you can click that table and click Add. You can also double-click it. A simple query can also be built from an existing query. To use such a query, in the Database window, click the Queries button and select the query you want. You can also create a query whose data would originate from more than one table. In this case, the tables must have been previously joined. To select the tables, from the Tables property page of the Show Table dialog box, you can double-click each one of the tables you need. More advanced queries can be built from more than two queries, a table and a query, or a combination of tables and queries.
After selecting the table, tables, query, or queries, you can click the Close button of the Show Tables dialog box. If the Show Tables dialog box is closed or for any reason and you want to display it, on the menu bar, you can click Query -> Show Table...
 Practical Learning: Introducing Query Design
- Open Windows Explorer or My Computer. From the resources that accompany this site, copy the Bethesda Car Rental1 database and paste it in your Exercises folder
- Open the Bethesda Car Rental1 database and, in the Database Window, click the Tables button
- Click the Cars table to select it. Then, on the toolbar of the Database window, click the Open button
- Scroll to the right of the table to review the columns
- Close the Cars table
- On the Database Window, click Queries and click the New button
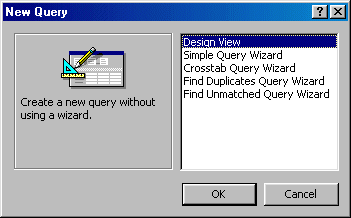
- In the New Query dialog box, click Design View and click OK. Notice that you are presented with a list of existing tables
- On the Show Table dialog box, click Cars
- Click Add and click

Designing a Query
The Select Query window presents another classic window. Its title bar displays its system
icon on the left section. This can be used to minimize, maximize, restore, move, resize, or close the window. Like all Microsoft Access window objects, the title bar displays a special menu when right-clicked:
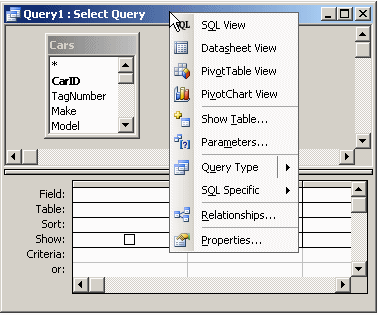
The right section of the title bar displays the classic system buttons of a regular window.
In the top wide area of the Select Query window, the query displays an object (table(s), query (queries)) or a group of objects that was selected to create the query. The lower portion of the query displays boxes that would be used to perform various operations related to the query. The upper and the lower sections of the Select Query window are separated by a splitter bar that you can use to resize them by dragging the splitter bar up or down:
Inserting Columns
To create the fields for a query, you use the table, query, tables, or queries displayed in the upper section of the window. Once you have decided on the originating object or objects, you can select which fields are relevant for your query:
- To select one field from the list, just click it.
- To select many fields on the same range, you can click one of them, press and hold Shift. Then click one field on the other end of the desired list.
- To select fields at random, click one of the desired fields, press and hold Ctrl; then click each one of the desired fields.
- To select all fields, you can either double-click the title bar of the list or click the * line on the list of fields.
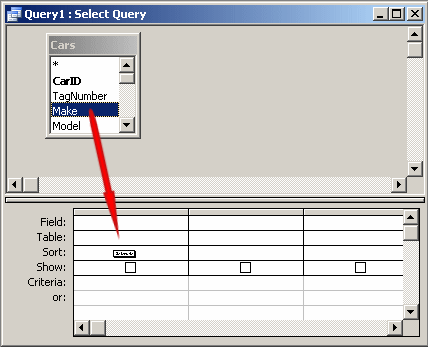
Once you have made your selection on the list, you can drag it and drop it on the query. Instead of dragging a field or all fields, you can either double-click a field to add it to the query, or double-click the * line to add all fields to the query.
 Practical Learning: Select Fields to Build a Query
- From the list of fields, click and drag Make, then drop it anywhere on the first empty field on the lower section of the view:
- On the list, scroll down and click AMFM
- Press and hold Shift, then click CDPlayer and release Shift. Notice that three fields have been
selected
- Drag the group of items and drop it on the empty column right to Make
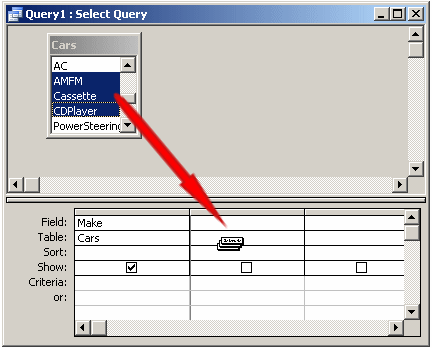
- Notice all the selected fields have been added to the query
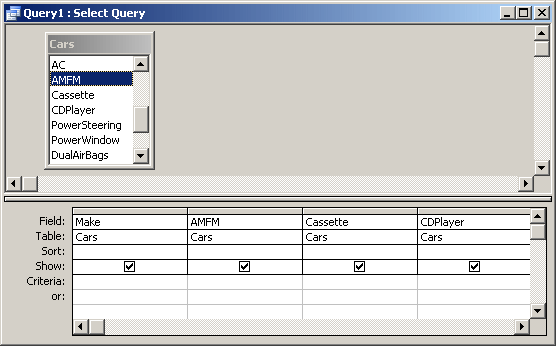
- To view the query, on the Query Design toolbar, click the View
button

- After viewing the query, to save it, on the Query Datasheet toolbar, click the Save button

- Type Cars Audio Options as the name of the query and press Enter
- After viewing the query, to close it, click its Close button

Selecting Columns
Sometimes, the idea of using a query is to test data or verify a condition. Therefore, a query, as compared to a table, could provide just a temporary means of studying information on your database. When performing such assignments or when testing values before isolating an appropriate list, you can add, insert, delete, replace or move fields at will. We have already covered different techniques of adding or inserting fields:
- To select a field in the lower section of the view, click the tiny gray bar of the column header. The whole column will be selected.
- To select a range of columns, click the column header of one at one end, press and hold Shift, then click the column header at the other end.
|

|
|
Replacing and Deleting Columns on a Query
|
|
As seen above, a query is built by selecting columns from the originating list and adding them. If you do not need a column anymore on a query, which happens regularly during data analysis, you can either delete it or replace it with another column:
- To delete a column, once it is selected, you can press Delete.
- To delete a group of columns, select them and press Delete.
- To replace a column, click the arrow on the combo box that displays its name and select a different field from the list.
Moving Columns
Columns on a query are positioned incrementally as they are added to its list. If you don't like the arrangement, you can move them and apply any sequence of your choice. Before moving a column or a group of columns, you must first select it, then:
- To move a field, click its column header once. Click it again and hold your
mouse down, then drag in the direction on your choice.
- To move a group of columns, first select the group and then proceed as if it were one column.
 Practical Learning: Manipulating Fields
- The Bethesda Car Rental1 database should still be opened.
In the Database Window, click the Tables button and click Cars to select it
- On the menu bar, click Insert -> Query
- In the New Query dialog box, double-click Design View.
Notice that the Cars table is already selected as the originating object
- In the list of fields, double-click Make, Model, NbrOfDoors, AMFM, Cassette, and CDPlayer
- To view the query, on the Query Design toolbar, click the View button

- After viewing the query, to switch back to Design View, on the Query Datasheet toolbar, click the View button

- To replace a field, in the lower section of the Design View, click NbrOfDoors and notice that an arrow of a combo box appears
- Click the arrow of the NbrOfDoors combo box and select CarYear

- Scroll to the right on the lower section of the view to display the first empty field
- To add a new field, click CDPlayer and press Tab. Notice the combo
box
- Press and hold Alt, then press the down arrow key and release Alt.
This displays the list of the combo box
- Press the down arrow key a few times until Picture is selected, then
press Enter
- Scroll back to the left
- To insert a field, drag TagNumber from the Cars list and drop it on top of
AMFM
- Notice that the newly inserted field has been added to the left of the field it was dropped on
(In the same way, you can select various fields and decide to insert them to the left of a field of your
choice)
- Scroll to the right side of the lower section of the view until you can see Picture.
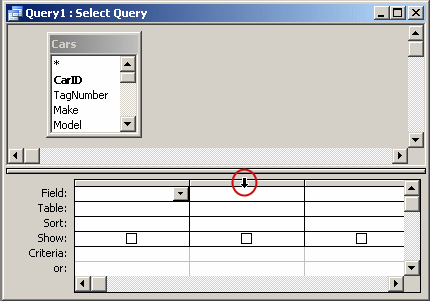
To delete a field, in the lower section of the view, position the mouse on the
tiny horizontal bar above Picture until the mouse turns into a down pointing arrow:
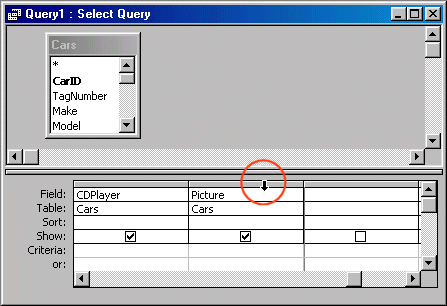
- Click. Notice that the whole column is selected
- Press Delete. Notice that the field is removed from the query
- To view the query, click the View button

- To switch the query back to Design View, on the main menu, click
View -> Design View
- Scroll back to the left of the lower view and make sure you can see
the TagNumber and the Make columns.
In the lower section of the view, click the bar on top of TagNumber and release the
mouse
- Click the TagNumber header bar again and hold your mouse down
- Notice a vertical line that guides you. Drag left until the vertical guiding line gets between Make and Model:
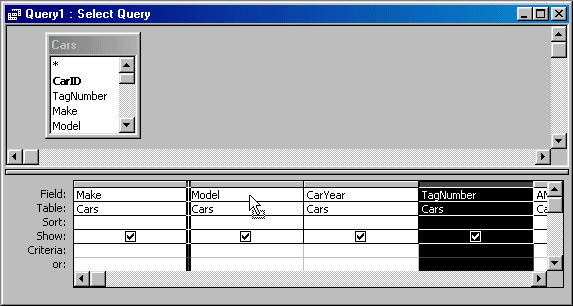
- Release the mouse
- To view the query, on the Query Design toolbar, click the View button

- Switch the query back to Design View
- Scroll the lower section right to see CDPlayer
- Click and hold your mouse on the bar on top of AMFM. Then drag right to CDPlayer to select the AMFM, the Cassette, and the CDPlayer columns. Then release the mouse
- Click and hold your mouse again on the bar on top of AMFM
- Drag left until the vertical line is between the Model and the CarYear columns
- Then release the mouse
- To run the query, right-click its title bar and click Datasheet View
- To close the query, double-click its system icon
- A message asks you whether you want to save the query, click No (this was a test; it was just a testů)
MOUS Topics
| S2 |
Create Table Structure |
| S11 |
Modify field properties |
| S13 |
Modify tables using Design View |
Exercises
Yugo National Bank
- Open the Yugo National Bank database and open the Customers table in
Design View. Insert a new field between CustomerID and AccountNumber.
Name it DateCreated and close the table
- Use the Table Wizard to create a new table based on the Accounts
sample table of the Personal category and include only the
AccountTypeID field. Rename AccountTypeID as TransactionTypeID. Save the
table as TransactionTypes and open it in Design View. Under the
existing field, add another field named TransactionType. Using the Field
Builder, add a field based on the Notes sample. Rename it Description.
Save the table and perform data entry as follows:
| TransactionTypeID |
TransactionType |
Description |
| 1 |
Deposit |
Used if a customer is depositing money, regardless of the type of account |
| 2 |
Withdrawal |
Specifies that a customer is receiving money. This also applies when a check is cashed from the
customer's account |
| 3 |
Fund Transfer |
This applies to an operation that consists of transferring money from one account to another |
| 4 |
Money Order |
This is selected if a person is purchasing a money order from this bank |
| 5 |
Service Charge |
There are various types of service charges. This category applies to all of them, regardless of the reason, as long as the Bank Management decides to withdraw money from the
customer's account as a fee or a penalty |
Close the table
-
Close the table
- Open the Employees table in Design View and change the names of the
following fields:
| Field Name |
New Name |
| EmailName |
Username |
| StateOrProvince |
State |
| PostalCode |
ZIPCode |
| Salary |
HourlySalary |
Save and close the table
-
Save and close the table
Watts A Loan
- Open the Watts A Loan database. In the Datasheet View of the Customers
table, insert a new field between CustomerID and FirstName. Name it
AccountNumber
- Using the Design View of the Customers table, use the Field Builder
dialog box to add a new field at the end of the table (under Notes) and
base the field on the OrderDate field from the
Orders sample table of the Business category. Rename the field as
AccountDate then move it up to position it between CustomerID and
AccountNumber. Save and close the table


![]() Practical Learning: Introducing Query Design
Practical Learning: Introducing Query Design

![]() Practical Learning: Select Fields to Build a Query
Practical Learning: Select Fields to Build a Query


![]() Practical Learning: Manipulating Fields
Practical Learning: Manipulating Fields

