Database Fields on Forms and Reports
 |
Database Fields on Forms and Reports |
Forms provide a friendlier look for data entry to the main user of the database. As such, you will spend a great deal of time designing their look, tuning their functionality, and checking their efficiency. Even when creating a product from the Database Wizard, you will usually realize that various objects are lacking critical fields for the role of the object, or the database itself, as software, needs a few more objects. As we have learned already, the quickest way to create forms and reports is by using the Database Wizard. Even if you create your database from scratch, you still can use the AutoForm or AutoReport to get very easily rendered and readily available objects. As it happens, the Database Wizard was configured to create only a limited number of objects. If you need additional objects, you can create your own. If you want to control everything or almost everything on the forms and reports, you will have to get into design. To add fields to a form or a report, you must display the object in Design View. This gives you access to the Controls toolbox, which hosts some of the Windows controls used on forms and reports.
Data on fields of forms and reports fall in three main categories:
The techniques used to create these fields are different but a field created using one technique can be changed into another category as necessary. If you want to use a field that is already part of a table or a query, before, or when, creating the form or report, you must specify the list that holds the fields. There are three main ways you can do this:
To add a field to a form or a report, you can either click a control from the Toolbox and click the form or report, or drag a field from the Field List to the form or report. |
|
|
Introduction to Form Design |
|
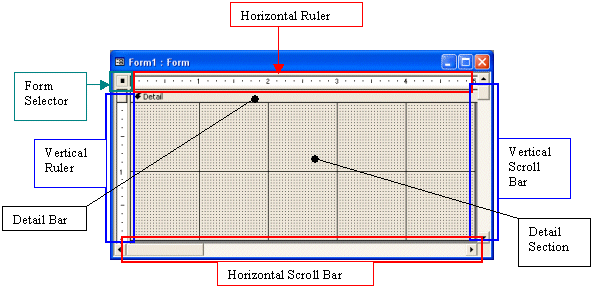
When it comes up, a form is presented as a rectangular box made of a form selection button, two rulers, two scroll bars, a horizontal bar labeled Detail, and a gray area: |
 |
|
By default, a form presents a section referred to as the Detail section. This section starts from the Detail bar to the lower end of the section.
If you click Form Header/Footer after right-clicking the form, two new sections will be added to the form:
Although two sections are added, you can reduce one completely so it would not appear to the user. Therefore, you can keep one section and hide the other. If you create a form using the Form Wizard, both the header and the footer sections are added but they are completely reduced so they would not appear to the user. If you want to display them to the user, you must expand them.
These sections would not appear to the user. They appear only if the user decides to print a form, in which case they would appear on the printed paper. Like the Form sections, you can
change either or both the
Page Header and the Page Footer sections.
|
![]() Practical Learning: Creating Forms Fields
Practical Learning: Creating Forms Fields
|
|
Introduction to Report Design |
|
By its structure, a report resembles a piece of paper that you can use to prepare printable information to the user. Like a form, a report is made of a Selector button, two rulers, two scroll bars, and a Detail section. Unlike a form, by default, a report presents a Page Header and a Page Footer sections: |
 |
|
As you can see, a report appears with three default sections. Like a form, you can add another section on top and another at the bottom of the report. To do this, you can right-click the body of the report and click Report Header/Footer. You can also click View -> Report Header/Footer on the main menu. Additionally, unlike a form, you can create as many sections on a report as you see fit. This is referred to as grouping fields. As mentioned for the form, you can add any control in any section of the report but, unlike a form, it is very important how you use the sections of a report as they have greater influence on the printed product. For this reason, each section can be configured for a specific task. If you are creating a regular report that displays one record per page, you may not need a Report Header and a Report Footer sections. If you are creating a brochure or a document that appears as a catalogue or a book, you may need a Report Header and a Report Footer sections. The sections would appear as follows:
|
![]() Practical Learning: Creating Reports Fields
Practical Learning: Creating Reports Fields
|
|
MOUS Topics |
| S22 | Switch between object views |
| S17 | Use the Control Toolbox to add controls |
|
Exercises |
Yugo National Bank
|
|
|
||
| Previous | Copyright © 2002-2016, FunctionX, Inc. | Next |
|
|
||