 |
Libraries and Namespaces |
|
Introduction to Libraries
Overview
A library is a program that contains procedures, functions, classes and/or other
resources that other programs can use. A library is neither an executable nor a web-based application. It is just a type of application that usually has the
extension .dll.
Creating a Library
A library can be made of a single file or as many
files as necessary. A file that is part of a library can contain one or
more procedures (and/or classes). Each procedure (or class) should implement a behavior that can eventually be
useful and accessible to other procedures (or classes). The contents of a library
are created exactly like those we have used so far.
Introduction to Namespaces
Overview
A namespace is a section of code that is recognized with a
name.
Creating a Namespace
In Visual Basic, a namespace must be created in its own
file, not in a webpage. A namespace can also be created in a library.
The primary formula to create a namespace is:
Namespace name

End Namespace
The creation of a namespace starts with the Namespace
keyword and ends with the End Namespace expression. On the right side of
the starting Namespace keyword, enter a name. The name follows the rules we have
used so far for names in the Visual Basic language. Here is an example:
Namespace Census

End Namespace
The section between the starting Namespace line and End
Namespace is the body of the namespace. In this body, you can write code as
you want. For example, you can create a class in it. Here is an example:
Namespace Geometry
    Public Class Rectangle

    End Class
End Namespace
Of course, in the body of the class, you can write the
necessary code. Here is an example:
Namespace Geometry
    Public Class Rectangle
        Public Width As Double
        Public Height As Double

        Public Function Perimeter() As Double
            Return (Width + Height) * 2
        End Function

        Public Function Area() As Double
            Return Width * Height
        End Function
    End Class
End Namespace
Accessing Members of a Namespace
The variables, procedures, and classes created inside a
namespace can be referred to as its members. To access a member of a namespace, you can
use the period operator. To do this, where you want to access the member, type the name of the namespace, followed by a
period, followed by the desired member of the namespace. Here is an example:
Namespace Geometry
    Public Class Rectangle

    End Class
End Namespace

Geometry.Rectangle
In the same way, wherever you want to access a member of a
namespace, you can simply qualify it. Once the member has been qualified, you
can use it. Here are examples:
Namespace Geometry
    Public Class Rectangle
        Public Width As Double
        Public Height As Double

        Public Function Perimeter() As Double
            Return (Width + Height) * 2
        End Function

        Public Function Area() As Double
            Return Width * Height
        End Function
    End Class
End Namespace

Dim rect As Geometry.Rectangle
Rect = New Geometry.Rectangle

rect.Width = 40.18
rect.Height = 28.46
In the same way, you can create as many members as you want
in the body of a namespace.
Nesting a Namespace
You can create one namespace inside of another namespace.
This is referred to as nesting the namespace. To nest a namespace, create its
body in the body of an existing namespace. Here is an example:
Namespace Geometry

    Namespace Quadrilateral

    End Namespace

End Namespace
Inside the new namespace, you can implement the behavior you
want. For example, you can create a class. The parent namespace is still its own
namespace and can contain any necessary thing. Here is an example:
Namespace Geometry
    Friend Class Triangle
        Public Base As Double
        Public Height As Double

        Public Function Area() As Double
            Return Base * Height / 2
        End Function
    End Class

    Namespace Quadrilateral
        Public Class Rectangle
            Public Width As Double
            Public Height As Double

            Public Function Perimeter() As Double
                Return (Width + Height) * 2
            End Function

            Public Function Area() As Double
                Return Width * Height
            End Function
        End Class
    End Namespace
End Namespace
To access a member of the parent namespace, you can qualify
it as we saw previously. To access a member of the nested namespace outside the
parent, type the name of the nesting namespace, followed by a period, followed
by the name of the nested namespace, followed by a period, and followed by the
member you want to access. Here are examples:
Namespace Geometry
    Friend Class Triangle
        Public Base As Double
        Public Height As Double

        Public Function Area() As Double
            Return Base * Height / 2
        End Function
    End Class

    Namespace Quadrilateral
        Public Class Rectangle
            Public Width As Double
            Public Height As Double

            Public Function Perimeter() As Double
                Return (Width + Height) * 2
            End Function

            Public Function Area() As Double
                Return Width * Height
            End Function
        End Class
    End Namespace
End Namespace

Dim Tri As Geometry.Triangle = New Geometry.Triangle

Dim Rect As Geometry.Quadrilateral.Rectangle

Rect = New Geometry.Quadrilateral.Rectangle
In the same way:
- You can create as many namespaces as you want inside of a nesting
namespace
- You can nest as many namespaces in as many nesting namespaces
Introduction to Built-In Namespaces and their Classes
Importing a Namespace
As mentioned in our introduction, a namespace is created in
a particular file and may contain one or more classes. If you want to use a class
contained in a namespace, you must import that namespace into your webpage file.
This is done in the top section of the webfile. The formula to follow is:
<%@ Import Namespace="namespace-name" %>
As you can see, you use the Import Namespace
expression ane assign the namespace to it. If the desired namespace is nested in
another namespace, provide the full qualification. Once you have imported the
namespace, you can directly use the classes and/or functions in it.
To make programming in Visual Basic easier, many
classes were created and stored in various namespaces. Each
namespace contains classes to solve specific problems.
The System Namespace
The most fundamental namespace in the .NET Framework is named System.
It has most of the fundamental classes you need to start a project. The System namespace
is fundamentally available when you create an ASP.NET webpage, so you don't have
to import it in your project.
Introduction to Built-In Classes and Built-In Objects
Introduction
To assist you with programming projects, the .NET
Framework includes many classes. Some classes are regularly used and some classes are hardly used. We cannot review all .NET
built-in classes. Instead, we will introduce and review some classes as they
become necessary.
An Object
The most fundamental class used in a project is called Object. You can use it
to declare a variable of any type. One way to use it is to pass it as parameter. Such a parameter can be anything.
A Nullable Object
To suport null values, the .NET Framework provides a
class named Nullable.
The Web Server
The main webserver for ASP.NET is named (Microsoft) Internet Information Server (or Services), or IIS. It provides the fundamental classes and objects used to manage websites created on the server and the webpages created in them. The objects are fundamentally created as regular (static) classes. You don't have to declare variables for them. You can directly use those objects in your code.
The Server Object
Introduction
The most fundamental object of IIS is named Server. It allows you to perform some basic operations on a webpage. Server is a static object. This means that you will never have to declare a variable for it. Instead, the Server object contains many objects and methods you can access from it. To do this, type Server. followed by the object you want to access.
In ASP.NET, the IIS Server object is represented by a class named HttpServerUtility.
Encoding an HTML String
HTML encoding consists of providing a string to a web browser. The string may or may not contain HTML in it. The easiest way to do this is to take a string from a webcontrol and using it as you see fit. To support HTML encoding, the Server class is equipped with a method named HtmlEncode. It is overloaded with two versions. One of the versions uses the following syntax:
Public Function HtmlEncode(ByVal s As String) As String
This method takes a string as argument. One way you can call this method is to pass the text of a web control to it. Here are examples:
<%@ Page Language="VB" %>

<!DOCTYPE html>
<html>
<head>
<script runat="server">
Sub btnEvaluateClick(ByVal sender As Object, ByVal e As EventArgs)
    Dim dailyRate As Double = 0.00
    Dim days As Integer
    Dim phone, entertain As Double
    Dim amount As Double

    If txtDailyRate.Text <> "" Then
        dailyRate  = Server.HtmlEncode(txtDailyRate.Text)
    End If

    days = If(txtDaysOccupied.Text = "", 0, Server.HtmlEncode(txtDaysOccupied.Text))
    phone = If(txtPhoneUse.Text = "", 0.00, Server.HtmlEncode(txtPhoneUse.Text))
    entertain = If(txtEntertainment.Text = "", 0.00, Server.HtmlEncode(txtEntertainment.Text))

    amount = (days * dailyRate) + phone + entertain

    txtAmountOwed.Text = amount
End Sub
</script>
<title>Hotel Management - Invoice Preparation</title>
</head>
<body>
<form id="frmManagement" runat="server">
<h3>Hotel Management - Invoice Preparation</h3>

<table>
  <tr>
    <td>Room #:</td>
    <td><asp:TextBox id="txtRoomNumber" style="width: 75px" runat="server" /></td>
  </tr>
  <tr>
    <td>Daily Rate:</td>
    <td><asp:TextBox id="txtDailyRate" style="width: 75px" runat="server" /></td>
  </tr>
  <tr>
    <td>Days Occupied:</td>
    <td><asp:TextBox id="txtDaysOccupied" style="width: 75px" runat="server" /></td>
  </tr>
  <tr>
    <td>Phone Use:</td>
    <td><asp:TextBox id="txtPhoneUse" style="width: 75px" runat="server" /></td>
  </tr>
  <tr>
    <td>Entertainment:</td>
    <td><asp:TextBox id="txtEntertainment" style="width: 75px" runat="server" />
           <asp:Button id="btnEvaluate"  text = "Evaluate"
               runat="server" OnClick="btnEvaluateClick"></asp:Button></p></td>
  </tr>
  <tr>
    <td>Amount Owed:</td>
    <td><asp:TextBox id="txtAmountOwed" style="width: 75px" runat="server" /></td>
  </tr>
</table>
</form>
</body>
</html>
Here is an example of using the webpage:
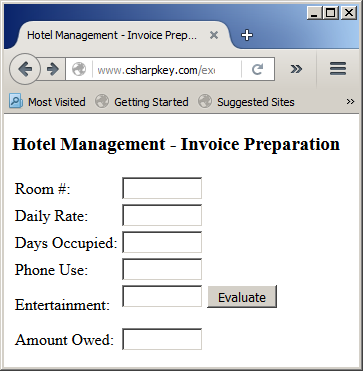
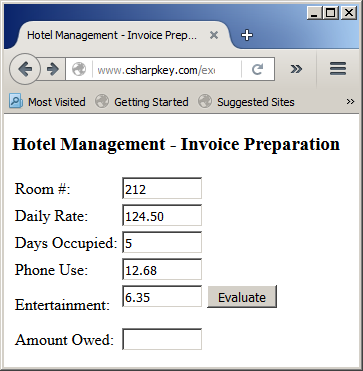
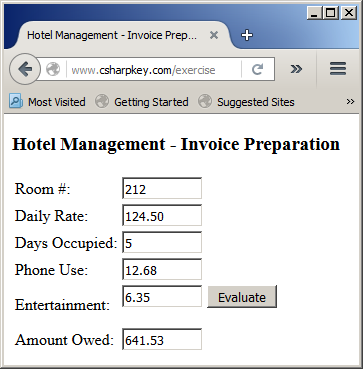
In reality, HTML encoding consists of providing a string to the browser and asking the browser to consider the string "as-is". In other words, the browser should be try to interpret the HTML tags in the string. Con sider the following example:
<%@ Page Language="VB" %>

<!DOCTYPE html>
<html>
<head>
</script>
<title>Social Sciences - Anthropology</title>
</head>
<body>
<%
    Dim study = Server.HtmlEncode("<p>The study of <b>anthropology</b> includes the <i>physical traits</i> " &
                                                   "of the <a href='body.htm'>human body</a>. The study explores such " &
                                                   "aspects as the <span style='font-family: Georgia; color: #f00'>culture</span> " &
                                                   "or the <span style='font-size: 0.88em; color: #00f'>environment</span>.</p>")

    Response.Write(study)
%>
</body>
</html>
This would produce:

Decoding an HTML String
Decoding an HTML string consists of providing a string to a
web browser to use. To support this operation, the Server class is equipped with a method named HtmlDecode that is overloaded with two versions. One the versions uses the following syntax:
Public Function HtmlDecode(ByVal s As String) As String
If the string is simple, it can be used as a normal string passed to the browser. Here is an example:
"<%@ Page Language="VB" %>

<!DOCTYPE html>
<html>
<head>
<script runat="server">
Sub btnEvaluateClick(ByVal sender As Object, ByVal e As EventArgs)
    Dim grossSalary As Double
    Dim ssTax, medicare, netPay As Double

    grossSalary = If(txtGrossSalary.Text = "", 0.00, Server.HtmlDecode(txtGrossSalary.Text))

    If grossSalary < 118500.00 Then
        ssTax = grossSalary * 6.20 / 100.00
    Else
        ssTax = 118500.00 * 6.20 / 100.00
    End If

    medicare = grossSalary * 1.45 / 100.00
    netPay = grossSalary - ssTax - medicare

    txtSocialSecurityTax.Text = ssTax
    txtMedicareTax.Text = medicare
    txtNetPay.Text = netPay
End Sub
</script>
<title>Payroll Evaluation</title>
</head>
<body>
<form id="frmPayroll" runat="server">
<h3>Payroll Evaluation</h3>

<table>
  <tr>
    <td>Gross Salary:</td>
    <td><asp:TextBox id="txtGrossSalary" style="width: 75px" runat="server" />
           <asp:Button id="btnEvaluate"  text = "Evaluate"
               runat="server" OnClick="btnEvaluateClick"></asp:Button></p></td>
  </tr>
  <tr>
    <td>Social Security Tax:</td>
    <td><asp:TextBox id="txtSocialSecurityTax" style="width: 75px" runat="server" /></td>
  </tr>
  <tr>
    <td>Medicare Tax:</td>
    <td><asp:TextBox id="txtMedicareTax" style="width: 75px" runat="server" /></td>
  </tr>
  <tr>
    <td>Net Pay:</td>
    <td><asp:TextBox id="txtNetPay" style="width: 75px" runat="server" /></td>
  </tr>
</table>
</form>
</body>
</html>
Here is an example of using the webpage:
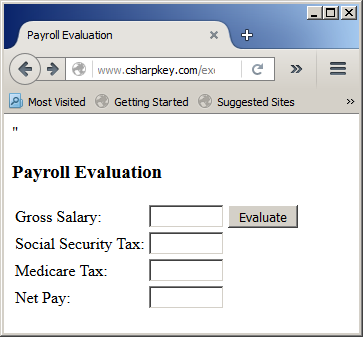
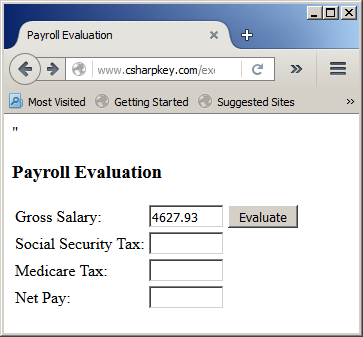
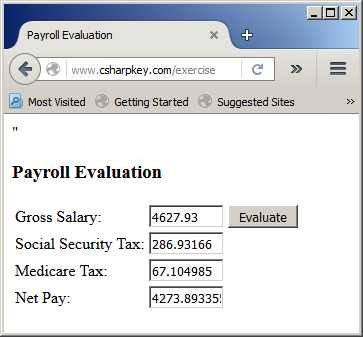
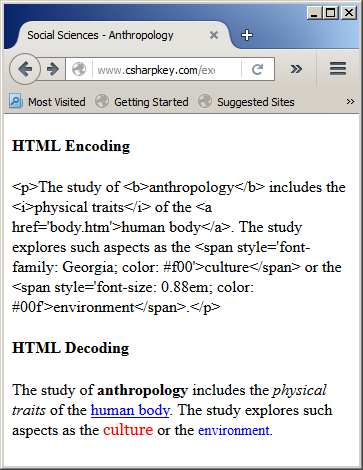
As opposed to encoding, HTML decoding consists of asking the browser to interpret the HTML tags in the string as HTML tags. Here is an example:
<%@ Page Language="VB" %>

<!DOCTYPE html>
<html>
<head>
</script>
<title>Social Sciences - Anthropology</title>
</head>
<body>
<%
    Dim study = Server.HtmlEncode("<p>The study of <b>anthropology</b> includes the <i>physical traits</i> " &
                                                   "of the <a href='body.htm'>human body</a>. The study explores such " &
                                                   "aspects as the <span style='font-family: Georgia; color: #f00'>culture</span> " &
                                                   "or the <span style='font-size: 0.88em; color: #00f'>environment</span>.</p>")
    Dim method = Server.HtmlDecode("<p>The study of <b>anthropology</b> includes the <i>physical traits</i> " &
                                                      "of the <a href='body.htm'>human body</a>. The study explores such " &
                                                      "aspects as the <span style='font-family: Georgia; color: #f00'>culture</span> " &
                                                      "or the <span style='font-size: 0.88em; color: #00f'>environment</span>.</p>")

    Response.Write("<h4>HTML Encoding</h4>")
    Response.Write(study)
    Response.Write("<h4>HTML Decoding</h4>")
    Response.Write(method)
%>
</body>
</html>
This would produce:
Transferring to a Webpage
Transferring to a webpage consists of suspending the current webpage and opening a new webpage. To support this operation, the Server class is equipped with an overloaded method named Transfer. One of its syntaxes uses the following syntax:
Public Sub Transfer(ByVal path As String)
This method takes the address of the new page as argument.
The Path to a File
To let you specify the location of a file on the webserver, the Server class is equipped with a method named MapPath. Its syntax is:
Public Function MapPath(ByVal path As String) As String
This method takes a string as an absolute or a relative path.
The Response Object
Introduction
To let you perform some actions on the server or on a webpage, IIS provides an object named Response.
Responding to a Client
To let you display some sentence(s) on a webpage, the Response object is equipped with a method named Write.
We have already seen various examples of using it.
Transferring to a Webpage
Transferring to a webpage consists of opening a new webpage. To support this operation, the Response class is equipped with an overloaded method named Redirect as an alternative to the Server.Transfer() method. One of the syntaxes of the Response.Redirect() method is:
Public Sub Redirect(ByVal url As String)
This method takes the address of the new page as argument. Here is an example:
<%@ Page Language="VB" %>

<!DOCTYPE html>
<html>
<head>
<script runat="server">
Sub btnOpenTimeSheetClick(ByVal sender As Object, ByVal e As EventArgs)
    Server.Transfer("http://www.functionx.com/")
End Sub
</script>
<title>Web Design</title>
</head>
<body>
<form runat="server">
<asp:Button id="btnOpenTimeSheet" Text="Open Time Sheet"
            OnClick="btnOpenTimeSheetClick" runat="server"></asp:Button>
</form>
</body>
</html>
If you want to control what happens to the first (or current) page, use the other version of the Response.Redirect() method. Its syntax is:
Public Sub Redirect(ByVal url As String, ByVal endResponse As Boolean)
If you want to stop the first (or current) page, pass the second argument as True.
Other Built-In Objects
Value Requesting
To make it possible to get the values a webpage visitor creates on a webpage, IIS provides an object named Request.
A User Session
A session is the group of operations a visitor performs on a webpage including the time a visitor spends on the page. To let you perform operations related to a session, IIS provides an object named Session.
My Object
The Visual Basic language provides a
special object named My. Although it has limited functionality for
web-based applications, it can give you access to some resources.
One of the objects accessible from My reference is the Response object. To access it, type My.Response followed by the Response member you want to use. Unlike the regular Response object that can be used only in the body of an object related to a form, the My.Response object allows to access Response member from anywhere. Here is an example:
<%@ Page Language="VB" %>

<!DOCTYPE html>

<script runat="server">
Public Class Triangle
    Public Sub Describe()
        My.Response.Write("<p>A triangle is a polygon made of three non-intersecting lines.</p>")
    End Sub
End Class
</script>
<html>
<head runat="server">
<title>Geometry - Polygons</title>
</head>
<body>
<%
    Dim tri As New Triangle()

    tri.Describe()
%>
</body>
</html>
Class Destruction
Garbage Collection
When you initialize a variable using the New operator, you
are in fact asking to provide memory space in the heap
memory for the variable. When the variable is no longer needed, it
must be removed from memory and the space it was using can be
made available to other variables or other programs. This is referred to as
garbage collection.
The .NET Framework solves the problem of garbage collection.
Class Finalization
When you declare a variable based on a class, memory is allocated for it. When
the object is not needed anymore, the object must be destroyed, the memory it was using must be emptied to
be made available to other objects on the computer, and the resources
that the object was using should (must) be freed to be restored to the
computer so they can be used by other programs. To make this possible, the
Object class is equipped with a method called Finalize.
The Finalize() method is automatically called
when an instance of a class is not needed anymore.
|