Introduction to Fields and Properties A Field in a Class In previous lessons, when we needed to define a characteristic of a class, we created a member variable in the class. Here is an example: <%@ Page Language="VB" %>
<!DOCTYPE html>
<html>
<head runat="server">
<script runat="server">
Public Class SalaryEstimation
Public HourlySalary As Double
Public Function CalculateWeeklySalary() As Double
Return HourlySalary * 40
End Function
End Class
Sub btnEvaluateClick() Handles btnEvaluate.Click
Dim estimate As New SalaryEstimation
Dim hr As Double
hr = CDbl(txtHourlySalary.Text)
estimate.HourlySalary = hr
txtWeeklySalary.Text = estimate.CalculateWeeklySalary()
End Sub
</script>
<style>
#container
{
margin: auto;
width: 305px;
}
#estimation { width: 300px; }
</style>
<title>Salary Estimation</title>
</head>
<body>
<form id="frmEstimation" runat="server">
<div id="container">
<h2>Salary Estimation</h2>
<table id="estimation">
<tr>
<td><b>Hourly Salary:</b></td>
<td><asp:TextBox id="txtHourlySalary" style="width: 75px" runat="server"></asp:TextBox>
<asp:Button id="btnEvaluate" Text="Evalluate" runat="server" />
</td>
</tr>
<tr>
<td><b>Weekly Salary:</b></td>
<td><asp:TextBox id="txtWeeklySalary" style="width: 75px"
runat="server"></asp:TextBox></td>
</tr>
</table>
</div>
</form>
</body>
</html>
So far, we were calling it a member variable. Actually, it is called a field. Here is an example of using the above HourlySalary field and its class:
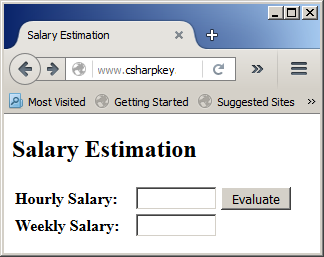
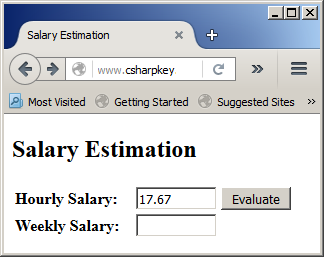
Here is another example of using the webpage:
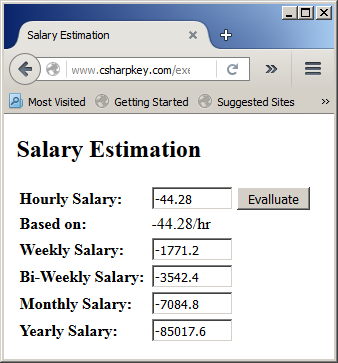
Notice that the visitor can provide a negative value for the hourly salary and there is nothing the field can do about that. Introduction to Properties A property is a member of a class that acts as a relay between a class and an object outside the class, that is, an object that provides a value to the class. As such, and unlike a field, a property can act as the "door" that validates, evaluates, accepts and/or rejects a value passed to an object of the class, or a value assigned to a member of the class. To make a property act as a "filter" to a member variable of a class, the member variable should (must) be hidden. You can create it using the Dim keyword so that the objects outside the class cannot "see" it. Here is an example: <script runat="server">
Public Class SalaryEstimation
Dim hSalary As Double
End Class
</script>
Once this is done, you must then create a property in the class and set up a relationship between both so that the property can play its role. To create a property, you use the Property keyword. With regards to their roles, there are various types of properties. Types of Properties Read-Only Properties A property is referred to as read-only if its role is only to make available the value of the member variable it represents. To create a read-only property, use a formula as follows (this formula takes into consideration only the keywords we have learned so far; there are other options that we choose to ignore at this time): [ Public ] [ ReadOnly ] | Shared ] Property name As data-type Get End Get End Property The optional Public keyword allows you to specify the level of access of the property. Normally, a property is created as Public so it can be accessed outside of its class. The optional Shared keyword would allow you to use the property without declaring an instance of its class. The ReadOnly keyword is required. It is used to indicate that the property's value can be accessed but it cannot be changed. The Property keyword is required. It is followed by the name of the property. The name essentially follows the rules of Visual Basic object names but it should start in uppercase. The creation of a property ends with an End Property line. Besides using the ReadOnly keyword, the key to create a read-only property is to include the Get keyword and ends with the End Get line. Here is an example of starting a read-only property: <script runat="server">
Public Class SalaryEstimation
Public ReadOnly Property HourlySalary As Double
Get
End Get
End Property
End Class
</script>
You can omit the As keyword and the data type of a property. If you don't specify the data type, the property is treated as Object. Otherwise, you can specify the necessary data type of the property. Here is an example: Between the Get and the End Get lines, you can implement the behavior that would be used to make the member variable's value available outside. The simplest way consists of just returning the corresponding member variable. To do this, type the Return keyword, followed by the hidden member variable whose value would be accessed through this property. Here is an example: <script runat="server">
Public Class SalaryEstimation
Dim hSalary As Double
Public ReadOnly Property HourlySalary As Double
Get
Return hSalary
End Get
End Property
End Class
</script>
When the clients of a class access a read-only property, they can only retrieve the value of the property but they cannot change it. Therefore, if you create a read-only property, you should provide the ability to specify the value of the member variable. To do this, you can create an appropriate method whose role would only be used to initialize the property. Most of the time, you would use a constructor to do this. Here is an example: <script runat="server">
Public Class SalaryEstimation
Dim hSalary As Double
Public Sub New(ByVal salary)
hSalary = salary
End Sub
Public ReadOnly Property HourlySalary As Double
Get
Return hSalary
End Get
End Property
End Class
</script>
Once a read-only property has been created, other classes or procedures can read its value. Here is an example: <%@ Page Language="VB" %>
<!DOCTYPE html>
<html>
<head runat="server">
<script runat="server">
Public Class SalaryEstimation
Dim hSalary As Double
Public Sub New(ByVal salary)
hSalary = salary
End Sub
Public ReadOnly Property HourlySalary As Double
Get
Return hSalary
End Get
End Property
Public ReadOnly Property WeeklySalary As Double
Get
Return HourlySalary * 40
End Get
End Property
Public ReadOnly Property BiWeeklySalary As Double
Get
Return WeeklySalary * 2.0
End Get
End Property
Public ReadOnly Property MonthlySalary As Double
Get
Return WeeklySalary * 4.0
End Get
End Property
Public ReadOnly Property YearlySalary As Double
Get
Return MonthlySalary * 12.0
End Get
End Property
End Class
Sub btnEvaluateClick() Handles btnEvaluate.Click
Dim estimate As SalaryEstimation
Dim hr As Double
hr = CDbl(txtHourlySalary.Text)
estimate = New SalaryEstimation(hr)
lblHourlySalary.Text = estimate.HourlySalary & "/hr"
txtWeeklySalary.Text = estimate.WeeklySalary
txtBiWeeklySalary.Text = estimate.BiWeeklySalary
txtMonthlySalary.Text = estimate.MonthlySalary
txtYearlySalary.Text = estimate.YearlySalary
End Sub
</script>
<style>
#container
{
margin: auto;
width: 305px;
}
#estimation { width: 300px; }
</style>
<title>Salary Estimation</title>
</head>
<body>
<form id="frmEstimation" runat="server">
<div id="container">
<h2>Salary Estimation</h2>
<table id="estimation">
<tr>
<td><b>Hourly Salary:</b></td>
<td>
<asp:TextBox id="txtHourlySalary" style="width: 75px" runat="server"></asp:TextBox>
<asp:Button id="btnEvaluate" Text="Evalluate" runat="server" />
</td>
</tr>
<tr>
<td><b>Based on:</b></td>
<td><asp:Label id="lblHourlySalary" style="width: 75px"
runat="server"></asp:Label></td>
</tr>
<tr>
<td><b>Weekly Salary:</b></td>
<td><asp:TextBox id="txtWeeklySalary" style="width: 75px"
runat="server"></asp:TextBox></td>
</tr>
<tr><td><b>Bi-Weekly Salary:</b></td>
<td><asp:TextBox id="txtBiWeeklySalary" style="width: 75px"
runat="server"></asp:TextBox></td></tr>
<tr>
<td><b>Monthly Salary:</b></td>
<td><asp:TextBox id="txtMonthlySalary" style="width: 75px"
runat="server"></asp:TextBox></td>
</tr>
<tr><td><b>Yearly Salary:</b></td>
<td><asp:TextBox id="txtYearlySalary" style="width: 75px"
runat="server"></asp:TextBox></td>
</tr>
</table>
</div>
</form>
</body>
</html>
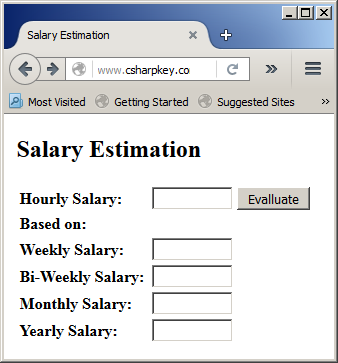
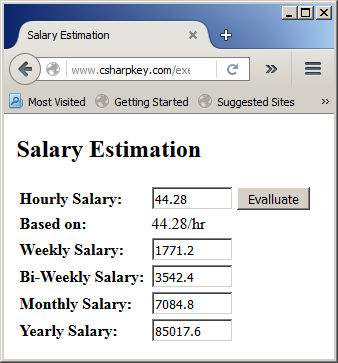
Here is an example of using the webpage:
Here is an example of using the webpage:
To make sure a property can validate, accept, and/or reject the values provided to the member variable, you can include a conditional statement in the property. Here is an example: <%@ Page Language="VB" %>
<!DOCTYPE html>
<html>
<head runat="server">
<script runat="server">
Public Class SalaryEstimation
Dim hSalary As Double
Public Sub New(ByVal salary)
hSalary = salary
End Sub
Public ReadOnly Property HourlySalary As Double
Get
If hSalary < 0.00 Then
Return 0.00
Else
Return hSalary
End If
End Get
End Property
Public ReadOnly Property WeeklySalary As Double
Get
Return HourlySalary * 40
End Get
End Property
Public ReadOnly Property BiWeeklySalary As Double
Get
Return WeeklySalary * 2.0
End Get
End Property
Public ReadOnly Property MonthlySalary As Double
Get
Return WeeklySalary * 4.0
End Get
End Property
Public ReadOnly Property YearlySalary As Double
Get
Return MonthlySalary * 12.0
End Get
End Property
End Class
Sub btnEvaluateClick() Handles btnEvaluate.Click
Dim estimate As SalaryEstimation
Dim hr As Double
hr = CDbl(txtHourlySalary.Text)
estimate = New SalaryEstimation(hr)
lblHourlySalary.Text = estimate.HourlySalary & "/hr"
txtWeeklySalary.Text = Format(estimate.WeeklySalary, "n")
txtBiWeeklySalary.Text = Format(estimate.BiWeeklySalary, "n")
txtMonthlySalary.Text = Format(estimate.MonthlySalary, "standard")
txtYearlySalary.Text = Format(estimate.YearlySalary, "STANDARD")
End Sub
</script>
<style>
#container
{
margin: auto;
width: 305px;
}
#estimation { width: 300px; }
</style>
<title>Salary Estimation</title>
</head>
<body>
<form id="frmEstimation" runat="server">
<div id="container">
<h2>Salary Estimation</h2>
<table id="estimation">
<tr>
<td><b>Hourly Salary:</b></td>
<td>
<asp:TextBox id="txtHourlySalary" style="width: 75px" runat="server"></asp:TextBox>
<asp:Button id="btnEvaluate" Text="Evalluate" runat="server" />
</td>
</tr>
<tr>
<td><b>Based on:</b></td>
<td><asp:Label id="lblHourlySalary" style="width: 75px"
runat="server"></asp:Label></td>
</tr>
<tr>
<td><b>Weekly Salary:</b></td>
<td><asp:TextBox id="txtWeeklySalary" style="width: 75px"
runat="server"></asp:TextBox></td>
</tr>
<tr><td><b>Bi-Weekly Salary:</b></td>
<td><asp:TextBox id="txtBiWeeklySalary" style="width: 75px"
runat="server"></asp:TextBox></td></tr>
<tr>
<td><b>Monthly Salary:</b></td>
<td><asp:TextBox id="txtMonthlySalary" style="width: 75px"
runat="server"></asp:TextBox></td>
</tr>
<tr><td><b>Yearly Salary:</b></td>
<td><asp:TextBox id="txtYearlySalary" style="width: 75px"
runat="server"></asp:TextBox></td>
</tr>
</table>
</div>
</form>
</body>
</html>
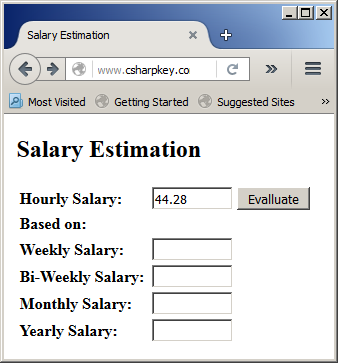
Here is an example of using the webpage:
Write-Only Properties A property is referred to as write-only if the clients of the class can change the value of that property but cannot read its value. The formula to create a write-only property is (once again, this formula mentions only the keywords we have reviewed so far): [ Public ] [ WriteOnly ] | Shared ] Property name As data-type Set(ByVal value As data-type ) End Set End Property The WriteOnly keyword is required. It is used to indicate that the property's value can be changed by the clients of the class but they cannot read it. The actual clause of a write-only property starts with the Set keyword that uses parentheses. The clause must end with the End Set expression. The Set statement takes an argument that is the same type as that of the property. Here is an example: <script runat="server">
Public Class TimeSheet
Dim mon As Single
Public WriteOnly Property Monday As Double
Set(ByVal value As Double)
End Set
End Property
End Class
</script>
The minimum operation you can perform with a write-only property is to assign it a value that would be provided by the outside world. To do this, you can assign the value of the Set argument to the corresponding member variable that the property represents. Here is an example: <%@ Page Language="VB" %>
<!DOCTYPE html>
<html>
<head runat="server">
<script runat="server">
Public Class TimeSheet
Dim id As Integer
Dim nbr As String
Dim mon As Single
Dim tue As Single
Dim wed As Single
Dim thu As Single
Dim fri As Single
Dim sat As Single
Dim sun As Single
Public Sub New(ByVal tsid As Integer, ByVal emplNbr As String)
id = tsid
nbr = emplNbr
End Sub
Public ReadOnly Property TimeSheetID As String
Get
Return id
End Get
End Property
Public ReadOnly Property EmployeeNumber As String
Get
Return nbr
End Get
End Property
Public WriteOnly Property Monday As Double
Set(ByVal value As Double)
mon = value
End Set
End Property
Public WriteOnly Property Tuesday As Double
Set(ByVal value As Double)
tue = value
End Set
End Property
Public WriteOnly Property Wednesday As Double
Set(ByVal value As Double)
wed = value
End Set
End Property
Public WriteOnly Property Thursday As Double
Set(ByVal value As Double)
thu = value
End Set
End Property
Public WriteOnly Property Friday As Double
Set(ByVal value As Double)
fri = value
End Set
End Property
Public WriteOnly Property Saturday As Double
Set(ByVal value As Double)
sat = value
End Set
End Property
Public WriteOnly Property Sunday As Double
Set(ByVal value As Double)
sun = value
End Set
End Property
Public ReadOnly Property TimeWorked As Double
Get
Return mon + tue + wed + thu + fri + sat + sun
End Get
End Property
End Class
Sub btnCalculateTimeWorkedClick(ByVal sender As Object, ByVal e As EventArgs)
Dim mon As Double,
tue As Double,
wed As Double,
thu As Double,
fri As Double,
sat As Double,
sun As Double
Dim ts As New TimeSheet(1001, txtEmployeeNumber.Text)
mon = CDbl(txtMonday.Text)
tue = CDbl(txtTuesday.Text)
wed = CDbl(txtWednesday.Text)
thu = CDbl(txtThursday.Text)
fri = CDbl(txtFriday.Text)
sat = CDbl(txtSaturday.Text)
sun = CDbl(txtSunday.Text)
ts.Monday = mon
ts.Tuesday = tue
ts.Wednesday = wed
ts.Thursday = thu
ts.Friday = fri
ts.Saturday = sat
ts.Sunday = sun
txtTimeWorked.Text = ts.TimeWorked
End Sub
</script>
<style>
</style>
<title>Salary Estimation</title>
</head>
<body>
<h3>Employee Time Sheet</h3>
<form id="frmTimeSheet" runat="server">
<table style="width: 350px">
<tr>
<td><b>Employee #:</b></td>
<td><asp:TextBox id="txtEmployeeNumber" style="width: 60px" runat="server" AutoPostBack="True"></asp:TextBox></td>
<td><asp:TextBox id="txtEmployeeName" runat="server"></asp:TextBox></td>
</tr>
</table>
<br>
<table>
<tr>
<td><b>Monday</b></td>
<td><b>Tuesday</b></td>
<td><b>Wednesday</b></td>
<td><b>Thursday</b></td>
<td><b>Friday</b></td>
<td><b>Saturday</b></td>
<td><b>Sunday</b></td>
</tr>
<tr>
<td><asp:TextBox id="txtMonday" Text="0.00" style="width: 60px" runat="server"></asp:TextBox></td>
<td><asp:TextBox id="txtTuesday" Text="0.00" style="width: 60px" runat="server"></asp:TextBox></td>
<td><asp:TextBox id="txtWednesday" Text="0.00" style="width: 60px" runat="server"></asp:TextBox></td>
<td><asp:TextBox id="txtThursday" Text="0.00" style="width: 60px" runat="server"></asp:TextBox></td>
<td><asp:TextBox id="txtFriday" Text="0.00" style="width: 60px" runat="server"></asp:TextBox></td>
<td><asp:TextBox id="txtSaturday" Text="0.00" style="width: 60px" runat="server"></asp:TextBox></td>
<td><asp:TextBox id="txtSunday" Text="0.00" style="width: 60px" runat="server"></asp:TextBox></td>
</tr>
</table>
<br>
<table>
<tr>
<td style="text-align: center">
<asp:Button id="btnCalculateTimeWorked" Text="Calculate Time Worked"
OnClick="btnCalculateTimeWorkedClick"
runat="server"></asp:Button></td>
</tr>
</table>
<br />
<table>
<tr>
<td><b>Time Worked:</b></td>
<td><asp:TextBox id="txtTimeWorked" style="width: 60px" runat="server"></asp:TextBox></td>
</tr>
</table>
</form>
</div>
</body>
</html>
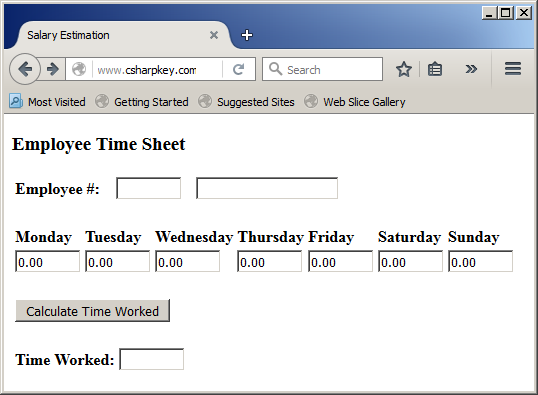
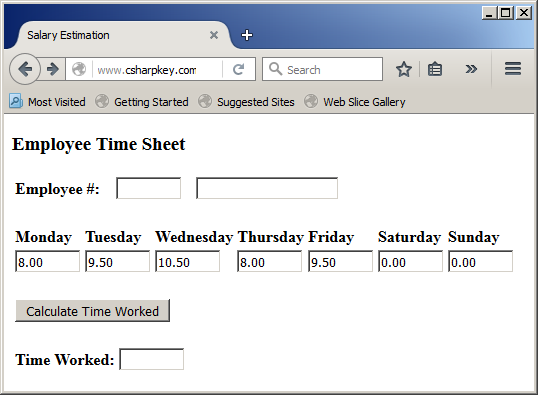
Here is an example of using the webpage:
Read/Write Properties A property is referred to as read-write if it allows external classes and procedures to either change its value or to read that value when necessary. To create a read-write property, you must implement both the Get and the Set clause. The formula to follow is: [ Public ] | Shared ] Property name As data-type Get End Get Set(ByVal value As data-type ) End Set End Property Notice that, because this is a read-write property, you omit the ReadOnly and the WriteOnly keywords. When implementing the property, provide the necessary functionality in the Get and Set statements as we reviewed in the respective above sections. Here are two examples: <%@ Page Language="VB" %>
<!DOCTYPE html>
<script runat="server">
Public Class Rhombus
Dim len As Double
Dim hgt As Double
Public Property Length As Double
Get
Return len
End Get
Set(value As Double)
len = value
End Set
End Property
Public Property Height As Double
Get
Return hgt
End Get
Set(value As Double)
hgt = value
End Set
End Property
Public ReadOnly Property Area
Get
Return len * hgt / 2.0
End Get
End Property
End Class
Sub btnCalculateClick(ByVal sender As Object, ByVal e As EventArgs)
Dim p As Double
Dim q As Double
Dim area As Double
Dim r As New Rhombus
p = txtLength.Text
q = txtHeight.Text
r.Length = p
r.Height = q
area = r.Area
lblLength.Text = p
lblHeight.Text = q
lblArea.Text = area
pnlRhombus.Visible = False
pnlResults.Visible = True
End Sub
</script>
<style>
#main-title
{
font-size: 1.08em;
font-weight: bold;
text-align: center;
font-family: Georgia, Garamond, 'Times New Roman', Times, serif;
}
#tblRhombus { width: 200px; }
#whole
{
margin: auto;
width: 205px;
}
</style>
<html>
<head runat="server">
<title>Geometry - Rhombus</title>
</head>
<body>
<p id="main-title">Geometry - Rhombus</p>
<form id="frmRhombus" runat="server">
<div id="whole">
<asp:Panel id="pnlRhombus" Visible="true" runat="server">
<table id="tblRhombus">
<tr>
<td>Length:</td>
<td><asp:TextBox id="txtLength" style="width: 75px" runat="server" /></td>
</tr>
<tr>
<td>Height:</td>
<td><asp:TextBox id="txtHeight" runat="server" style="width: 75px" /></td>
</tr>
<tr>
<td> </td>
<td>
<asp:Button id="btnCalculate" runat="server"
Text="Calculate" style="width: 85px" OnClick="BtnCalculateClick" />
</td>
</tr>
</table>
</asp:Panel>
<asp:Panel id="pnlResults" Visible="false" runat="server">
<table id="tblResults">
<tr>
<td>Length:</td>
<td><asp:Label id="lblLength" style="width: 75px" runat="server" /></td>
</tr>
<tr>
<td>Height:</td>
<td><asp:Label id="lblHeight" runat="server" style="width: 75px" /></td>
</tr>
<tr>
<td>Area: </td>
<td><asp:Label id="lblArea" runat="server" style="width: 75px" /></td>
</tr>
</table>
</asp:Panel>
</div>
</form>
</body>
</html>
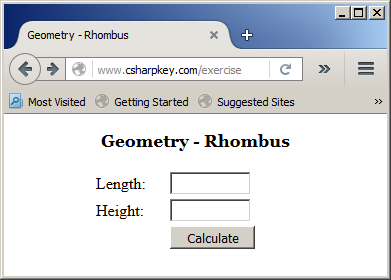
Here is an example of using the webpage:
Auto-Implemented Properties Introduction An auto-implemented property is a read/write property that includes neither a Get nor a Set section (or clause). A Read-Only Auto-Implemented Property A read-only property can be self-implemented. Such a property doesn't include a Get section. The basic formula to create a read-only auto-implemented property is: [Public | Private] ReadOnly Property property-name As data-type Here is an example: <script runat="server">
Public Class Student
Public ReadOnly FullName As String
End Class
</script>
A Read-Write Auto-Implemented Property A read-write property is one that doesn't include a boby. The formula to create such a property is: [Public | Private] Property property-name As data-type Here is an example: <script runat="server">
Public Class Octahedron
Private len As Double
Public Sub New(ByVal length As Double)
len = length
End Sub
Public Property Length As Double
End Class
</script>
A Default Value for an Auto-Implemented Property If you want an auto-implemented property to hold a default value, assign that value when creating the property. Here are examples: <script runat="server">
Public Class Student
Public ReadOnly FullName As String = "John Doe"
End Class
Public Class Octahedron
Private len As Double
Public Sub New(ByVal length As Double)
len = length
End Sub
Public Property Length As Double = 1.00
End Class
</script>
A Class for a Property You can create a property whose type is a class. The property can be read-only, write-only, or read-write. As done for primitive type, you can start with a private member variable whose type is a class. When creating the class, follow the same steps we have used so far. Here is an example: <script runat="server">
Public Class Rhombus
End Class
Public Class Rhombohedron
Private bs As Rhombus
Public Property Base As Rhombus
Get
Return bs
End Get
Set(value As Rhombus)
bs = value
End Set
End Property
End Class
</script>
<style>
After declaring a variable, you can access the property. To access the members of the property, you can first define an object from its class, and then assign that object to the property. Here is an example: <%@ Page Language="VB" %>
<!DOCTYPE html>
<script runat="server">
Public Class Rhombus
Private len As Double
Private hgt As Double
Public Property Length As Double
Get
Return len
End Get
Set(value As Double)
len = value
End Set
End Property
Public Property Height As Double
Get
Return hgt
End Get
Set(value As Double)
hgt = value
End Set
End Property
Public ReadOnly Property Area As Double
Get
Return len * hgt / 2.0
End Get
End Property
End Class
Public Class Rhombohedron
Private dp As Double
Private bs As Rhombus
Public Property Depth As Double
Get
Return dp
End Get
Set(value As Double)
dp = value
End Set
End Property
Public Property Base As Rhombus
Get
Return bs
End Get
Set(value As Rhombus)
bs = value
End Set
End Property
Public ReadOnly Property Volume
Get
Return bs.Area * dp
End Get
End Property
End Class
Sub btnCalculateClick(ByVal sender As Object, ByVal e As EventArgs)
Dim p As Double
Dim q As Double
Dim d As Double
Dim v As Double
Dim r As New Rhombus
Dim rh As New Rhombohedron
Dim faceArea As Double
p = txtLength.Text
q = txtHeight.Text
r.Length = p
r.Height = q
rh.Base = r
d = txtDepth.Text
rh.Depth = d
faceArea = rh.Base.Area
lblLength.Text = p
lblHeight.Text = q
lblDepth.Text = d
lblFaceArea.Text = faceArea
lblVolume.Text = rh.Volume
pnlRhombohedron.Visible = False
pnlResults.Visible = True
End Sub
</script>
<style>
#main-title
{
font-size: 1.08em;
font-weight: bold;
text-align: center;
font-family: Georgia, Garamond, 'Times New Roman', Times, serif;
}
.tblRhombohedron { width: 200px; }
#whole
{
margin: auto;
width: 205px;
}
</style>
<html>
<head runat="server">
<title>Geometric Volumes - Rhombohedron</title>
</head>
<body>
<p id="main-title">Geometric Volumes - Rhombohedron</p>
<form id="frmRhombohedron" runat="server">
<div id="whole">
<asp:Panel id="pnlRhombohedron" Visible="true" runat="server">
<h3>Base</h3>
<table class="tblRhombohedron">
<tr>
<td>Length:</td>
<td><asp:TextBox id="txtLength" style="width: 75px" runat="server" /></td>
</tr>
<tr>
<td>Height:</td>
<td><asp:TextBox id="txtHeight" runat="server" style="width: 75px" /></td>
</tr>
</table>
<h3>Prism</h3>
<table class="tblRhombohedron">
<tr>
<td>Depth:</td>
<td><asp:TextBox id="txtDepth" style="width: 75px" runat="server" /></td>
</tr>
<tr>
<td> </td>
<td><asp:Button id="btnCalculate" runat="server"
Text="Calculate" style="width: 85px"
nClick="BtnCalculateClick" />
</td>
</tr>
</table>
</asp:Panel>
<asp:Panel id="pnlResults" Visible="false" runat="server">
<table class="tblRhombohedron">
<tr>
<td>Length:</td>
<td><asp:Label id="lblLength" style="width: 75px" runat="server" /></td>
</tr>
<tr>
<td>Height:</td>
<td><asp:Label id="lblHeight" runat="server" style="width: 75px" /></td>
</tr>
<tr>
<td>Depth:</td>
<td><asp:Label id="lblDepth" runat="server" style="width: 75px" /></td>
</tr>
<tr>
<td>Face Area: </td>
<td><asp:Label id="lblFaceArea" runat="server" style="width: 75px" /></td>
</tr>
<tr>
<td>Volume: </td>
<td><asp:Label id="lblVolume" runat="server" style="width: 75px" /></td>
</tr>
</table>
</asp:Panel>
</div>
</form>
</body>
</html>
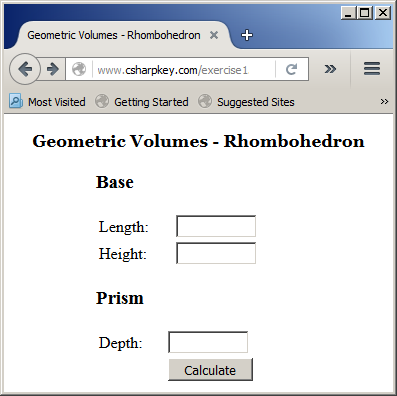
Here is an example of using the webpage:
By the way, and as you may have realized, you can use constructors to make your objects and properties easy to manage. Here is an example: <%@ Page Language="VB" %>
<!DOCTYPE html>
<script runat="server">
Public Class Rhombus
Private len As Double
Private hgt As Double
Public Sub New(ByVal length As Double, ByVal height As Double)
len = length
hgt = height
End Sub
Public Property Length As Double
Get
Return len
End Get
Set(value As Double)
len = value
End Set
End Property
Public Property Height As Double
Get
Return hgt
End Get
Set(value As Double)
hgt = value
End Set
End Property
Public ReadOnly Property Area As Double
Get
Return len * hgt / 2.0
End Get
End Property
End Class
Public Class Rhombohedron
Private dp As Double
Private bs As Rhombus
Public Sub New(ByVal base As Rhombus, ByVal length As Double)
bs = base
dp = length
End Sub
Public Property Depth As Double
Get
Return dp
End Get
Set(value As Double)
dp = value
End Set
End Property
Public Property Base As Rhombus
Get
Return bs
End Get
Set(value As Rhombus)
bs = value
End Set
End Property
Public ReadOnly Property FaceArea As Double
Get
Return bs.Area
End Get
End Property
Public ReadOnly Property Volume As Double
Get
Return bs.Area * dp
End Get
End Property
End Class
Sub btnCalculateClick(ByVal sender As Object, ByVal e As EventArgs)
Dim p As Double
Dim q As Double
Dim d As Double
Dim v As Double
Dim r As Rhombus
Dim rh As Rhombohedron
p = txtLength.Text
q = txtHeight.Text
d = txtDepth.Text
r = New Rhombus(p, q)
rh = New Rhombohedron(r, d)
lblLength.Text = p
lblHeight.Text = q
lblDepth.Text = d
lblFaceArea.Text = rh.FaceArea
lblVolume.Text = rh.Volume
pnlRhombohedron.Visible = False
pnlResults.Visible = True
End Sub
</script>
<style>
#main-title
{
font-size: 1.08em;
font-weight: bold;
text-align: center;
font-family: Georgia, Garamond, 'Times New Roman', Times, serif;
}
.tblRhombohedron { width: 200px; }
#whole
{
margin: auto;
width: 205px;
}
</style>
<html>
<head runat="server">
<title>Geometric Volumes - Rhombohedron</title>
</head>
<body>
<p id="main-title">Geometric Volumes - Rhombohedron</p>
<form id="frmRhombohedron" runat="server">
<div id="whole">
<asp:Panel id="pnlRhombohedron" Visible="true" runat="server">
<h3>Base</h3>
<table class="tblRhombohedron">
<tr>
<td>Length:</td>
<td><asp:TextBox id="txtLength" style="width: 75px" runat="server" /></td>
</tr>
<tr>
<td>Height:</td>
<td><asp:TextBox id="txtHeight" runat="server" style="width: 75px" /></td>
</tr>
</table>
<h3>Prism</h3>
<table class="tblRhombohedron">
<tr>
<td>Depth:</td>
<td><asp:TextBox id="txtDepth" style="width: 75px" runat="server" /></td>
</tr>
<tr>
<td> </td>
<td><asp:Button id="btnCalculate" runat="server"
Text="Calculate" style="width: 85px"
OnClick="BtnCalculateClick" />
</td>
</tr>
</table>
</asp:Panel>
<asp:Panel id="pnlResults" Visible="false" runat="server">
<table class="tblRhombohedron">
<tr>
<td>Length:</td>
<td><asp:Label id="lblLength" style="width: 75px" runat="server" /></td>
</tr>
<tr>
<td>Height:</td>
<td><asp:Label id="lblHeight" runat="server" style="width: 75px" /></td>
</tr>
<tr>
<td>Depth:</td>
<td><asp:Label id="lblDepth" runat="server" style="width: 75px" /></td>
</tr>
<tr>
<td>Face Area: </td>
<td><asp:Label id="lblFaceArea" runat="server" style="width: 75px" /></td>
</tr>
<tr>
<td>Volume: </td>
<td><asp:Label id="lblVolume" runat="server" style="width: 75px" /></td>
</tr>
</table>
</asp:Panel>
</div>
</form>
</body>
</html>
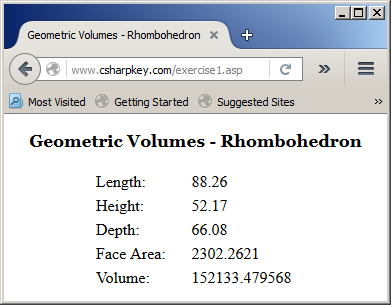
Here is an example of using the webpage:
As you get more experience, you know that there are various ways you can write fast code. Here is an example: <script runat="server">
Sub btnCalculateClick(ByVal sender As Object, ByVal e As EventArgs)
Dim p As Double
Dim q As Double
Dim d As Double
Dim v As Double
Dim r As Rhombus
Dim rh As Rhombohedron
p = txtLength.Text
q = txtHeight.Text
d = txtDepth.Text
rh = New Rhombohedron(New Rhombus(p, q), d)
lblLength.Text = p
lblHeight.Text = q
lblDepth.Text = d
lblFaceArea.Text = rh.FaceArea
lblVolume.Text = rh.Volume
pnlRhombohedron.Visible = False
pnlResults.Visible = True
End Sub
</script>
Here is an example of using the webpage: <script runat="server">
Sub btnCalculateClick(ByVal sender As Object, ByVal e As EventArgs)
Dim rh As Rhombohedron
rh = New Rhombohedron(New Rhombus(txtLength.Text, txtHeight.Text), txtDepth.Text)
lblLength.Text = txtLength.Text
lblHeight.Text = txtHeight.Text
lblDepth.Text = txtDepth.Text
lblFaceArea.Text = rh.FaceArea
lblVolume.Text = rh.Volume
pnlRhombohedron.Visible = False
pnlResults.Visible = True
End Sub
</script>
| ||||