FunctionX Logo

Creating and Using Lists


The TList Class


Introduction

We have already introduced the TStrings and its child the TStringList classes to create a list of strings. The role of TStrings is to create a list of single items, such as a list of names or a list of numbers. Sometimes you will want a list that itself is made of objects, an object in this sense being made of its own variables that characterize the object.

The Visual Component Library provides various classes adapted for creating a list of objects, such as a list of cars, a list of houses, or a list of countries. As you know, such objects are made internal parts; for example a car is made of doors, tires, and options (air condition, power steering, cruise control, etc) while a house is made of rooms, furniture, books, electronic devices, etc.

Practical Learning Practical Learning: Creating an Application

  1. Start a new application with its default form.
  2. To save the project, on the Standard toolbar, click the Save All button
  3. Locate the folder that contains your exercises and display it in the Save In combo box.
    Click the Create New Folder button. Type Address Book1 and press Enter twice
  4. Click Unit1 to select it, type Main and press Enter.
  5. Type AddressBook and press Enter
  6. Change the Caption of the form to Address Book - Contacts List and change its Name to frmMain

Preparing a List

The TList is used to create a list of objects, any type of object. In fact, the TList considers that an object is defined as

void *ObjectOfTheList[Index];

As you can see from this definition, TList does not care what type of list you want to create as long as you can define it as an entity, an object. The second issue to keep in mind is that, because TList does not care about the kind of list you want to create and does not know in advance the number of objects in your list, it conveniently keeps the objects of your list in an array. This means that, as you create your list, TList adds your objects in an expanding list.

To initiate a VCL list, the first thing you must do is to declare an instance of a TList. If the list will be used as a local object, you can declare it in a function or event. If the list will be accessed by more than one event or function, you should declare its instance in the class that will host the list. Because TList is a VCL object, it must be declared as a pointer:

TList * ListOfObjects;

In the constructor of the class that will host the list, initialize the pointer by letting the compiler know which class the list instance belongs to. This is done using the new operator. After using the class, you should (must) delete it and recover the memory it was using. This is done using the delete operator. If the list was created globally in a form's class, you can delete it in the OnDestroy event of the form.

Practical Learning: Creating an Object

  1. Press F12 to display the Code Editor. In the public section of the TForm1 class, declare a pointer to TList as follows:
     
    The Add Field Dialog Box
     
    //---------------------------------------------------------------------------
    class TfrmMain : public TForm
    {
    __published:	// IDE-managed Components
    private:	// User declarations
    public:
        TList * ListOfContacts;		// User declarations
        __fastcall TfrmMain(TComponent* Owner);
    };
    //---------------------------------------------------------------------------
  2. Click the Main.cpp tab to access the source file. In the constructor of the TForm1 class, initialize the TList pointer as follows:
     
    //---------------------------------------------------------------------------
    __fastcall TfrmMain::TfrmMain(TComponent* Owner)
        : TForm(Owner)
    {
        ListOfContacts = new TList;
    }
    //---------------------------------------------------------------------------
  3. On the Object Inspector, click the Events tab. Double-click the event of OnDestroy and delete the list as follows:
     
    //---------------------------------------------------------------------------
    void __fastcall TfrmMain::FormDestroy(TObject *Sender)
    {
        delete ListOfContacts;
        ListOfContacts = NULL;
    }
    //---------------------------------------------------------------------------
  4. Save your project

Preparing an Object for a List

Before creating the actual list of objects, you should first define the kind of object will make up the list. One way to do this is to create a class that holds the members or characteristics of the object. For example, for a list of countries, each object can include the country name, its area, its population, its capital, its internet code, etc. The object can be created as follows:

class TCountry
{
public:
    AnsiString CountryName;
    Double Area;
    Extended Population;
    AnsiString Capital;
    AnsiString InternetCode;
};

To create such an object, you have two options, you can create a fully functional C++ class:

class TCountry
{
private:
    AnsiString CountryName;
    Double Area;
    Extended Population;
    AnsiString Capital;
    AnsiString InternetCode;
public:
    __fastcall TCountry(AnsiString cn="", AnsiString a="",
                        Extended p=0, AnsiString c="",
                        AnsiString ic="");
    virtual __fastcall ~TCountry();
    void __fastcall setCountryName(const AnsiString CName);
    AnsiString __fastcall getCountryName() const;
    void __fastcall setArea(const Double A);
    Double __fastcall getArea() const;
    void __fastcall setPopulation(const Extended P);
    Extended __fastcall getPopulation() const;
    void __fastcall setCapital(const AnsiString C);
    AnsiString __fastcall getCapital() const;
    void __fastcall setInternetCode(const AnsiString IC);
    AnsiString __fastcall getInternetCode() const;
    TCountry& __fastcall operator=(const TCountry &Ctry);
};

Because your object will only be used as a "frame", it is a traditional shortcut to create it as a simple structure, listing only the members you will need. Such an object can be created as follows:

struct TCountry
{
    AnsiString CountryName;
    Double Area;
    Extended Population;
    AnsiString Capital;
    AnsiString InternetCode;
    __fastcall TCountry(AnsiString cn="", AnsiString a="",
                        Extended p=0, AnsiString c="",
                        AnsiString ic="");
    virtual __fastcall ~TCountry();
    TCountry& __fastcall operator=(const TCountry &Ctry);
};

This option provides you with three possibilities to create an instance of a country:

  • you can access each member and assign it an appropriate value
  • you can use a constructor to initialize a complete object or you can use the constructor to initialize only the members whose value you know
  • You can use the overloaded assignment operator to make a copy of an instance and assign it to another instance of the object when necessary.

Practical Learning Practical Learning: Creating an Object

  1. To create an object, on the Standard toolbar, click the New button New.
  2. In the New property sheet of the New Items dialog box, click Unit and click OK
  3. Save the unit as Contacts
  4. In the Contacts.h file, type the following:
     
    //---------------------------------------------------------------------------
    #ifndef ContactsH
    #define ContactsH
    #include <vcl.h>
    //---------------------------------------------------------------------------
    struct TContact
    {
        // The items that make up a (valid) contact
        AnsiString FirstName;
        AnsiString LastName;
        AnsiString Address;
        AnsiString City;
        AnsiString State;
        AnsiString ZIPCode;
        AnsiString Country;
        AnsiString EmailAddress;
        AnsiString HomePhone;
        // Default constructor for an empty contact
        __fastcall TContact();
        // Contact with only the first and last names
        __fastcall TContact(AnsiString FN, AnsiString LN);
        // Complete contact
        __fastcall TContact(AnsiString FN, AnsiString LN, AnsiString Adr,
                            AnsiString CT, AnsiString St, AnsiString ZIP,
                            AnsiString Ctry, AnsiString Email, AnsiString HP);
        // Copy constructor
        __fastcall TContact(const TContact &Cont);
        // Destructor
        virtual __fastcall ~TContact();
        // This provides the ability to copy a contact
        TContact& operator=(const TContact& Cont);
    };
    //---------------------------------------------------------------------------
    #endif
  5. In the source file of Contacts.cpp, implement the constructors and the operator function as follows:
     
    //---------------------------------------------------------------------------
    
    #pragma hdrstop
    #include "Contacts.h"
    //---------------------------------------------------------------------------
    #pragma package(smart_init)
    __fastcall TContact::TContact()
        : FirstName("John"), LastName("Doe"),
          Address("123 Main Street"), City("Great City"),
          State("Big State"), ZIPCode("01234"), Country("USA"),
          EmailAddress("johndoe@inc.com"), HomePhone("(123) 456-7890")
    {
    }
    //---------------------------------------------------------------------------
    __fastcall TContact::TContact(AnsiString FN, AnsiString LN)
        : FirstName(FN), LastName(LN),
          Address("<Null>"), City("<Null>"),
          State("<Null>"), ZIPCode("<Null>"), Country("<Null>"),
          EmailAddress("<Null>"), HomePhone("<Null>")
    {
        // <Null> means Undefined
    }
    //---------------------------------------------------------------------------
    __fastcall TContact::TContact(AnsiString FN, AnsiString LN, AnsiString Adr,
                            AnsiString CT, AnsiString St, AnsiString ZIP,
                            AnsiString Ctry, AnsiString Email, AnsiString HP)
        : FirstName(FN), LastName(LN),
          Address(Adr), City(CT),
          State(St), ZIPCode(ZIP), Country(Ctry),
          EmailAddress(Email), HomePhone(HP)
    {
    }
    //---------------------------------------------------------------------------
    __fastcall TContact::TContact(const TContact &Cont)
        : FirstName(Cont.FirstName), LastName(Cont.LastName),
          Address(Cont.Address), City(Cont.City),
          State(Cont.State), ZIPCode(Cont.ZIPCode), Country(Cont.Country),
          EmailAddress(Cont.EmailAddress), HomePhone(Cont.HomePhone)
    {
    }
    //---------------------------------------------------------------------------
    __fastcall TContact::~TContact()
    {
    }
    //---------------------------------------------------------------------------
    TContact& TContact::operator=(const TContact& Cont)
    {
        FirstName    = Cont.FirstName;
        LastName     = Cont.LastName;
        Address      = Cont.Address;
        City         = Cont.City;
        State        = Cont.State;
        ZIPCode      = Cont.ZIPCode;
        Country      = Cont.Country;
        EmailAddress = Cont.EmailAddress;
        HomePhone    = Cont.HomePhone;
    
        return *this;
    }
    //---------------------------------------------------------------------------
  6. Save your project

List Build-Up

Once you have an object whose list you want to create, you can create each instance of the object and add the instance to the list. Because the objects are stored in an array, you would repeat this process for each object you want to include in the list. The TList class provides all the necessary operations you would need to perform on a list.

Before adding an object to a list, you must "fill" it up first. This can be done by providing a value for each member of the object. Because you are responsible for creating the object, you are also responsible for providing the right value for each member of the object. If you provide a wrong or invalid value, TList does not have any mechanism of checking the internal values of the object. Consequently, you can build the simplest object that contains only one or two members, or you can build the most complex object that resembles a chemical reaction. The choice is yours.

Once the object is complete or at least acceptable as far as its structure is defined, you can add it to the list. This can be taken care of by using the TList::Add() method. Its syntax is:

int __fastcall Add(void * Item);

The Item to add must be a recognizable and defined object.

TList has an internal mechanism of counting the objects that are added to its list. This count is stored in the Count member variable. Therefore, you can call it anytime to find out how many items exist in a list. When using the Add() method, if the Item argument is the first item to be added to the list, it would receive an index of 0 and the Count would be 1. When you add an object, the Count is incremented. The newly added object receives an index of Count-1. This means that there are two main actions the Add() method performs. First it adds an object at the end of the list because the additions of items are incremental. Second, it returns the index of the newly added object. Knowing this index, you can access a specific object in the list array.

As you are adding objects to the list, the TList class takes care of incrementing the number of objects in the list. This is taken care of by the Capacity member variable. In fact, the Capacity serves two purposes. If you want to specify the number of items in a list, for example imagine you want to create a list of ten countries, you can specify this using the Capacity variable. In the same way, if you want to find out how many items the list can include, you can call the Capacity member variable.

Practical Learning Practical Learning: Creating a List

  1. In the public section of the TfrmMain class, declare a pointer to TContact as follows:
     
    //---------------------------------------------------------------------------
    #ifndef MainH
    #define MainH
    //---------------------------------------------------------------------------
    #include <Classes.hpp>
    #include <Controls.hpp>
    #include <StdCtrls.hpp>
    #include <Forms.hpp>
    #include "Contacts.h"
    //---------------------------------------------------------------------------
    class TfrmMain : public TForm
    {
    __published:	// IDE-managed Components
        void __fastcall FormDestroy(TObject *Sender);
    private:	// User declarations
    public:
        TList * ListOfContacts;
        TContact * Contact;		// User declarations
        __fastcall TfrmMain(TComponent* Owner);
    };
    //---------------------------------------------------------------------------
    extern PACKAGE TfrmMain *frmMain;
    //---------------------------------------------------------------------------
    #endif
  2. To create a list, in the constructor of the TfrmMain class, type the following instances of TContact and add them to the list as follows:
     
    __fastcall TfrmMain::TfrmMain(TComponent* Owner)
        : TForm(Owner)
    {
        ListOfContacts = new TList;
    
        Contact = new TContact;
        Contact->FirstName = "Hermine";
        Contact->LastName  = "Toussaint";
        Contact->Address   = "4088 Patient Rd";
        Contact->City      = "Silver Spring";
        Contact->State     = "MD";
        Contact->ZIPCode   = "20904";
        Contact->Country   = "USA";
        Contact->EmailAddress = "toussainth@mcps.mc.md.us";
        Contact->HomePhone = "(301) 805-5008";
        ListOfContacts->Add(Contact);
    
        Contact = new TContact("Bertrand", "Yamaguchi", "7215 16th Street #D14",
                               "Washington", "DC", "20002", "USA",
                               "yamaguchib@russelinc.net", "(202) 661-5000");
        ListOfContacts->Add(Contact);
        
        Contact = new TContact;
        Contact->FirstName = "Lester";
        Contact->LastName  = "Aarons";
        Contact->Address   = "10882 Washington Ave";
        Contact->City      = "Arlington";
        Contact->State     = "VA";
        Contact->ZIPCode   = "22231";
        Contact->Country   = "USA";
        Contact->EmailAddress = "arronsl12@fortsullivan.ddm.mil";
        Contact->HomePhone = "(703) 790-4000";
        ListOfContacts->Add(Contact);
        
        Contact = new TContact;
        Contact->FirstName = "Charlotte";
        Contact->LastName  = "Singh";
        Contact->Address   = "442 Southampton Dr Ste402";
        Contact->City      = "Rockville";
        Contact->State     = "MD";
        Contact->ZIPCode   = "20852";
        Contact->Country   = "USA";
        Contact->EmailAddress = "singhc@csamd.net";
        Contact->HomePhone = "(301) 667-1437";
        ListOfContacts->Add(Contact);
    }
    //---------------------------------------------------------------------------
  3. Save your project

List Navigation

List navigation consists of moving back and forth among items or locating an item on a list.

Once you have added some objects, each one is stored in an array of Items[] defined as follows:

void *Items[int Index];

As you can see the TList::Items member variable takes an index as an integer and returns the object that is stored at that index. You can also use the Items member variable in a for loop to scan the list.

To get to the very first item in the list, you have two options. You can call the Items variable with an index of 0 as Items[0]. Alternatively, you can call the TList::First() member variable whose syntax is:

void * __fastcall First(void);

In the same way, to access the last item of the list, you can either call Items[TList::Count-1] or use the TList::Last() method. Its syntax is:

void * __fastcall Last(void);

On the other hand, if you know the item you want access to, you can call the TList::IndexOf() method. Its syntax is:

int __fastcall IndexOf(void * Item);

To use the IndexOf() method, you must provide the item that you want to locate. If the item exists, this function returns the index of the item.


Practical Learning Practical Learning: Navigating a List

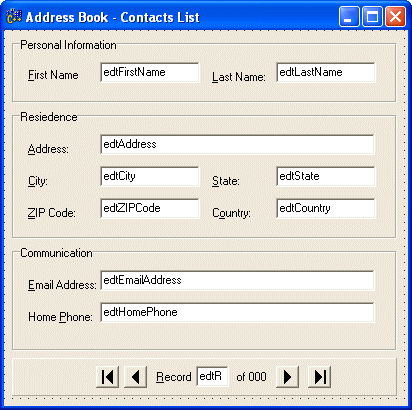
  1. Display the form and design it as follows:
     
    Address Book
  2. The form contains three GroupBox controls Named, from top to bottom, grpPersonalInformation, grpResidence, and grpCommunication respectively.
  3. The Name to give to each Edit control is displayed on the above form. The bottom Edit control is named edtRecordNumber.
  4. Set the ReadOnly property value to true for all Edit controls except for the bottom one (the one on the right side of the Record label, leave its ReadOnly value to false).
  5. The bottom buttons, from left to right, are Named btnFirst, btnPrevious, btnNext, btnLast. They use glyphs from the Bitmaps folder. The bitmaps from left to right are First, Previous, Next, and Last
  6. The label with a Caption of 000 is named lblCount
  7. Save the project.
  8. To keep track of the record that is displaying at all times, we will need a global variable. Therefore, in the private section of the form, declare a variable as:
     
    int CurrentRecord;
  9. In the constructor of the form, just after the opening bracket, initialize the CurrentRecord variable to 0:
     
    //---------------------------------------------------------------------------
    __fastcall TfrmMain::TfrmMain(TComponent* Owner)
        : TForm(Owner)
    {
        CurrentRecord = 0;
        ListOfContacts = new TList;
        ...
  10. Every time we change the displaying record on the form, we will need to update the bottom buttons. For example, when we are on the first record, the user should not be able to use the First and the Previous buttons since this could cause the compiler to throw an error. In the same way, when the last record is displaying, the user would not need the Next and the Last buttons. When displaying each record, we can just update this information. Professionally, it would be nice to have a function that manages these buttons every time a record changes. Object oriented programming means we should divide jobs.
    In the private section of the form, declare the following method:
     
    void __fastcall UpdateButtons();
  11. Implement the function as follows:
     
    //---------------------------------------------------------------------------
    void __fastcall TfrmMain::UpdateButtons()
    {
        if( CurrentRecord <= 1 )
        {
            btnFirst->Enabled = False;
            btnPrevious->Enabled = False;
            btnNext->Enabled = True;
            btnLast->Enabled = True;
        }
        else if( CurrentRecord < ListOfContacts->Count )
        {
            btnFirst->Enabled = True;
            btnPrevious->Enabled = True;
            btnNext->Enabled = True;
            btnLast->Enabled = True;
        }
        else if( CurrentRecord == ListOfContacts->Count )
        {
            btnFirst->Enabled = True;
            btnPrevious->Enabled = True;
            btnNext->Enabled = False;
            btnLast->Enabled = False;
        }
    }
    //---------------------------------------------------------------------------
  12. Also, every time the user clicks a button to navigate the records, the values for that record will need to display. We can handle this update for ever event of the navigation buttons. It appears more professional to have a function that can take care of this so that, whenever a new record needs to be displayed, the function or event that needs this update can just call the function that displays the values for the record. The function that makes the call must specify which record needs to be displayed.
    In the private section of the TForm1 class, declare a function as follows:
     
    void __fastcall DisplayRecord(const TContact * Contact);
  13. Implement the function as follows:
     
    //---------------------------------------------------------------------------
    void __fastcall TfrmMain::DisplayRecord(const Contact * Contact)
    {
        // Display or update each Edit control
        edtFirstName->Text = Contact->FirstName;
        edtLastName->Text  = Contact->LastName;
        edtAddress->Text   = Contact->Address;
        edtCity->Text      = Contact->City;
        edtState->Text     = Contact->State;
        edtZIPCode->Text   = Contact->ZIPCode;
        edtCountry->Text   = Contact->Country;
        edtEmailAddress->Text = Contact->EmailAddress;
        edtHomePhone->Text = Contact->HomePhone;
    }
    //---------------------------------------------------------------------------
  14. On the form, double-click the First button and implement its OnClick event as follows:
     
    //---------------------------------------------------------------------------
    void __fastcall TfrmMain::btnFirstClick(TObject *Sender)
    {
        // Set the CurrentRecord variable to the first record
        CurrentRecord = ListOfContacts->IndexOf( ListOfContacts->First() ) + 1;
        // Retrieve the first record and assign it to a TContact object
        Contact = reinterpret_cast<TContact *>(ListOfContacts->First());
        DisplayRecord(Contact);
        // Display the current index in the bottom Edit control
        edtRecordNumber->Text = IntToStr(CurrentRecord);
        // Call the UpdateButtons() method to decide what to do with the buttons
        UpdateButtons();
    }
    //---------------------------------------------------------------------------
  15. On the form, double-click the Previous button and implement its OnClick event as follows:
     
    //---------------------------------------------------------------------------
    void __fastcall TfrmMain::btnPreviousClick(TObject *Sender)
    {
        // Decrease the CurrentRecord variable
        CurrentRecord--;
    
        // Get the current record and assign it to a TContact instance
        Contact = reinterpret_cast<TContact *>(ListOfContacts->Items[CurrentRecord-1]);
        DisplayRecord(Contact);
    
        edtRecordNumber->Text = IntToStr(CurrentRecord);
        UpdateButtons();
    }
    //---------------------------------------------------------------------------
  16. On the form, double-click the Next button and implement its OnClick event as follows:
     
    //---------------------------------------------------------------------------
    void __fastcall TfrmMain::btnNextClick(TObject *Sender)
    {
        Contact = reinterpret_cast<TContact *>(ListOfContacts->Items[CurrentRecord]);
        DisplayRecord(Contact);
        edtRecordNumber->Text = IntToStr(CurrentRecord+1);
        // Decrease the record numbering
        CurrentRecord++;
        UpdateButtons();
    }
    //---------------------------------------------------------------------------
  17. On the form, double-click the Last button and implement its OnClick event as follows:
     
    //---------------------------------------------------------------------------
    void __fastcall TfrmMain::btnLastClick(TObject *Sender)
    {
        CurrentRecord = ListOfContacts->Count;
        Contact = reinterpret_cast<TContact *>(ListOfContacts->Last());
        DisplayRecord(Contact);
        edtRecordNumber->Text = IntToStr(ListOfContacts->Count);
        UpdateButtons();
    }
    //---------------------------------------------------------------------------
  18. When the form opens, we need to make sure that the first record displays. All we have to do is to call the OnClick event of the Next button. While we are at it, we will display the number of records on the second label of the bottom panel.
    Find an unoccupied area on the form and double-click it to access the OnCreate event of the form
  19. Implement the event as follows:
     
    //---------------------------------------------------------------------------
    void __fastcall TfrmMain::FormCreate(TObject *Sender)
    {
        // When the form opens, act as if the Next button was clicked
        btnNextClick(Sender);
    
        // Display the total number of records on the navigation bar
        lblCount->Caption = ListOfContacts->Count;
    }
    //---------------------------------------------------------------------------
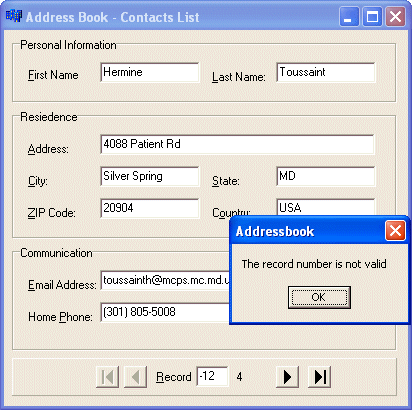
  20. If the user types a number in the Record Number edit box and press Enter, we will allow the corresponding record to display. The real problem we need to solve is to avoid invalid values.
    On the top combo box of the Object Inspector, select edtRecordNumber and click the Events tab.
  21. Double-click the event of OnKeyDown and implement it as follows:
     
    //---------------------------------------------------------------------------
    void __fastcall TfrmMain::edtRecordNumberKeyDown(TObject *Sender,
          WORD &Key, TShiftState Shift)
    {
        // If the user press Enter while in the Edit control
        if( Key == VK_RETURN )
        {
            // If the Edit control is empty
            if( edtRecordNumber->Text.IsEmpty() )
                return; // Do nothing
            else if( (edtRecordNumber->Text.ToInt() > 0) &&
                     (edtRecordNumber->Text.ToInt() <= ListOfContacts->Count) )
            {
                // Since the Edit control contains
                CurrentRecord = edtRecordNumber->Text.ToInt();
                Contact = reinterpret_cast<TContact *>(ListOfContacts->Items[CurrentRecord-1]);
                DisplayRecord(Contact);
                UpdateButtons();
            }
            else if( (edtRecordNumber->Text.ToInt() < 0) ||
                     (edtRecordNumber->Text.ToInt() > ListOfContacts->Count) )
            {
                ShowMessage("The record number is not valid");
            }
        }
    }
    //---------------------------------------------------------------------------
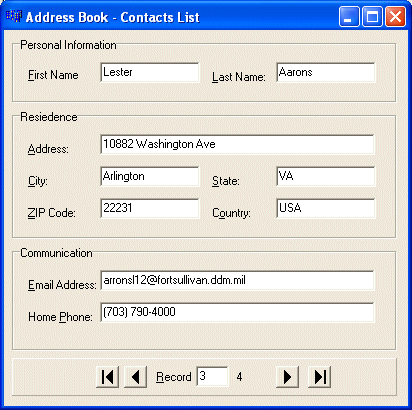
  22. Test the application
     
    Address Book Address Book
  23. After using the form, close it and save your project


Operations on a List

Operations on items of a list consist of adding, inserting, deleting, or moving items to or from a list. All these operation are already provided by the TList class. The most you have to do is to adapt the class to your goal. Although the operations on a list can be performed in the form layout we have used so far, they can better be viewed and appreciated in a view that displays all records at the same time. That is why sometimes spreadsheet views are used in databases. For this exercise, we will use, we will use a ListView control.

Practical Learning: Using a ListView

  1. Create a new application with its default form
  2. To save the project, on the Standard toolbar, click the Save All button
  3. Locate the folder that contains your exercises and display it in the Save In combo box.
    Click the Create New Folder button. Type Address Book2 and press Enter twice
  4. Click Unit1 to select it, type Main and press Enter.
  5. Type AddressBook and press Enter
  6. Change its properties as follows:
    Caption = Address Book - Contacts List
    Height
    = 340
    Name
    = frmMain
    ShowHint
    = true
    Width = 456
  7. From the Win32 tab of the Component Palette, double-click ImageList and. on the form, double-click ImageList1
  8. From the Bitmaps folder and using the Add button, select the Exit bitmap
  9. From the Standatd tab of the Component Palette, double-click MainMenu
  10. While the MainMenu1 icon is still selected, set its Images property to ImageList1.
  11. Double-click MainMenu1.
  12. While the first menu item is still selected, on the Object Inspector, click Caption, type &File and press Enter.
  13. Set the Caption of the item under File to E&xit and set its ImageIndex value to 0
  14. Close the Menu Designer.
  15. On the main menu of the form, click File -> Exit and implement the event as follows:
     
    //---------------------------------------------------------------------------
    void __fastcall TfrmListView::Exit1Click(TObject *Sender)
    {
        Close();
    }
    //---------------------------------------------------------------------------
  16. From the Win32 tab of the Component Palette, click ToolBar and click an unoccupied area on the form.
  17. Set the properties of the toolbar as follows:
    EdgeBorders = [ebTop,ebBottom]
    Flat = true
    Height = 24
    Images = ImageList1
  18. From the Win32 tab of the Component Palette, add a ListView control under the toolbar on the form.
  19. On the Object Inspector, change the properties as follows:
    GridLines = true
    Height = 248
    Left = 0

    Name = lvwContacts
    RowSelect = true
    Top = 26

    ViewStyle = vsReport
    Width = 448
  20. On the form, double-click the ListView1 control
  21. Using the Add New button, create the columns as follows:
     
     Caption Alignment Width
     First Name taLeftJustify 80
     MI taLeftJustify 24
     Last Name taLeftJustify 80
     Email Address taLeftJustify 160
     Home Phone taCenter 100
  22. Add a Panel to the form with the following properties:
    Align = alBottom
    BevelOuter = bvLowered
    Caption = none
    Height = 20
     
    Address Book - List View
  23. Save your project
  24. Create a new Unit and save it as Contacts
  25. In the Contacts.h file, create a TContact class as follows:
     
    //---------------------------------------------------------------------------
    #ifndef ContactsH
    #define ContactsH
    #include <vcl.h>
    //---------------------------------------------------------------------------
    class TContact
    {
    public:
        AnsiString FirstName;
        AnsiString MI;
        AnsiString LastName;
        AnsiString Address;
        AnsiString City;
        AnsiString State;
        AnsiString ZIPCode;
        AnsiString Country;
        AnsiString EmailAddress;
        AnsiString HomePhone;
        __fastcall TContact(AnsiString FN="John", AnsiString M="T",
                            AnsiString LN="Doe",
                            AnsiString Adr="123 Main Street",
                            AnsiString CT="USA",
                            AnsiString St="ZZ", AnsiString ZIP="01234",
                            AnsiString Ctry="USA",
                            AnsiString Email="doej@mailme.com",
                            AnsiString HP="(123) 456-7890");
        __fastcall TContact(const TContact &Cont);
        virtual __fastcall ~TContact();
        TContact& operator=(const TContact& Cont);
    };
    //---------------------------------------------------------------------------
    #endif
  26. In the Contacts.cpp file, define the object as follows:
     
    //---------------------------------------------------------------------------
    
    #pragma hdrstop
    
    #include "Contacts.h"
    
    //---------------------------------------------------------------------------
    #pragma package(smart_init)
    
    //---------------------------------------------------------------------------
    __fastcall TContact::TContact(AnsiString FN, AnsiString M,
                                  AnsiString LN, AnsiString Adr,
                                  AnsiString CT, AnsiString St, AnsiString ZIP,
                                  AnsiString Ctry, AnsiString Email, AnsiString HP)
        : FirstName(FN), MI(M), LastName(LN),
          Address(Adr), City(CT),
          State(St), ZIPCode(ZIP), Country(Ctry),
          EmailAddress(Email), HomePhone(HP)
    {
    }
    //---------------------------------------------------------------------------
    __fastcall TContact::TContact(const TContact &Cont)
        : FirstName(Cont.FirstName), MI(Cont.MI), LastName(Cont.LastName),
          Address(Cont.Address), City(Cont.City),
          State(Cont.State), ZIPCode(Cont.ZIPCode), Country(Cont.Country),
          EmailAddress(Cont.EmailAddress), HomePhone(Cont.HomePhone)
    {
    }
    //---------------------------------------------------------------------------
    __fastcall TContact::~TContact()
    {
    }
    //---------------------------------------------------------------------------
    TContact& TContact::operator=(const TContact& Cont)
    {
        FirstName    = Cont.FirstName;
        MI           - Cont.MI;
        LastName     = Cont.LastName;
        Address      = Cont.Address;
        City         = Cont.City;
        State        = Cont.State;
        ZIPCode      = Cont.ZIPCode;
        Country      = Cont.Country;
        EmailAddress = Cont.EmailAddress;
        HomePhone    = Cont.HomePhone;
    
        return *this;
    }
    //---------------------------------------------------------------------------
  27. In the header file of Main.h, declare a TContacts and a TList instances as follows:
     
    //---------------------------------------------------------------------------
    
    #ifndef MainH
    #define MainH
    //---------------------------------------------------------------------------
    #include <Classes.hpp>
    #include <Controls.hpp>
    #include <StdCtrls.hpp>
    #include <Forms.hpp>
    #include <ImgList.hpp>
    #include <Menus.hpp>
    #include <ComCtrls.hpp>
    #include <ExtCtrls.hpp>
    #include <ToolWin.hpp>
    #include "Contacts.h"
    //---------------------------------------------------------------------------
    class TfrmMain : public TForm
    {
    __published:	// IDE-managed Components
        TImageList *ImageList1;
        TMainMenu *MainMenu1;
        TMenuItem *File1;
        TMenuItem *Exit1;
        TToolBar *ToolBar1;
        TListView *lvwContacts;
        TPanel *Panel1;
        void __fastcall Exit1Click(TObject *Sender);
    private:
        TContact *Contact;
        TList *ListOfContacts;	// User declarations
    public:		// User declarations
        __fastcall TfrmMain(TComponent* Owner);
    };
    //---------------------------------------------------------------------------
    extern PACKAGE TfrmMain *frmMain;
    //---------------------------------------------------------------------------
    #endif
  28. In the constructor of the TfrmMain class in the Main.cpp file, initialize the ListOfContacts variable as follows:
     
    //---------------------------------------------------------------------------
    __fastcall TfrmMain::TfrmMain(TComponent* Owner)
        : TForm(Owner)
    {
        ListOfContacts = new TList;
    }
    //---------------------------------------------------------------------------
  29. In the OnDestroy event of the the frmMain form, destroy the ListOfContacts variable as follows:
     
    //---------------------------------------------------------------------------
    void __fastcall TfrmMain::FormDestroy(TObject *Sender)
    {
        delete ListOfContacts;
        ListOfContacts = NULL;
    }
    //---------------------------------------------------------------------------
  30. Save your project

A List and its New Items

In the previous section of this lesson, we learned how to statically create a list. That is, we learned how you, the programmer, can create a list for the user. If you want the user to have more control on the list, you should give her the ability to add new items to a list or insert items in the order of her choice.

We have already learned that, to add an item to the end of a list, you can use the TList::Add() method. To add a new record, we will provide the user with a dialog box that contains all the fields that compose a complete record. The user can provide the piece of information that are available. Upon clicking OK, we will retrieve the record and add it to the list.

Once a few records exist in the list, it is time for maintenance. The ListView we have created will display only a few pieces of information, due to lack of space. That is why we will display only the name, the email address and the telephone number of a contact. If the user wants to see more details about a contact, we will allow her to select a record, either double-click it or click a button. A dialog box will display the whole record. To do this, when the user double-clicks a record, we will retrieve its index and display its details in the same dialog box used to create a new record. Upon closing the dialog box, if the user clicks OK after changing any piece of information on the contact, we will her if she wants to update the change.

Practical Learning Practical Learning: Adding and Inserting Items to a List

  1. On the View toolbar, click the New Form button New Form
  2. Change its properties as follows:
    BorderStyle = bsDialog
    Caption = Address Book - Record Details
    Height = 360
    Name = dlgRecord
    Width = 490
  3. Save the form as Record and design it as follows:
     
    Address Book
  4. The form contains three GroupBox controls Named, from top to bottom, grpPersonalInformation, grpResidence, and grpCommunication respectively.
  5. The Name to give to each Edit control is displayed on the above form. The middle Edit control in the top group is named edtMI
  6. Set the ReadOnly property value to true for all Edit controls.
  7. The right buttons are BitBtn type with Kinds mrOk and mrCancel
  8. Save the project.
  9. Display the other form (View -> Forms, frmMain) and double-click ImageList1
  10. Using the Add button, add the NewRecord button
  11. On the form, double-click MainMenu1.
  12. Click the blue box under the File menu and click Caption. Type &New Record... and click Name.  Type mnuNewRecord
  13. Set the ImageIndex value of the New Record menu item to 1 and set its ShortCut to Ctrl+N. Move the new menu item on top of Exit
     
    Menu Designer
  14. Close the Menu Designer
  15. On the main menu of C++ Builder, click File -> Include Unit Hdr...
  16. Record should be selected. Therefore, click OK.
  17. Whenever anything changes about the list of records, for example when the user adds or deletes a record, the list of records should be updated. Instead of performing this operation every time, we can use a central function that displays records. When the records need to be displayed or updated, we can just call it.
    In the private section of the header file of the TfrmMain class, declare a function as follows:
     
    private:
        TContact *Contact;
        TList *ListOfContacts;
        void __fastcall ShowContacts();	// User declarations
    public:		// User declarations
        __fastcall TfrmMain(TComponent* Owner);
    };
    //---------------------------------------------------------------------------
    extern PACKAGE TfrmMain *frmMain;
    //---------------------------------------------------------------------------
    #endif
  18. In the source file, implement the function as follows:
     
    //---------------------------------------------------------------------------
    void __fastcall TfrmMain::ShowContacts()
    {
        // If the list view had some items, dismiss them
        lvwContacts->Items->Clear();
    
        // For each record, display its values in the list view
        for( int i = 0; i < ListOfContacts->Count; i++ )
        {
            TListItem * lstItem;
    
            lstItem = lvwContacts->Items->Add();
            lstItem->Caption =     reinterpret_cast<TContact *>(ListOfContacts->Items[i])->FirstName;
            lstItem->SubItems->Add(reinterpret_cast<TContact *>(ListOfContacts->Items[i])->MI);
            lstItem->SubItems->Add(reinterpret_cast<TContact *>(ListOfContacts->Items[i])->LastName);
            lstItem->SubItems->Add(reinterpret_cast<TContact *>(ListOfContacts->Items[i])->EmailAddress);
            lstItem->SubItems->Add(reinterpret_cast<TContact *>(ListOfContacts->Items[i])->HomePhone);
        }
    }
    //---------------------------------------------------------------------------
  19. To allow the user to create a new contact, on the main menu of the form, click File -> New Record and implement the event as follows:
     
    //---------------------------------------------------------------------------
    void __fastcall TfrmMain::mnuNewRecordClick(TObject *Sender)
    {
        // Make sure that all edit boxes
        // from the Record Details dialog boxes are empty
        dlgRecord->edtFirstName->Text = "";
        dlgRecord->edtMI->Text = "";
        dlgRecord->edtLastName->Text = "";
        dlgRecord->edtAddress->Text = "";
        dlgRecord->edtCity->Text = "";
        dlgRecord->edtState->Text = "";
        dlgRecord->edtZIPCode->Text = "";
        dlgRecord->edtCountry->Text = "USA";
        dlgRecord->edtEmailAddress->Text = "";
        dlgRecord->edtHomePhone->Text = "";
    
        // Display the Record dialog to the user
        dlgRecord->ShowModal();
        
        // Find out if the user clicked OK
        if( dlgRecord->ModalResult == mrOk )
        {
            // Create a new record
            Contact = new TContact;
            Contact->FirstName = dlgRecord->edtFirstName->Text;
            Contact->MI = dlgRecord->edtMI->Text;
            Contact->LastName = dlgRecord->edtLastName->Text;
            Contact->Address = dlgRecord->edtAddress->Text;
            Contact->City = dlgRecord->edtCity->Text;
            Contact->State = dlgRecord->edtState->Text;
            Contact->ZIPCode = dlgRecord->edtZIPCode->Text;
            Contact->Country = dlgRecord->edtCountry->Text;
            Contact->EmailAddress = dlgRecord->edtEmailAddress->Text;
            Contact->HomePhone = dlgRecord->edtHomePhone->Text;
    
            // Add the new record to the list
            ListOfContacts->Add(Contact);
        }
    
        // Display a condensed list of contacts
        ShowContacts();
    }
    //---------------------------------------------------------------------------
  20. On the form, right-click the toolbar and click New Button. Change the ImageIndex of the new button to 1.
  21. Change its Hint to New Record
  22. Click the Events tab of the Object Inspector and on its OnClick right field, select mnuNewRecordClick
  23. Test the application. Click File -> New Record...
     
    Address Book
    Address Book
    Address Book
  24. After using the application, close the form and save the project
  25. To allow the user to view more details about a record, on the form, click the ListView1 control.
  26. On the Object Inspector, click the Events tab. Double-click the empty box on the right side of OnDblClick and implement the event as follows:
     
    //---------------------------------------------------------------------------
    void __fastcall TfrmMain::lvwContactsDblClick(TObject *Sender)
    {
        // Suppose the user double-cliks an item, get its index
        int ItemSelected = lvwContacts->ItemIndex;
    
        // If an item was double-clicked, display its record
        if( ItemSelected >= 0 )
        {
            Contact = reinterpret_cast<TContact *>(ListOfContacts->Items[ItemSelected]);
            dlgRecord->edtFirstName->Text = Contact->FirstName;
            dlgRecord->edtMI->Text = Contact->MI;
            dlgRecord->edtLastName->Text = Contact->LastName;
            dlgRecord->edtAddress->Text = Contact->Address;
            dlgRecord->edtCity->Text = Contact->City;
            dlgRecord->edtState->Text = Contact->State;
            dlgRecord->edtZIPCode->Text = Contact->ZIPCode;
            dlgRecord->edtCountry->Text = Contact->Country;
            dlgRecord->edtEmailAddress->Text = Contact->EmailAddress;
            dlgRecord->edtHomePhone->Text = Contact->HomePhone;
            dlgRecord->ShowModal();
    
            // After viewing the record and upon closing the dialog box
            // find out if the user clicked OK
            if( dlgRecord->ModalResult == mrOk )
            {
                // Since the user clicked OK
                // find out if any value of the record has changed
                if( (dlgRecord->edtFirstName->Text != Contact->FirstName) ||
                    (dlgRecord->edtMI->Text != Contact->MI) ||
                    (dlgRecord->edtLastName->Text != Contact->LastName) ||
                    (dlgRecord->edtAddress->Text != Contact->Address) ||
                    (dlgRecord->edtCity->Text != Contact->City) ||
                    (dlgRecord->edtState->Text != Contact->State) ||
                    (dlgRecord->edtZIPCode->Text != Contact->ZIPCode) ||
                    (dlgRecord->edtCountry->Text != Contact->Country) ||
                    (dlgRecord->edtEmailAddress->Text != Contact->EmailAddress) ||
                    (dlgRecord->edtHomePhone->Text != Contact->HomePhone) )
                {
                    // Since a record has changed, ask a question to the user
                    int Response =
                        Application->MessageBox("The record has changed\n"
                                                "Do you want to save it?",
                                                "Address Book",
                                                MB_YESNO | MB_ICONQUESTION);
    
                    // If the user wants to update the change on the record
                    if( Response == IDYES )
                    {
                        // Replace each value of the selected record
                        // with the new value
                        Contact->FirstName = dlgRecord->edtFirstName->Text;
                        Contact->MI = dlgRecord->edtMI->Text;
                        Contact->LastName = dlgRecord->edtLastName->Text;
                        Contact->Address = dlgRecord->edtAddress->Text;
                        Contact->City = dlgRecord->edtCity->Text;
                        Contact->State = dlgRecord->edtState->Text;
                        Contact->ZIPCode = dlgRecord->edtZIPCode->Text;
                        Contact->Country = dlgRecord->edtCountry->Text;
                        Contact->EmailAddress = dlgRecord->edtEmailAddress->Text;
                        Contact->HomePhone = dlgRecord->edtHomePhone->Text;
    
                        // Redisplay the contacts
                        ShowContacts();
                    }
                }
            }
        }
    }
    //---------------------------------------------------------------------------
  27. On the form, double-click ImageList1 and, using the Add button, add the Details bitmap
  28. On the form, right-click the toolbar and click New Button. Make sure the ImageIndex of the new button is set to 2 and change its Name to btnRecordDetails.
  29. Click the Events tab. In its OnClick right box, select lvwContactsDblClick
  30. Test the application.
  31. After using it, close the form and save the project


List Item Insertion

Besides the TList::Add() method used to add an item to a list, the TList class also allows you to insert an item in any order inside the list. This operation is handled by the TList::Insert() method. Its syntax is:

void __fastcall Insert(int Index, void *Item);

The first argument of this function, Index, specifies the index that the new item will occupy after being added. Because the list of items is zero-based (since it is a C++ array), to add an item to the first position, specify Index as 0. In the same way, to add an item to the 3rd position, specify Index as 2. The Item argument is the item that you want to insert.

There are two main ways you would use the Insert() method. If you know the exact position where you want to insert an object, then supply the known index. By contrast, you can use Insert() to insert a new item before or after one of your choice. To do this, you must first retrieve the index of the item that will succeed the one you want to add. This index would be used as a the Index argument.

Practical Learning Practical Learning: Adding and Inserting Items to a List

  1. On the form, double-click ImageList1 and, using the Add button, add the Insert bitmap
  2. On the form, right-click the toolbar and click New Button
  3. Make sure that the new bitmap is assigned to the new button and change its Name to btnInsertRecord
  4. Change its Hint to Insert Record
  5. Double-click the new button and implement its OnClick event as follows:
     
    //---------------------------------------------------------------------------
    void __fastcall TfrmMain::btnInsertRecordClick(TObject *Sender)
    {
        // In order to insert a record, we need to find out if a record is selected
        int ItemSelected = lvwContacts->ItemIndex;
    
        // If a record is selected
        if( ItemSelected >= 0 )
        {
            // Empty all edit boxes of the Record Details dialog box
            dlgRecord->edtFirstName->Text = "";
            dlgRecord->edtMI->Text = "";
            dlgRecord->edtLastName->Text = "";
            dlgRecord->edtAddress->Text = "";
            dlgRecord->edtCity->Text = "";
            dlgRecord->edtState->Text = "";
            dlgRecord->edtZIPCode->Text = "";
            dlgRecord->edtCountry->Text = "USA";
            dlgRecord->edtEmailAddress->Text = "";
            dlgRecord->edtHomePhone->Text = "";
    
            // Display the Record dialog to the user
            dlgRecord->ShowModal();
    
            // Find out if the user clicked OK
            if( dlgRecord->ModalResult == mrOk )
            {
                // Create a new record
                Contact = new TContact;
                Contact->FirstName = dlgRecord->edtFirstName->Text;
                Contact->MI = dlgRecord->edtMI->Text;
                Contact->LastName = dlgRecord->edtLastName->Text;
                Contact->Address = dlgRecord->edtAddress->Text;
                Contact->City = dlgRecord->edtCity->Text;
                Contact->State = dlgRecord->edtState->Text;
                Contact->ZIPCode = dlgRecord->edtZIPCode->Text;
                Contact->Country = dlgRecord->edtCountry->Text;
                Contact->EmailAddress = dlgRecord->edtEmailAddress->Text;
                Contact->HomePhone = dlgRecord->edtHomePhone->Text;
    
                // Insert the new record to the list
                ListOfContacts->Insert(ItemSelected, Contact);
            }
        }
    
        // Display an update list of contacts in the ListView
        ShowContacts();
    }
    //---------------------------------------------------------------------------
  6. If a record is selected and the user presses Insert, we can perform the same task.
    On the form, click the ListView control and, on the Object Inspector, click the Events tab.
  7. Double-clicks the event on the right side of OnKeyDown and implement it as follows:
     
    //---------------------------------------------------------------------------
    void __fastcall TfrmMain::lvwContactsKeyDown(TObject *Sender, WORD &Key,
          TShiftState Shift)
    {
        if( Key == VK_INSERT )
            btnInsertRecordClick(Sender);
    }
    //---------------------------------------------------------------------------
  8. Test the application
  9. After using it, close the form and save the project

Removing Items From a List

If you find out that your list includes an item you don't need, you can remove such an item from your list. The deletion of an item from a TList list can be handled by the TList::Delete() method. Its syntax is:

void __fastcall Delete(int Index);

To process your request, this function needs the index of the item you want to delete. You can get this index using the TList::Items[] member variable.

Besides the Delete() method, the TList class provides a method used to delete a record if you know the value of the record instead of its position. The method is TList::Remove() and its syntax is:

int __fastcall Remove(void *Item);

Instead of the index, the Remove method needs the item itself. If you supply an item that exists in the list, Remove() would delete it. If the operation is successful, Remove() returns the index the item had.

There are two significant differences between the Delete() and the Remove() methods:

  • Because Delete() takes the Index of the item you want to remove, if the index is valid, the operation would be successful and stop. In other words, Delete() only makes sure that the index corresponds to a valid item number in the list: Delete() does not look for it; it only checks that the index is true.
  • Remove() looks for the Item you supply to it. If the item exists, Remove() deletes it. If more than one item matches the Item argument you supply, Remove() deletes the first item that matches Item.

Practical Learning Practical Learning: Deleting Records

  1. On the form, double-click ImageList1 and, using the Add button, add the Delete bitmap
  2. Right-click the toolbar and click New Button. Make sure the Delete bitmap is assigned to the new button and change its Name to btnDeleteRecord
  3. Change its Hint to Delete Record
  4. Double-click the new button and implement its event as follows:
     
    //---------------------------------------------------------------------------
    void __fastcall TfrmMain::btnDeleteRecordClick(TObject *Sender)
    {
        // Find out if an item is selected
        int SelectedItem = lvwContacts->ItemIndex;
    
        if( SelectedItem >= 0 )
        {
            int Response =
                Application->MessageBox("Are you sure you want to delete this record?",
                                        "Address Book",
                                        MB_YESNO | MB_DEFBUTTON2 | MB_ICONQUESTION);
            if( Response == IDYES )
            {
                // If an item is selected, delete it
                ListOfContacts->Delete(SelectedItem);
                // Update and show the list of records
                ShowContacts();
            }
        }
    }
    //---------------------------------------------------------------------------
  5. If the user press Delete, we can perform the same action.
    On the form, click the ListView control and, on the Object Inspector, click the Events tab.
  6. Double-clicks the event on the right side of OnKeyDown and change it as follows:
     
    //---------------------------------------------------------------------------
    void __fastcall TfrmMain::lvwContactsKeyDown(TObject *Sender, WORD &Key,
          TShiftState Shift)
    {
        if( Key == VK_INSERT )
            btnInsertRecordClick(Sender);
        if( Key == VK_DELETE )
            btnDeleteRecordClick(Sender);
    }
    //---------------------------------------------------------------------------
  7. Test the application
  8. After using it, close the form and save the project

List Clearance 

Clearing a list consists of deleting all of its records in one step. This operation can be taken care of by the TList::Clear() method. Its syntax is:

void __fastcall Clear();

As you can see, there is no particular information this function needs. If the list is empty, the method would not do anything. If the list contains records, then all of them would be deleted. The only thing you might do is to warn the user especially if the records cannot be recovered.

Practical Learning Practical Learning: Clearing a List

  1. On the form, double-click ImageList1 and, using the Add button, add the Clear bitmap
  2. On the form, right-click the toolbar and click New Button. Make sure the Clear bitmap is assigned to the new button. Change its Name to btnClear and its Hint to Delete All Records
  3. Double-click the new button and implement its event as follows:
     
    //---------------------------------------------------------------------------
    void __fastcall TfrmMain::btnClearClick(TObject *Sender)
    {
        int Warning1 =
            Application->MessageBox("This action will erase all of your contacts"
                                    "\nAre you sure you want to erase all contacts?",
                                    "Address Book",
                                    MB_YESNO | MB_DEFBUTTON2 | MB_ICONQUESTION);
        if( Warning1 == IDYES )
        {
            int Warning2 =
                Application->MessageBox(
                    "Are you absolutely sure that you want to erase all contacts?",
                    "Address Book",
                    MB_YESNO | MB_DEFBUTTON2 | MB_ICONQUESTION);
            if( Warning2 == IDYES )
            {
                ListOfContacts->Clear();
                lvwContacts->Items->Clear();
            }
        }
    }
    //---------------------------------------------------------------------------
  4. Test the application
  5. After using it, close the form and save the project

The VCL's Collection of List

Besides the TList class that we have studied in this lesson, the VCL provides a wide range of classes that can be used to create lists or maintain them. This means that, although you can create your lists from scratch using C++, there are already classes that can help you accomplish your scenario.

TOrderedList: Like TList, the TOrderedList class is derived straight from TObject. The purpose of TOrderedList is to lay  a foundation of creating a list that can be ordered. This class itself does not do anything. It gives birth to other classes that take care of the necessary function definitions. This is because C++ implements ordered lists differently.

TQueue: A queue is a technique of arranging objects in an order so that items are aligned, like at the bank: the first person on the line is also the first person to be served and to get out of the bank. This technique is referred to as First-In First-Out (FIFO). To create such a list in a VCL application, you can use the TQueue class. It is derived from the TOrderedList class.

TStack: A stack is a technique of arranging objects like when you put books in a box. If you decide to remove them, you would first remove the last book you had put in the box. This arrangement is referred to as Last-In First-Out (LIFO). To create such a list, you can use the TStack class which is derived from the TOrderedList.

There are many other classes the VCL provides for lists.


Copyright © 2003-2007 FunctionX, Inc.