VCL Controls: The Month Calendar


Introduction

The Win32 API provides a control used to select dates on a colorful calendar. The dates used and the way they display are based on the Regional Settings of the Control Panel. It may also depend on the operating system:

This convenient control is called Month Calendar. The title bar of the control displays two buttons and two labels. The left button allows the user to select the previous month by clicking the button. The left label displays the currently selected month. The right label displays the year of the displayed date. The right button is used to get to the next month.

The calendar can be configured to display more than one month. Here is an example that displays two months:

If the control is displaying more than one month, the buttons would increment or decrement by the previous or next month in the list. For example, if the control is displaying April and May, if the user clicks the left button, the control would display March and April. If the control is displaying April and May and the user clicks the right button, the control would display May and June. Also, to select any month of the current year, the user can click the name of the month, which displays the list of months and this allows the user to click the desired month:

To select a year, the user clicks the year number. This changes the year label into a spin button:

To change the year, the user can click the up or down arrows of the spin button. As the spin button is displaying, the user can also use the arrow keys of the keyboard to increase or decrease the value.

Under the title bar, the short names of week days display, using the format set in Control Panel. In US English, the first day is usually Sunday. The first day can be changed by the programmer.

On the control, the currently selected date has a circle around. To select a date on the control, the user clicks the desired date, which changes from the previous selection.

In the main area, the numeric days of the month display on a white background (this color and any color on the control can be changed as we will see in the next section). To select a date, the user clicks it in the list. By default, the calendar opens with today's day circled with a hand-drawn-look-alike ellipse. Using the buttons of the title bar, the month label, and/or the year, the user can change the date. If at one time the calendar is displaying a date other than today, and if the user wants to return to today's date, he can click the bottom label that displays Today (you as the programmer can hide the Today label if you want).


Practical Learning: Starting the Exercise

  1. Start Borland C++ Builder or a new project with its default form
  2. Save the project in a new folder called Payroll1
  3. Save the unit as Main and the project as Payroll
  4. Change the Caption of the form to Employees Payroll
  5. Change the name of the form to frmMain
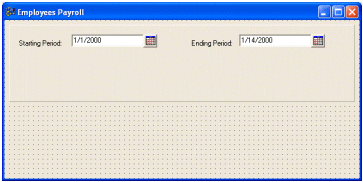
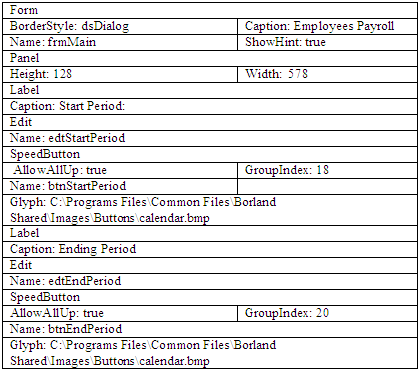
  6. Design the form as follows:
     
  7. Double-click an empty area on the form to access its OnCreate event and implement it as follows:
     
    //---------------------------------------------------------------------------
    void __fastcall TfrmMain::FormCreate(TObject *Sender)
    {
    	edtStartPeriod->Text = Date();
    	edtEndPeriod->Text = Date() + 13;
    }
    //---------------------------------------------------------------------------
  8. Save All

Month Calendar Properties

To create a calendar, add the MonthCalendar button to a form or container. The MonthCalendar object is created from the TMonthCalendar class which is indirectly derived from TWinControl. The MonthCalendar control is a rectangular object without a border. After placing it on the form, it displays the current month and only one month. This is because, by default, its width and height are set enough to accommodate a month. To display more than one month, change the width of the control to provide enough space:

In the same way, you can increase the height to display many months.

To make it a highly visual object, a calendar uses different colors to represent the background, week days, the background of the title bar, the text of the title bar, the text of the days of the previous month, and the text of the days of the next month. These colors are controlled by the CalColors property of the control. At design time, you can set these colors to the values of your choice:

Of course, you can programmatically change these colors. Although any color is allowed in any category, you should make sure that the calendar is still reasonably appealing and usable.

Under the title bar, the short names of week days display, using the format set in Control Panel. In US English, the first day is usually Sunday. If you want to start with a different day, set the value using the FirstDayOfWeek property. Under the names of the week and their line separator, the numeric days of the month are listed.

The MonthCalendar control is used to let the user know today's date in two ways. On the calendar, today's date is circled by a hand-drawn ellipse. In the bottom section of the calendar, today's date is also displayed as a sentence. If you want to display or hide the bottom label, set the ShowToday Boolean property accordingly. For example, to hide it, set this property to false.

At any time, a particular date is selected and has an ellipse with the same color as the background of the title bar. By default, the selected date is today's date. On the Object Inspector, it is represented by the Date property. When the user clicks the calendar, a date is selected. To find out what date the user selected, you can access the TMonthCalendar::Date value. The Date value of the MonthCalendar is a TDateTime type. Here is an example:

/---------------------------------------------------------------------------
void __fastcall TForm1::MonthCalendar1Click(TObject *Sender)
{
	Label1->Caption = MonthCalendar1->Date;
}
//---------------------------------------------------------------------------

When the user clicks the MonthCalendar control, one date is selected. To control whether the user can select one or more dates, set the value of the MultiSelect property accordingly. For example, if you want the user to select a range of dates on the control, set the MultiSelect property to true.

Practical Learning: Adding a Calendar Control

  1. Click an empty area on the form, under the panel
  2. On the Component Palette, click the Win32 tab. Double-click the MonthCalendar button 
  3. Click an empty area on the form again and, once more, from the Win32 tab of the Component Palette, double-click the Calendar button
  4. Position both calendars as follows:
     
  5. Change the Name of the left Calendar control to calStartPeriod and change the Name of the right Calendar to calEndPeriod
  6. Change the FirstDayOfWeek of both controls to dowMonday
  7. Set the Visible property of both calendars to false
  8. On the form, double-click the left SpeedButton and implement its OnClick event as follows:
     
    //---------------------------------------------------------------------------
    void __fastcall TfrmMain::btnStartPeriodClick(TObject *Sender)
    {
    	if( btnStartPeriod->Down == True )
    		calStartPeriod->Visible = True;
    	else
    		calStartPeriod->Visible = False;
    }
    //---------------------------------------------------------------------------
  9. On the form, double-click the right SpeedButton and implement its OnClick event as follows:
     
    //---------------------------------------------------------------------------
    void __fastcall TfrmMain::btnEndPeriodClick(TObject *Sender)
    {
    	if( btnEndPeriod->Down == True )
    		calEndPeriod->Visible = True;
    	else
    		calEndPeriod->Visible = False; 
    }
    //---------------------------------------------------------------------------
  10. Test the application and return to Bcb
  11. Save All 
 

Calendar Methods and Events

The TMonthCalendar class provides a constructor that can be used to programmatically create a calendar and place it on a form or container. To do this, declare a pointer to TMonthCalendar and, using the new operator, specify a the container and the parent of the control. Here is an example:

//---------------------------------------------------------------------------
#include <vcl.h>
#include <ComCtrls.hpp>
#pragma hdrstop

#include "Unit1.h"
//---------------------------------------------------------------------------
#pragma package(smart_init)
#pragma resource "*.dfm"
TForm1 *Form1;
//---------------------------------------------------------------------------
__fastcall TForm1::TForm1(TComponent* Owner)
	: TForm(Owner)
{
}
//---------------------------------------------------------------------------
void __fastcall TForm1::FormCreate(TObject *Sender)
{
	TMonthCalendar *MCal = new TMonthCalendar(this);
	MCal->Parent = this;
}
//---------------------------------------------------------------------------

After creating the control, all of the properties we have seen above can be accessed.

To accentuate the importance of one or more days of a month, you can call the BoldDays() method. Its syntax is:

void __fastcall BoldDays(const unsigned * Days, const int Days_Size, unsigned &MonthBoldInfo);

This method can be used to format some days in bold and it is mostly used in conjunction with the OnGetMonthInfo() event. The only event the MonthCalendar control handles on its own is the OnGetMonthInfo() event. Its syntax is:

void __fastcall OnGetMonthInfo(TObject *Sender, DWORD Month, DWORD &MonthBoldInfo)

This event fires as soon as the month of the calendar has been changed. As a descendant of TWinControl, the MonthCalendar control fires the same regular events of a Windows control.


Practical Learning: Using a Month Calendar Control

  1. On the top section of the source file of the form, include the DateUtils header file under the vcl header file: #include <DateUtils.hpp>
  2. On the form, double-click the left Calendar and implement its OnClick event as follows:
     
    //---------------------------------------------------------------------------
    void __fastcall TfrmMain::calStartPeriodClick(TObject *Sender)
    {
    	// Get the date that the user has just selected
    	TDateTime DateSelected = calStartPeriod->Date;
    	// Find out the numeric "name" of the weekday
    	Word DOTW = DayOfTheWeek(DateSelected);
    
    	// Make sure the user selected a Monday
    	if( DOTW == 1 )
    	{
    		// Since the user selected a Monday date,
    		// display it in the Ending Period edit box
    		edtStartPeriod->Text =
    		calStartPeriod->Date;
    	}
    	// Make sure the user can select only a Monday date
    	else if( DOTW != 1 )
    	{
    		ShowMessage("The selected date is invalid\n"
    				"A time sheet period starts on Monday");
    		return;
    	}
    }
    //---------------------------------------------------------------------------
  3. On the form, double-click the right Calendar and implement its OnClick event as follows:
     
    //---------------------------------------------------------------------------
    void __fastcall TfrmMain::calEndPeriodClick(TObject *Sender)
    {
    	// Get the current date selected on the End Period Calendar
    	TDateTime DateSelected = calEndPeriod->Date;
    	// Find the numeric "name" of the weekday
    	Word DOTW = DayOfTheWeek(DateSelected);
    	// Get the date of the left calendar
    	TDateTime StartPeriod = calStartPeriod->Date;
    
    	// Find out if the user selected a Sunday date
    	if( DOTW == 7 )
    	{ 
    		// Since the user selected a date on Sunday,
    		// display it in the Ending Period edit box
    		if( DateSelected == StartPeriod + 13 )
    			edtEndPeriod->Text = calEndPeriod->Date;
    		// Make sure the date the user selected is the week following
    		// the previous
    		else
    		{
    			ShowMessage("Invalid date selection\n"
    				"The time sheet period spans 14 days");
    		}
    	} 
    	// Make sure the user selects a Sunday date.
    	// Otherwise, dismiss it
    	else if( DOTW != 7 )
    	{
    		ShowMessage("The selected date is invalid\n"
    			"A time sheet period ends on Sunday");
    	}
    }
    //---------------------------------------------------------------------------
  4. Test the application
     
  5. Return to Bcb and Save All 


Home Copyright © 2004-2014 FunctionX, Inc.