 |
Overflowing the Size of a Box or Element |
|
Introduction
|
|
There are two main ways you deal with the sizes of boxes or
those of elements. You can let the browser
manage the size; we have seen some examples and we will study more options in the next
few sections. Another option is that you want to manage the size of the box or
element yourself, for any reason.
|
One
way you do this is to give a fixed size to the box and put anything you want in that box.
Consider the following examples:
<html>
<head>
<title>F# Graphical Applications</title>
<style>
.pseudocode
{
height: 150pt;
width: 450pt;
background-color: Navy;
}
.msgbox
{
height: auto;
width: 450pt;
background-color: Maroon;
}
.GUI
{
height: 200pt;
width: 450pt;
background-color: DarkGreen;
}
#main-title
{
color: #F00;
font: bold, 24pt, Bodoni MT Black, Georgia, Garamond, serif;
}
.description
{
color: #000;
font: bold, 12pt, Times New Roman, Garamond, Georgia, serif;
}
.preformatted
{
white-space: pre;
font-size: 12pt;
color: Lime;
font-family: Courier New, Georgia, serif;
}
</style>
</head>
<body>
<h1 id="main-title">F# Graphical Applications</h1>
<p class="description">The F# language supports various types of applications,
including graphical applications. In Microsoft Windows, applications used to
be created in the Win32 library. The basic pseudocode to create a Win32
application is as follows:</p>
<section class="pseudocode">
<p class="preformatted">Load the necessary libraries
Include the header files
Create a callback procedure
Handle the events using a switch statement
Create a WinMain function
Create a WNDCLASS/WNDCLASSEX variable
Specify the characteristics of the variable
Assign the callback function to the <i>lpfnWndProc</i> member
Call the RegisterClass/RegisterClassEx() function
Call the CreateWindow/CreateWindowEx() function
Find out if the window was created
Present the window
Handle the operating system messages
End the application</p>
</section>
<p class="description">When it comes to <abbr title="Graphical User Interface">
GUI</abbr> applications in F#, the easiest type to create is to simply
display a message box. Here is an example:</p>
<section class="msgbox">
<p class="preformatted">open System
open System.Windows.Forms
MessageBox.Show("A simple message box is the easiest graphical object to create in F#.", "Exercise", MessageBoxButtons.OK, MessageBoxIcon.Information) |> ignore</p>
</section>
<p class="description">For a more functioning GUI application, the .NET
Framework provides the <b>Form</b> class that includes various properties
and methods that can be used to enhance the application's functionality.
Here is an example of a <b>Form</b>-based application:</p>
<section class="GUI">
<p class="preformatted">open System
open System.Drawing
open System.Windows.Forms
// Form: Picture Viewer
let pictureViewer = new Form(MaximizeBox = false, Text = "Picture Viewer", ClientSize = new System.Drawing.Size(780, 570), StartPosition = FormStartPosition.CenterScreen)
// Picture Box: Viewer
let pbxViewer = new PictureBox(Size = new Size(760, 505), Location = new Point(12, 12), SizeMode = PictureBoxSizeMode.Zoom, BorderStyle = BorderStyle.FixedSingle)
pictureViewer.Controls.Add pbxViewer
// Button: Picture Selection
let btnSelectPicture = new Button(Width = 135, Text = "Select Picture...", Location = new Point(12, 534))
pictureViewer.Controls.Add btnSelectPicture
let ofdPictureSelection = new OpenFileDialog(Filter = "Joint Photographic Experts Group (*.jpg;.jpeg)|*.jpg;*.jpeg|Bitmap Files (*.bmp)|*.bmp|Graphical Interchange Format (*.gif)|*.gif|Portable Network
Graphics (*.png)|*.png|All Files (*.*)|*.*")
let btnSelectPictureClick _ =
if ofdPictureSelection.ShowDialog() = DialogResult.OK then
pbxViewer.Image <- Image.FromFile ofdPictureSelection.FileName
btnSelectPicture.Click.Add btnSelectPictureClick
// Button: Close
let btnClose = new Button(Text = "Close", Location = new Point(697, 534))
pictureViewer.Controls.Add btnClose
let btnCloseClick _ = pictureViewer.Close()
btnClose.Click.Add btnCloseClick
[<EntryPoint>]
[<STAThread>]
let main argv =
Application.Run pictureViewer
0</p>
</section>
<p class="description">You see? Programming is Fun!</p>
</body>
</html>
This would produce:

The Vertical Scroll Bar
If you have text or content that vertically exceeds the
height you allocated for it, you can make the box or element display a vertical
scroll bar so your visitor can navigate up or down in the box. To support the
vertical scroll bar, CSS provides a style named overflow-y. It can take a
value as:
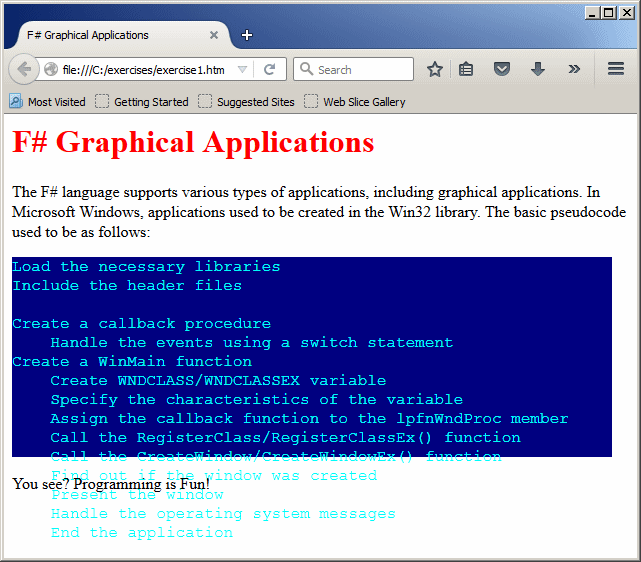
- visible: This is the defualt value. It means that no scroll bar
will show and the whole content of the section or element will display,
including the portion that goes overboard. Here is how the section would look:

- scroll:
The section will display a vertical scroll bar. Part of the content of the
section may be hidden and the visitor can scroll up and down in the section. Here is an example:
<!DOCTYPE html>

<html>
<head>
<title>F# Graphical Applications</title>

<style>
.pseudocode
{
    overflow-y: scroll;
    height:     150pt;
    width:      450pt;
    background-color: Navy;
}

#main-title
{
    color: #F00;
    font:  bold, 24pt, Bodoni MT Black, Georgia, Garamond, serif;
}
.description
{
    color: #000;
    font:  bold, 12pt, Times New Roman, Garamond, Georgia, serif;
}

.preformatted
{
    white-space: pre;
    font-size:   12pt;
    color:       Aqua;
    font-family: Courier New, Georgia, serif;
}

</style>
</head>
<body>

<h1 id="main-title">F# Graphical Applications</h1>

<p class="description">The F# language supports various types of applications,
including graphical applications. In Microsoft Windows, applications used to
be created in the Win32 library. The basic pseudocode to create a Win32
application is as follows:</p>

<section class="pseudocode">
<p class="preformatted">Load the necessary libraries
Include the header files

Create a callback procedure
    Handle the events using a switch statement
Create a WinMain function
    Create a WNDCLASS/WNDCLASSEX variable
    Specify the characteristics of the variable
    Assign the callback function to the <i>lpfnWndProc</i> member
    Call the RegisterClass/RegisterClassEx() function
    Call the CreateWindow/CreateWindowEx() function
    Find out if the window was created
    Present the window
    Handle the operating system messages
    End the application</p>
</section>

<p class="description">You see? Programming is Fun!</p>
</body>
</html>
This would produce:

Even if the height of the section is enough for the box or element to show its whole content, the
box or element would still show the vertical scroll bar. Here is an example:Here is an example:
<html>
<head>
<title>F# Graphical Applications</title>

<style>
.pseudocode
{
    overflow-y: scroll;
    height:     238pt;
    width:      450pt;
    background-color: Navy;
}

. . .

</style>
</head>
<body>

. . .

<p class="description">You see? Programming is Fun!</p>
</body>
</html>
This would produce:

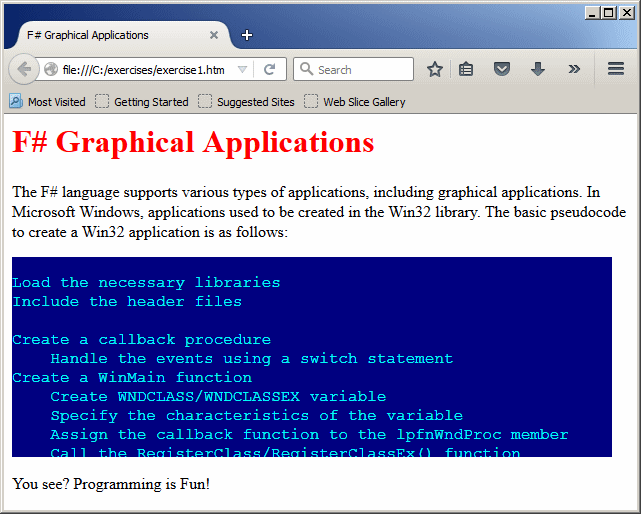
- hidden: The box or element will not show any scroll bar. If the
section cannot show its whole content, the content that is overboard will be
hidden and the visitor cannot navigate to it. Here is how the section may look:

- auto: The browser will decide if the vertical scroll bar is
necessary. It will check the value of the height and the amount of the
content (such as the length or text or the size of a picture or table) and
decide whether the scroll bar is necessary
The Horizontal Scroll Bar
If the contents of a section is too wide for a box or
element to show it completely, CSS provides a style named overflow-y that
can be made to manage it. This style produces a horizontal scroll bar. The style
logically works like its vertical counterpart, except that it appears
horizontally. It uses the same types of values:
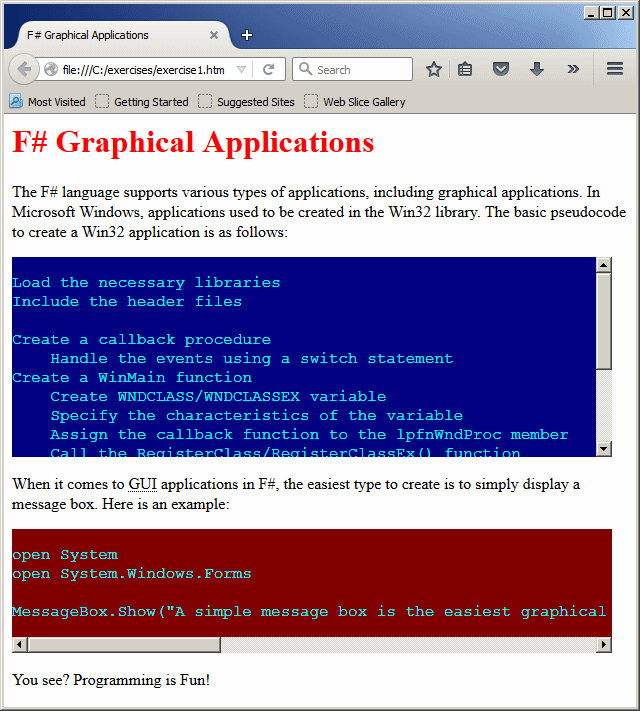
- visible: This defualt value indicates that there will be no
horizontal scroll bar. Here is how the section may appear:

- scroll:
The section will display a horizontal scroll bar so the visitor can scroll
left and right in the section. Here is an example:
<html>
<head>
<title>F# Graphical Applications</title>
<style>
.msgbox
{
overflow-x: scroll;
height: auto;
width: 450pt;
background-color: Maroon;
}
.pseudocode
{
overflow-y: auto;
height: 150pt;
width: 450pt;
background-color: Navy;
}
#main-title
{
color: #F00;
font: bold, 24pt, Bodoni MT Black, Georgia, Garamond, serif;
}
.description
{
color: #000;
font: bold, 12pt, Times New Roman, Garamond, Georgia, serif;
}
.preformatted
{
white-space: pre;
font-size: 12pt;
color: Aqua;
font-family: Courier New, Georgia, serif;
}
</style>
</head>
<body>
<h1 id="main-title">F# Graphical Applications</h1>
<p class="description">The F# language supports various types of applications,
including graphical applications. In Microsoft Windows, applications used to
be created in the Win32 library. The basic pseudocode to create a Win32
application is as follows:</p>
<section class="pseudocode">
<p class="preformatted">Load the necessary libraries
Include the header files
Create a callback procedure
Handle the events using a switch statement
Create a WinMain function
Create a WNDCLASS/WNDCLASSEX variable
Specify the characteristics of the variable
Assign the callback function to the <i>lpfnWndProc</i> member
Call the RegisterClass/RegisterClassEx() function
Call the CreateWindow/CreateWindowEx() function
Find out if the window was created
Present the window
Handle the operating system messages
End the application</p>
</section>
<p class="description">When it comes to <abbr title="Graphical User Interface">
GUI</abbr> applications in F#, the easiest type to create is to simply
display a message box. Here is an example:</p>
<section class="msgbox">
<p class="preformatted">open System
open System.Windows.Forms
MessageBox.Show("A simple message box is the easiest graphical object to create in F#.", "Exercise", MessageBoxButtons.OK, MessageBoxIcon.Information) |> ignore</p>
</section>
<p class="description">You see? Programming is Fun!</p>
</body>
</html>
This would produce:

If the width of the box or element is enough for the box or element to show its whole content, the
box or element would still show a horizontal scroll bar
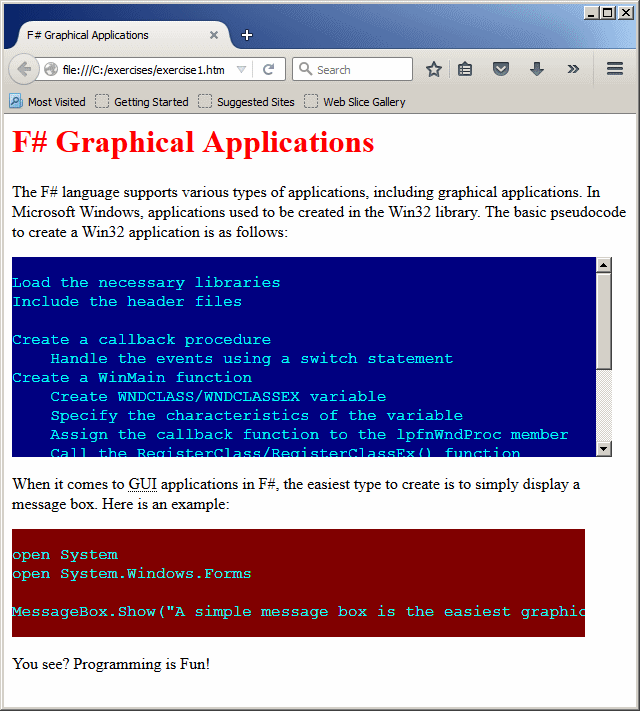
- hidden: The box or element will not show a horizontal scroll bar. If the
content is too wide for the box or element, a section would be hidden and the visitor cannot
access it. Here is an example:
<html>
<head>
<title>F# Graphical Applications</title>
<style>
.msgbox
{
overflow-x: hidden;
height: auto;
width: 430pt;
background-color: Maroon;
}
. . .
</style>
</head>
<body>
<h1 id="main-title">F# Graphical Applications</h1>
. . .
<p class="description">When it comes to <abbr title="Graphical User Interface">
GUI</abbr> applications in F#, the easiest type to create is to simply
display a message box. Here is an example:</p>
<section class="msgbox">
<p class="preformatted">open System
open System.Windows.Forms
MessageBox.Show("A simple message box is the easiest graphical object to create in F#.", "Exercise", MessageBoxButtons.OK, MessageBoxIcon.Information) |> ignore</p>
</section>
<p class="description">You see? Programming is Fun!</p>
</body>
</html>
This would produce:

- auto: The browser will decide if it needs to display the
horizontal scroll bar on the box or element
|
|