Home

Creating a Client Server Application


Practical LearningPractical Learning: Creating the Employees

  1. To add a new class to the project, in the Class View, right- click BethesdaCarRental1 -> Add -> Class...
  2. Set the Class Name to Employee and click Add
  3. Change the Employee.cs file as follows:
    using System;
    using System.Collections.Generic;
    using System.Linq;
    using System.Text;
    
    namespace BethesdaCarRental1
    {
        [Serializable]
        public class Employee
        {
        public string FirstName;
            public string LastName;
            public string Title;
            public double HourlySalary;
    
            // This constructor completely defines an employee
            public Employee(string fname = "Unknown",
                            string lname = "Unknown",
                            string title = "Employee",
                            double salary = 0.00d)
            {
                FirstName = fname;
                LastName = lname;
                Title = title;
                HourlySalary = salary;
            }
    
            public string FullName
            {
                get { return LastName + ", " + FirstName; }
            }
        }
    }
  4. To add another form to the application, in the Solution Explorer, right- click BethesdaCarRental1 -> Add -> Windows Form...
  5. Set the Name to EmployeeEditor and click Add
  6. Design the form as follows: 
     
    Bethesda Car Rental: Employees
     
    Control Text Name Properties
    Label &Employee #:    
    MaskedTextBox   txtEmployeeNumber Mask: 00-000
    Modifiers: public
    Label First Name:    
    TextBox   txtFirstName Modifiers: public
    Label Last Name:    
    TextBox   txtLastName Modifiers: public
    Label Full Name:    
    TextBox   txtFullName Enabled: False
    Modifiers: public
    Label Title:    
    TextBox   txtTitle Modifiers: public
    Label Hourly Salary:    
    TextBox   txtHourlySalary Modifiers: public
    TextAlign: Right
    Button OK btnOK DialogResult: OK
    Button Cancel btnCancel DialogResult: Cancel
    Form     AcceptButton: btnOK
    CancelButton: btnCancel
    FormBorderStyle: FixedDialog
    MaximizeBox: False
    MinimizeBox: False
    ShowInTaskbar: False
  7. Click the Last Name text box
  8. In the Properties window, click the Events button and double-click Leave
  9. Implement the event as follows:
    // This code is used to create and display the customer's full name
    private void txtLastName_Leave(object sender, EventArgs e)
    {
        string strFirstName = txtFirstName.Text;
        string strLastName = txtLastName.Text;
        string strFullName;
    
        if (strFirstName.Length == 0)
            strFullName = strLastName;
        else
            strFullName = strLastName + ", " + strFirstName;
    
        txtFullName.Text = strFullName;
    }
  10. To add a new form to the application, in the Solution Explorer, right-click BethesdaCarRental1 -> Add -> Windows Form...
  11. Set the Name to Employees and click Add
  12. From the Toolbox, add a ListView to the form
  13. While the new list view is still selected, in the Properties window, click the ellipsis button of the Columns field and create the columns as follows:
     
    (Name) Text TextAlign Width
    colEmployeeNumber Empl #   45
    colFirstName First Name   65
    colLastName Last Name   65
    colFullName Full Name   140
    colTitle Title   120
    colHourlySalary Hourly Salary Right 75
  14. Design the form as follows:
     
    Bethesda Car Rental: Employees
     
    Control Text Name Other Properties
    ListView   lvwEmployees Anchor: Top, Bottom, Left, Right
    FullRowSelect: True
    GridLines: True
    View: Details
    Button New Employee... btnNewEmployee Anchor: Bottom, Right
    Button Close btnClose Anchor: Bottom, Right
  15. Double-click an unoccupied area of its body
  16. Change the file as follows:
    using System;
    using System.Collections.Generic;
    using System.ComponentModel;
    using System.Data;
    using System.Drawing;
    using System.Linq;
    using System.Text;
    using System.Windows.Forms;
    using System.IO;
    using System.Runtime.Serialization.Formatters.Binary;
    
    namespace BethesdaCarRental
    {
        public partial class Employees : Form
        {
            // This is the list of employees
            Dictionary<string, Employee> ListOfEmployees;
    
            public Employees()
            {
                InitializeComponent();
            }
    
            internal void ShowEmployees()
            {
                if (ListOfEmployees.Count == 0)
                    return;
    
                // Before displaying the employees, empty the list view
                lvwEmployees.Items.Clear();
                // This variable will allow us to identify the odd and even indexes
                int i = 1;
    
                // Use the KeyValuePair class to visit each key/value item
                foreach (KeyValuePair<string, Employee> kvp in ListOfEmployees)
                {
                    // Create a list view item
                    ListViewItem lviEmployee = new ListViewItem(kvp.Key);
    
                    Employee empl = kvp.Value;
    
                    lviEmployee.SubItems.Add(empl.FirstName);
                    lviEmployee.SubItems.Add(empl.LastName);
                    lviEmployee.SubItems.Add(empl.FullName);
                    lviEmployee.SubItems.Add(empl.Title);
                    lviEmployee.SubItems.Add(empl.HourlySalary.ToString("F"));
    
                    if (i % 2 == 0)
                    {
                        lviEmployee.BackColor = Color.FromArgb(255, 128, 0);
                        lviEmployee.ForeColor = Color.White;
                    }
                    else
                    {
                        lviEmployee.BackColor = Color.FromArgb(128, 64, 64);
                        lviEmployee.ForeColor = Color.White;
                    }
    
                    lvwEmployees.Items.Add(lviEmployee);
    
                    i++;
                }
            }
    
            private void Employees_Load(object sender, EventArgs e)
            {
                ListOfEmployees = new Dictionary<string, Employee>();
                BinaryFormatter bfmEmployees = new BinaryFormatter();
    
                // This is the file that holds the list of parts
                string strFilename = @"\\EXPRESSION\Bethesda Car Rental\Employees.cre";
    
                if (File.Exists(strFilename))
                {
                    FileStream stmEmployees = new FileStream(strFilename,
                                                             FileMode.Open,
                                                             FileAccess.Read,
                                                             FileShare.Read);
    
                    try
                    {
                        // Retrieve the list of employees from the file
                        ListOfEmployees = (Dictionary<string, Employee>)bfmEmployees.Deserialize(stmEmployees);
                    }
                    finally
                    {
                        stmEmployees.Close();
                    }
                }
    
                ShowEmployees();
            }
        }
    }
  17. Return to the Employees form and double-click the New Employee button
  18. Implement its event as follows:
    private void btnNewEmployee_Click(object sender, EventArgs e)
    {
        EmployeeEditor editor = new EmployeeEditor();
    
        // Show the Employee Editor
        if (editor.ShowDialog() == DialogResult.OK)
        {
            if (editor.txtEmployeeNumber.Text == "")
            {
                MessageBox.Show("You must provide an employee number",
                                "Bethesda Car Rental",
                                MessageBoxButtons.OK, MessageBoxIcon.Information);
                return;
            }
    
            if (editor.txtLastName.Text == "")
            {
                MessageBox.Show("You must provide the employee's last name",
                                "Bethesda Car Rental",
                                MessageBoxButtons.OK, MessageBoxIcon.Information);
                return;
            }
    
            string strFilename = @"\\EXPRESSION\Bethesda Car Rental\Employees.cre";
    
            Employee empl = new Employee();
    
            empl.FirstName = editor.txtFirstName.Text;
            empl.LastName = editor.txtLastName.Text;
            empl.Title = editor.txtTitle.Text;
            empl.HourlySalary = double.Parse(editor.txtHourlySalary.Text);
            ListOfEmployees.Add(editor.txtEmployeeNumber.Text, empl);
    
            FileStream bcrStream = new FileStream(strFilename,
                                                  FileMode.Create,
                                                  FileAccess.Write,
                                                  FileShare.Write);
            BinaryFormatter bcrBinary = new BinaryFormatter();
            bcrBinary.Serialize(bcrStream, ListOfEmployees);
            bcrStream.Close();
    
            ShowEmployees();
        }
    }
  19. Display the Central form
  20. Double-click the Employees button and implement its event as follows:
    private void btnEmployees_Click(object sender, EventArgs e)
    {
        Employees dlgEmployees = new Employees();
        dlgEmployees.ShowDialog();
    }
  21. To save the project, on the Standard toolbar, click the Save All button


Practical LearningPractical Learning: Creating the Customers

  1. To add a new class to the project, in the Class View, right-click BethesdaCarRental1 -> Add -> Class...
  2. Set the Class Name to Customer and click Finish
  3. Change the Customer.cs file as follows:
    using System;
    using System.Collections.Generic;
    using System.Linq;
    using System.Text;
    
    namespace BethesdaCarRental1
    {
        [Serializable]
        public class Customer
        {
            public string FullName;
            public string Address;
            public string City;
            public string State;
            public string ZIPCode;
    
            // This constructor defines a customer
            public Customer(string fName = "John Unknown",
                            string adr = "123 Main Street",
                            string ct = "Great City",
                            string ste = "AA",
                            string zip = "00000-0000")
            {
                FullName = fName;
                Address = adr;
                City = ct;
                State = ste;
                ZIPCode = zip;
            }
        }
    }
  4. To add another form to the application, on the main menu, click Project -> Add Windows Forms
  5. Set the Name to CustomerEditor and click Add
  6. Design the form as follows: 
     
    Bethesda Car Rental: Customers
     
    Control Text Name Properties
    Label Driver's Lic. #:    
    TextBox   txtDrvLicNbr Modifiers: Public
    Label State:    
    ComboBox   cbxStates Modifiers: Public
    Items: AL, AK, AZ, AR, CA, CO, CT, DE, DC, FL, GA, HI, ID, IL, IN, IA, KS, KY, LA, ME, MD, MA, MI, MN, MS, MO, MT, NE, NV, NH, NJ, NM, NY, NC, ND, OH, OK, OR, PA, RI, SC, SD, TN, TX, UT, VT, VA, WA, WV, WI, WY
    Label Full Name:    
    TextBox   txtFullName Modifiers: Public
    Label Address:    
    TextBox   txtAddress Modifiers: Public
    Label City:    
    TextBox   txtCity Modifiers: Public
    Label ZIP Code:    
    TextBox   txtZIPCode Modifiers: Public
    Button OK btnOK DialogResult: OK
    Button Close btnCancel DialogResult: Cancel
    Form     AcceptButton: btnOK
    CancelButton: btnCancel
    FormBorderStyle: FixedDialog
    MaximizeBox: False
    MinimizeBox: False
    ShowInTaskbar: False
  7. To add a new form to the application, on the main menu, click Project -> Add Windows Forms
  8. Set the Name to Customers and press Enter
  9. From the Toolbox, add a ListView to the form
  10. While the new list view is still selected, in the Properties window, click the ellipsis button of the Columns field and create the columns as follows:
     
    (Name) Text Width
    colDrvLicNbr Driver's Lic. # 100
    colFullName Full Name 100
    colAddress Address 160
    colCity City 100
    colState State 38
    colZIPCode ZIPCode  
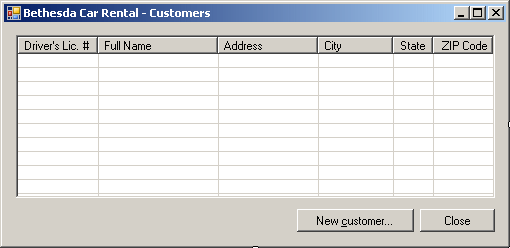
  11. Design the form as follows: 
     
    Bethesda Car Rental: Customers
     
    Control Text Name Other Properties
    ListView   lvwCustomers View: Details
    GridLines: True
    FullRowSelect: True
    Button New Customer... btnNewCustomer Anchor: Bottom, Right
    Button Close btnClose Anchor: Bottom, Right
  12. Double-click an unoccupied area of the form
  13. Change the file as follows:
    using System;
    using System.Collections.Generic;
    using System.ComponentModel;
    using System.Data;
    using System.Drawing;
    using System.Linq;
    using System.Text;
    using System.Windows.Forms;
    using System.IO;
    using System.Runtime.Serialization.Formatters.Binary;
    
    namespace BethesdaCarRental1
    {
        public partial class Customers : Form
        {
            Dictionary<string, Customer> ListOfCustomers;
    
            public Customers()
            {
                InitializeComponent();
            }
    
            internal void ShowCustomers()
            {
                if (ListOfCustomers.Count == 0)
                    return;
    
                lvwCustomers.Items.Clear();
                int i = 1;
    
                foreach (KeyValuePair<string, Customer> kvp in ListOfCustomers)
                {
                    ListViewItem lviCustomer = new ListViewItem(kvp.Key);
    
                    Customer cust = kvp.Value;
    
                    lviCustomer.SubItems.Add(cust.FullName);
                    lviCustomer.SubItems.Add(cust.Address);
                    lviCustomer.SubItems.Add(cust.City);
                    lviCustomer.SubItems.Add(cust.State);
                    lviCustomer.SubItems.Add(cust.ZIPCode);
    
                    if (i % 2 == 0)
                    {
                        lviCustomer.BackColor = Color.Navy;
                        lviCustomer.ForeColor = Color.White;
                    }
                    else
                    {
                        lviCustomer.BackColor = Color.Blue;
                        lviCustomer.ForeColor = Color.White;
                    }
    
                    lvwCustomers.Items.Add(lviCustomer);
    
                    i++;
                }
            }
    
            private void Customers_Load(object sender, EventArgs e)
            {
                ListOfCustomers = new Dictionary<string, Customer>();
                BinaryFormatter bfmCustomers = new BinaryFormatter();
    
                string strFilename = @"\\EXPRESSION\Bethesda Car Rental\Customers.crc";
    
                if (File.Exists(strFilename))
                {
                    FileStream stmCustomers = new FileStream(strFilename,
                                                             FileMode.Open,
                                                             FileAccess.Read,
                                                             FileShare.Read);
    
                    try
                    {
                        // Retrieve the list of employees from file
                        ListOfCustomers = (Dictionary<string, Customer>)bfmCustomers.Deserialize(stmCustomers);
                    }
                    finally
                    {
                        stmCustomers.Close();
                    }
                }
    
                ShowCustomers();
            }
        }
    }
  14. Return to the Customers form and double-click the New Customer button
  15. Implement its event as follows:
    private void btnNewCustomer_Click(object sender, EventArgs e)
    {
        CustomerEditor editor = new CustomerEditor();
    
        if (editor.ShowDialog() == DialogResult.OK)
        {
            if (editor.txtDrvLicNbr.Text == "")
            {
                MessageBox.Show("You must provide the driver's " +
                                "license number of the customer",
                                "Bethesda Car Rental",
                                MessageBoxButtons.OK, MessageBoxIcon.Information);
                return;
            }
    
            if (editor.txtFullName.Text == "")
            {
                MessageBox.Show("You must provide the employee's full name",
                                "Bethesda Car Rental",
                                MessageBoxButtons.OK, MessageBoxIcon.Information);
                return;
            }
    
            string strFilename = @"\\EXPRESSION\Bethesda Car Rental\Customers.crc";
    
            Customer cust = new Customer();
    
            cust.FullName = editor.txtFullName.Text;
            cust.Address = editor.txtAddress.Text;
            cust.City = editor.txtCity.Text;
            cust.State = editor.cbxStates.Text;
            cust.ZIPCode = editor.txtZIPCode.Text;
            ListOfCustomers.Add(editor.txtDrvLicNbr.Text, cust);
    
            FileStream bcrStream = new FileStream(strFilename,
                                                  FileMode.Create,
                                                  FileAccess.Write,
                                                  FileShare.Write);
            BinaryFormatter bcrBinary = new BinaryFormatter();
            bcrBinary.Serialize(bcrStream, ListOfCustomers);
            bcrStream.Close();
    
            ShowCustomers();
        }
    }
  16. Display the Central form
  17. Double-click the Customers button and implement its event as follows:
    private void btnCustomers_Click(object sender, EventArgs e)
    {
        Customers dlgCustomers = new Customers();
        dlgCustomers.ShowDialog();
    }
  18. To save the project, on the Standard toolbar, click the Save All button


Previous Copyright © 2010-2016, FunctionX Next