Home

Topics on Views


A View as a Virtual Table


Introduction

A view is primarily a type. As such, it uses most of the same functionalities of its parent object(s). For example, you open a view the same way you do a table from the Object Explorer. If you just want to see the records, you can right-click the view and click Select Top 1000 Rows. As we will see later, unlike tables, not all views allow data entry. For those that do, you can right-click the view and click Edit Top 200 Rows.

Once a view is opened whether in a Query window or in a View Designer, records navigation is performed the same way for a table: using keys or the mouse.

Practical LearningPractical Learning: Introducing Topics on Views

  1. Start the computer and log in
  2. Launch Microsoft SQL Server and click Connect.
    In the Object Explorer, make sure you have the LambdaSquare2  (codes/LamdaSquare2.txt) database from the previous lesson. If you don't have it, open the codes/LamdaSquare2.sql (codes/LamdaSquare2.txt) file and execute it, then close the LambdaSquare2.sql window.
    In the Object Explorer, expand Databases, expand LambdaSquare2, and expand Views
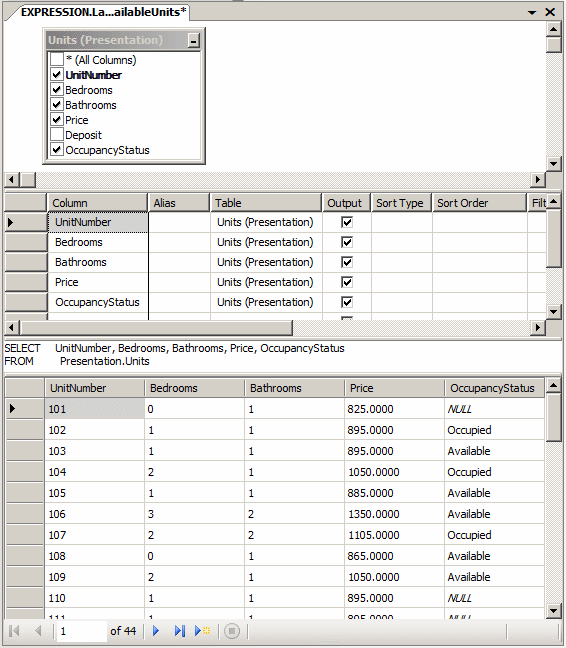
  3. Right-click Presentation.AvailableUnits and click Design
  4. To see the result, on the main menu, click Query Designer -> Execute SQL

Introducing Topics on Views

Views and Expressions

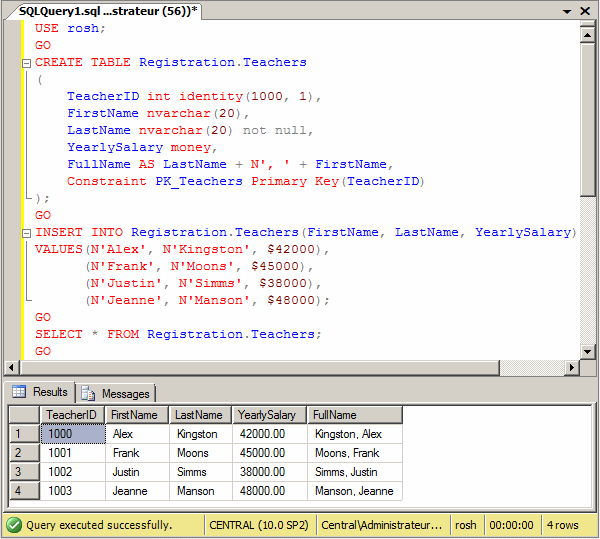
Although both use expressions, one of the fundamental differences of tables and views is in the way each deals with expressions. In a table, you can create an expression that would combine either one or more columns of the table and one ore more external constants, or the same columns of the same table. Here is an example:

USE rosh;
GO
CREATE VIEW Registration.Staff
(
	TeacherID int identity(1000, 1),
	FirstName nvarchar(20),
	LastName nvarchar(20) not null,
	YearlySalary money,
	FullName AS LastName + N', ' + FirstName,
	Constraint PK_Teachers Primary Key(TeacherID)
);
GO
INSERT INTO Registration.Teachers(FirstName, LastName, YearlySalary)
VALUES(N'Alex', N'Kingston', $42000),
      (N'Frank', N'Moons', $45000),
      (N'Justin', N'Simms', $38000),
      (N'Jeanne', N'Manson', $48000);
GO
SELECT * FROM Registration.Teachers;
GO

This would produce:

Views and Expressions

Among the differences is the way the expression is created for each. In a view:

  • An expression is also created by combining columns with other columns or columns with constants
  • The expression is a member of a SELECT statement
  • The AS and the name of the expression are written after the expression

Here is an example:

USE rosh;
GO
CREATE VIEW Registration.Staff
AS
    SELECT LastName + N', ' + FirstName AS FullName,
	   YearlySalary
    FROM Registration.Teachers;
GO

SELECT * FROM Registration.Staff;
GO

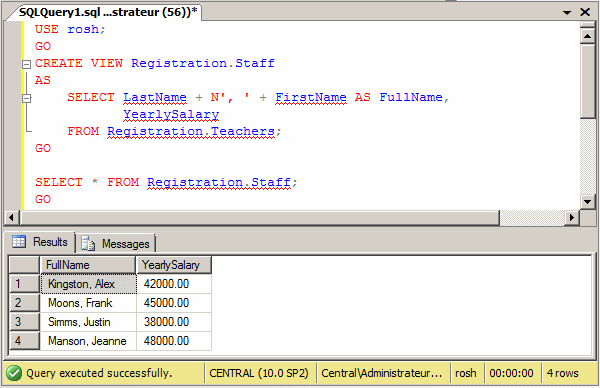
When you execute the view, the expression would produce its value. Here is an example:

Views and Expressions

As mentioned for a table, if you decide to create a record using a view, you are not allowed to specify a value for the expression.

Views and Functions

To create more complex or advanced views, you can involve functions. As always, probably the easiest functions to use are those built-in. 

If there is no built-in function that performs the operation you want, you can create your own. Here is an example:

CREATE FUNCTION Registration.GetFullName
(
	@FName nvarchar(20),
	@LName nvarchar(20)
)
RETURNS nvarchar(41)
AS
BEGIN
	RETURN @LName + N', ' + @FName;
END
GO

 Once you have a function you want to use, you can call it in the body of your view as you judge it necessary. Here is an example:

CREATE VIEW Registration.StaffMembers
AS
SELECT Registration.GetFullName(FirstName, LastName) AS [Full Name]
FROM   Registration.Teachers;
GO

SELECT * FROM Registration.StaffMembers;
GO

This would produce:

Views and Functions

Views and Data Analysis


Introduction

The primary goal of a view is to hold a query that can be used over and over again. For this reason, a view is created from a SELECT statement.

Selecting Fields

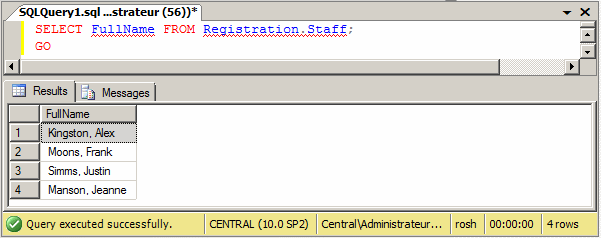
When creating a view, you can add as many columns as you want as long as those columns were already created in the table that holds the original records. As done for data analysis of a table, when you execute a view, you can select just one column from it. Here is an example:

SELECT FullName FROM Registration.Staff;
GO

This would produce:

Views and Data Analysis

In the same way, you can select as many columns as you want.

Introduction to Selecting Records in a View

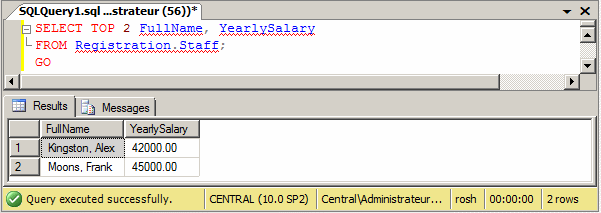
By default, when you execute a view, you would get all records. If you want, you can use TOP to specify a percentage of, or a number of, first records to select. Here is an example:

SELECT TOP 2 FullName, YearlySalary
FROM Registration.Staff;
GO

This would produce:

Selecting Records

Besides adding columns to a view, you can set a condition to restrict the resulting records. Of course, a condition is set using WHERE. To visually set a condition, either start a view by right-clicking Views and New View in the Object Explorer or right-click it and click Design. In the Criteria pane, click the box at the intersection of the column and Filter, and type the conditional value.

To programmatically set a condition:

  • If you are programmatically creating a new view, add a WHERE condition. Here is an example:
    CREATE VIEW Registration.Boys
    AS
    SELECT FirstName,
           LastName,
           Gender,
           ParentsNames
    FROM Registration.Students
    WHERE Gender = N'male';
    GO
  • If the view exists already, you can still ALTER it and add or modify the condition. Here is an example:
    ALTER VIEW FemaleStudents
    AS
    SELECT FirstName,
           LastName,
           ParentsNames
    FROM Registration.Students
    WHERE Gender = N'female';
    GO

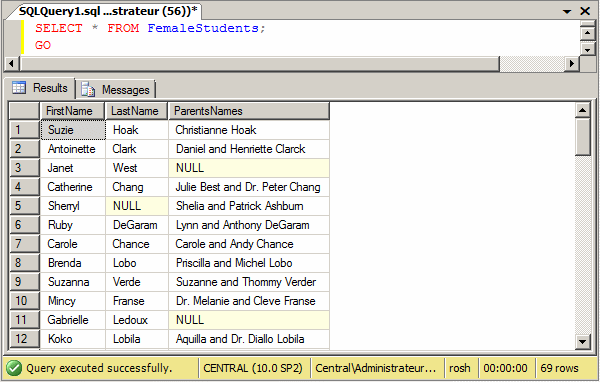
When executing a view that has a condition, you can simply apply the SELECT keyword to the name of the view. Here is an example:

SELECT * FROM FemaleStudents;
GO

This would produce:

Views and Data Analysis

Notice the number of records.

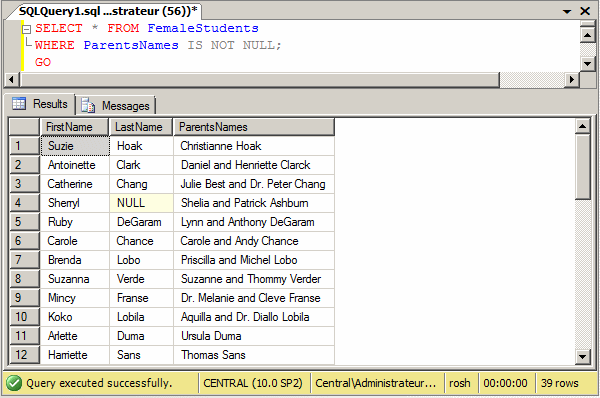
Just as done for tables, when SELECTing records from a view, whether it already has a condition or not, you can specify a condition to restrict the records it produces. Here is an example:

SELECT * FROM FemaleStudents
WHERE ParentsNames IS NOT NULL;
GO

This would produce:

Views and Data Analysis

Notice a different number of records.

All the rules we reviewed for data analysis on tables are also available on views:

  • Creating a view that includes records with null values on a certain field. Here is an example:
    CREATE VIEW Registration.UnknownParents
    AS
    SELECT FirstName,
           LastName,
           Gender,
           ParentsNames
    FROM Registration.Students
    WHERE ParentsNames IS NULL;
    GO
  • Creating a view that includes a condition tied to a column but omit that column in the result. Here is an example:
    CREATE VIEW Registration.Girls
    AS
    SELECT FirstName,
           LastName,
           DateOfBirth,
           ParentsNames
    FROM Registration.Students
    WHERE Gender = N'female';
    GO
  • Creating a view that has a condition that compares strings based on a certain field. Here is an example:
    CREATE VIEW Registration.StudentsInSilverSpring
    AS
    SELECT FirstName,
           LastName,
           Gender,
           ParentsNames
    FROM Registration.Students
    WHERE City = N'silver spring';
    GO
  • Creating a view that uses a pattern in the condition. Here is an example:
    USE Exercise;
    GO
    CREATE VIEW LastNamesThatIncludeAN
    AS
    SELECT [First Name],[Last Name], Salary
    FROM Employees
    WHERE [Last Name] LIKE N'%an%';
    GO
  • Creating a view that uses a condition based on a number-based field. Here is an example:
    USE Exercise;
    GO
    CREATE VIEW Personnel.EmployeesWhoEarnMoreThan15Dollars
    AS
    SELECT [Last Name], [First Name], Salary
    FROM Personnel.Employees
    WHERE Salary !< 15.00;
    GO
  • Creating a view that includes a condition based on a Boolean field. Here is an example:
    CREATE VIEW Registration.StudentsInASingleParentHome
    AS
    SELECT FirstName,
           LastName,
           DateOfBirth,
           EmergencyName,
           EmergencyPhone
    FROM Registration.Students
    WHERE SingleParentHome = 1;
    GO
  • Creating a view that uses a condition based on a date/time-based field. Here is an example:
    CREATE VIEW Registration.StudentsBornIn1995
    AS
    SELECT FirstName,
           LastName,
           DateOfBirth,
           EmergencyName,
           EmergencyPhone
    FROM Registration.Students
    WHERE DateOfBirth >= N'01/01/1995';
    GO
  • Creating a view that combines conditions. Here is an example:
    CREATE VIEW Registration.EmergencyInformation
    AS
    SELECT FirstName,
           LastName,
           Gender,
           DateOfBirth
    FROM Registration.Students
    WHERE (EmergencyName IS NOT NULL) AND (EmergencyPhone IS NOT NULL);
    GO
  • Creating a view that includes a BETWEEN or an IN operation
  • Creating a view that negates any of the above conditions

You cannot specify an option to sort records in a view unless the SELECT statement includes a TOP.

Practical LearningPractical Learning: Adding a Condition to a View

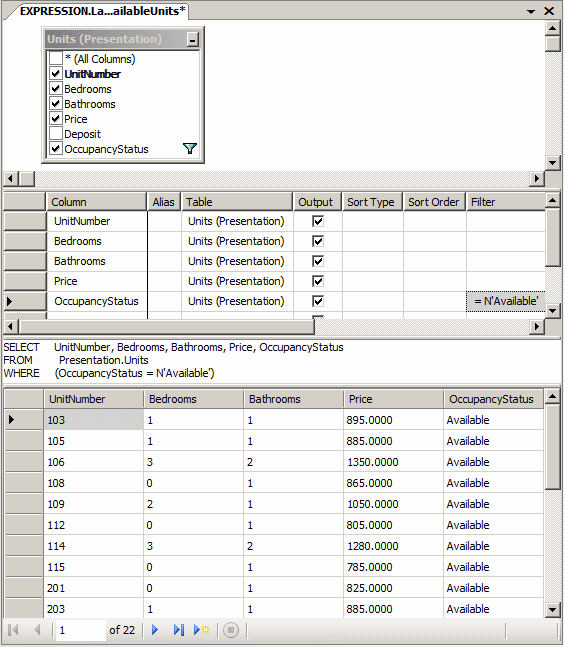
  1. In the Criteria pane, click the box at the intersection of OccupancyStatus and Filter
  2. Type Available
  3. To see the result, on the main menu, click Query Designer -> Execute SQL

    Introducing Topics on Views

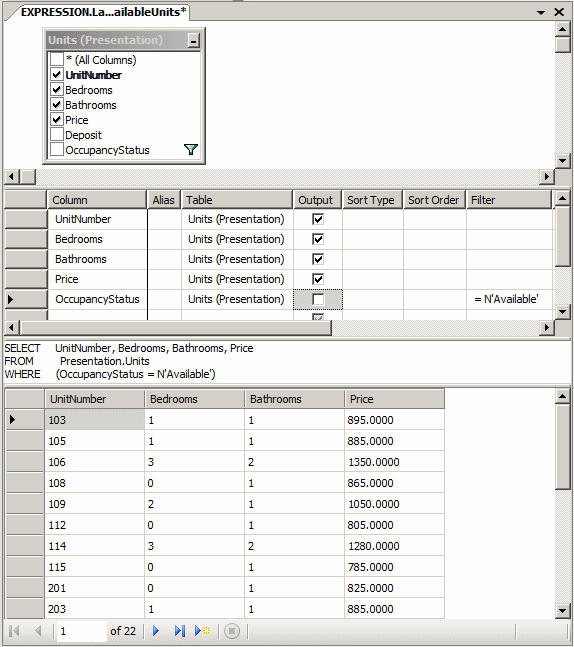
  4. Since we already know that all records in this view have an Available value, there is no reason to have that field in the view.
    In the Criteria pane, click the check box at the intersection of OccupancyStatus and Output to remove that check box
  5. To see the result, on the View Designer toolbar, click the Execute SQL button Execute SQL

    Introducing Topics on Views

  6. Close the view
  7. When asked whether you want to save, click Yes

Selecting Distinct Records in a View

Consider the following view:

USE Exercise;
GO
CREATE TABLE Personnel.Employees(EmployeeNumber nchar(10), [First Name] nvarchar(20),
	[Last Name] nvarchar(20), Salary money, [Full Time?] bit);
GO
INSERT INTO Personnel.Employees
VALUES(N'29730', N'Philippe', N'Horsford', 20.05, 1),
      (N'28084', N'Joan', N'Shepherd', 12.72, NULL),
      (N'44179', NULL, N'Shepherd', 10.59, 1),
      (N'27924', N'Gregory', N'Hope', 12.85, 1),
      (N'79272', N'Joshua', N'Anderson', 18.26, 2),
      (N'22803', N'Gregory', N'Swanson', 15.95, NULL),
      (N'39742', NULL, N'Anders', 8.88, 2),
      (N'83084', N'Josephine', N'Anderson', 20.02, 1),
      (N'51508', N'James', N'Anders', 18.26, 1),
      (N'92485', N'John', N'Anderson', 12.49, NULL);
GO

CREATE VIEW Personnel.Contractors
AS
    SELECT [First Name], [Last Name], Salary
    FROM Personnel.Employees;
GO

We already know how to select records from a view. Here is an example:

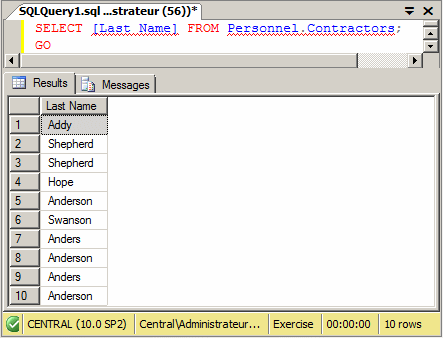
SELECT [Last Name] FROM Personnel.Contractors;
GO

This would produce:

Views and Data Analysis

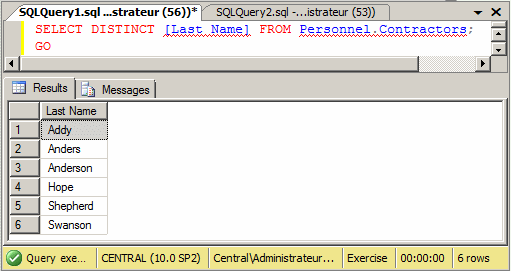
Notice the number of records. If you have records that have a repeating value in a view, when selecting those records, you can ask the database engine to select them distinctively. This is done by using the DISTINCT. Here is an example:

SELECT DISTINCT [Last Name] FROM Personnel.Contractors;
GO

This would produce:

Views and Data Analysis


Views and Joins


Introduction

Asides from their similarities and differences, tables and views have advantages and disadvantages each. One of the disadvantages of performing data analysis on a table is that, once you close the table, you lose the whole SQL statement you have created or written. Imagine the statement was complex or it involved many tables, and you lose it. Next time, you would have to re-create the statement. This is where one of the biggest advantages of a view is revealed. A view makes it possible to create a SELECT statement, save it, and "play" (execute) it as often as necessary. Another obvious advantages of a view is that it can be modified as many times as necessary, saved, and re-used to produced the new results.

A View With Many Tables

As seen in our introduction to joins, you can create a view that involves more than one table or more than one view. If you are starting a view, on the Add Table dialog box, click each table and click Add or double-click the desired tables. Then click OK.

After selecting the table, the design is done the same way we saw when studying joins:

  • As seen for the joins, if you are using more than one table and they are not (yet) related, you can drag a column from one table and drop it on another table to create a JOIN between them
  • To select the columns, you can use any of the sections or panes: The Diagram pane, the Criteria pane, or the SQL pane

Practical LearningPractical Learning: Creating Views With Joins

  1. In the Object Explorer, under LambdaSquare2, right-click Views and click New View...
  2. In the Add Table dialog box, double-click Tenants (Rentals) and Allocations (Rentals)
  3. Click Close
  4. In the Allocations (Rentals) table, click the check box of UnitNumber
  5. In the Tenants (Rentals) table, click the check box of FullName
  6. In the Allocations (Rentals) table, click the check box of MonthlyPayment
  7. Click an empty area in the View Designer
  8. In the Properties window, click Schema, then click the arrow of its combo box and select Rentals
  9. Close the view
  10. When asked whether you want to save, click Yes
  11. Set the name to UnitsAllocated
  12. Click OK
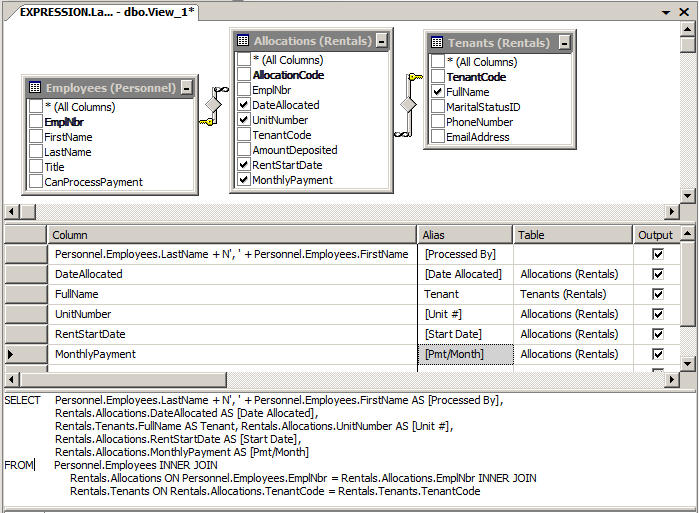
  13. In the Object Explorer, under LambdaSquare2, right-click Views and click New View...
  14. In the Add Table dialog box, double-click Employees (Personnel), Allocations (Rentals), and Tenants (Rentals)
  15. Click Close
  16. In the Criteria pane, click the first box under Column and type LastName + N', ' + FirstName
  17. Press Tab and type Processed By
  18. In the Allocations (Rentals) table, click the check box of DateAllocated
  19. In the Tenants (Rentals) table, click the check box of FullName
  20. In the Allocations (Rentals) table, click the check boxes of UnitNumber, RentStartDate, and MonthlyPayment
  21. In the Properties window, click Schema, then click the arrow of its combo box and select Rentals
     
    Views With Joins
  22. Click an empty area in the View Designer
  23. In the Properties window, click Schema, then click the arrow of its combo box and select Rentals
  24. Close the view
  25. When asked whether you want to save, click Yes
  26. Set the name to AllocationsSummary
  27. Click OK
  28. To execute one of the views, in the Object Explorer, right-click Rentals.UnitsAllocated and click Select Top 1000 rows
  29. Close the view
  30. Still in the Object Explorer, right-click Rentals.AllocationsSummary and click Select Top 1000 rows
  31. Close the Query window
  32. In the Object Explorer, under LambdaSquare2, right-click Views and click New View...
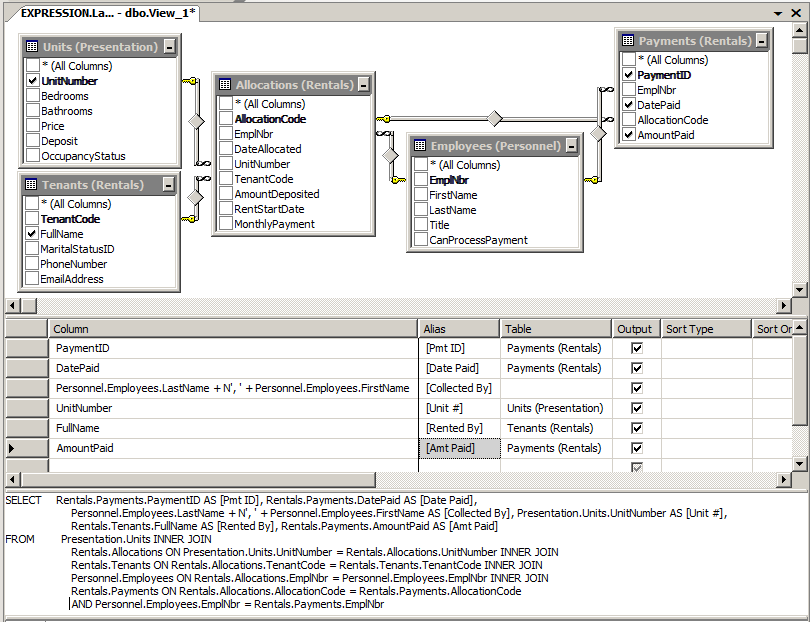
  33. In the Add Table dialog box, double-click Units (Presentation), Tenants (Rentals), Allocations (Rentals), Employees (Personnel), and Payments (Rentals)
  34. Click Close
  35. In the Payments (Rentals) table, click the check boxes of PaymentID and DatePaid
  36. In the Criteria pane, click the first empty box under Column and type LastName + N', ' + FirstName
  37. Press Tab and type Collected By
  38. In the Units (Presentation) table, click the check box of UnitNumber
  39. In the Tenants (Rentals) table, click the check box of FullName
  40. In the Payments (Rentals) table, click the check box of AmountPaid
     
    Views With Joins
  41. Click an empty area in the View Designer
  42. In the Properties window, click Schema, then click the arrow of its combo box and select Rentals
  43. To save the view, on the View Designer toolbar, click the Save button Save
  44. Set the name to PaymentsSummary
  45. Click OK
  46. Close the view
  47. In the Object Explorer, right-click Rentals.PaymentsSummary and click Select Top 1000 rows
  48. Close the view

View in Joins and Data Analysis

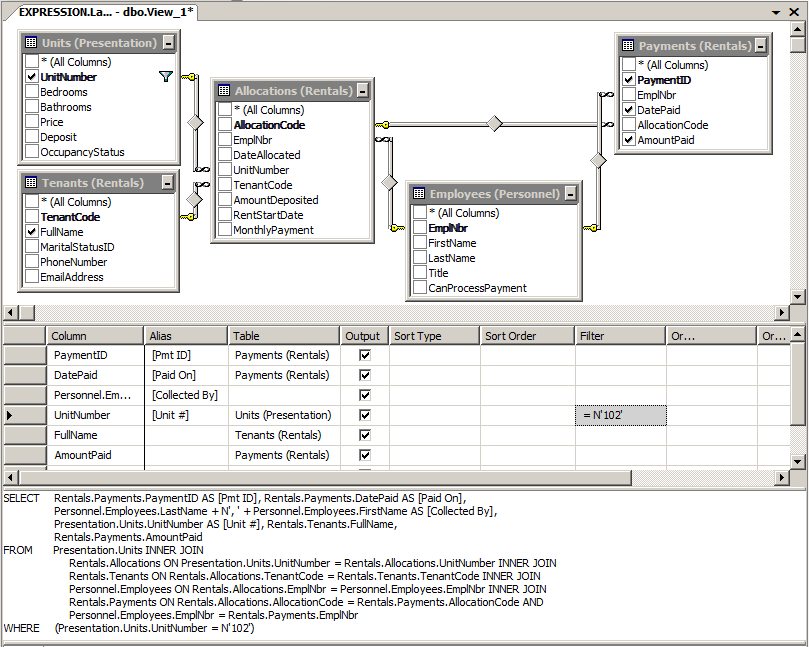
After adding tables to a view, you can set a criterion by which the records would be selected and kept. If you are working visually, you must first select a column in the desired table or view, then use its corresponding box in the Filter column of the Criteria pane. Of course, you can add manually write code in the SQL pane.

If you are writing code, you can also add a WHERE condition to your SELECT statement using the field(s) of your choice and/or a condition of your choice.

Practical LearningPractical Learning: Adding Conditions to Views and Joins

  1. In the Object Explorer, under LambdaSquare2, right-click Views and click New View...
  2. In the Add Table dialog box, double-click Units (Presentation), Tenants (Rentals), Allocations (Rentals), Employees (Personnel), and Payments (Rentals)
  3. Click Close
  4. In the Payments (Rentals) table, click the check boxes of PaymentID and DatePaid
  5. In the Criteria pane, click the first empty box under Column and type LastName + N', ' + FirstName
  6. Press Tab and type Collected By
  7. In the Units (Presentation) table, click the check box of UnitNumber
  8. In the Tenants (Rentals) table, click the check box of FullName
  9. In the Payments (Rentals) table, click the check box of AmountPaid
  10. In the Criteria pane, click the box at the intersection of UnitNumber and Filter
  11. Type 102
     
    Views With Joins
  12. In the Properties window, click Schema, then click the arrow of its combo box and select Rentals
  13. Close the view
  14. When asked whether you want to save, click Yes
  15. Set the name to PaymentsForUnit102
  16. Click OK
  17. To execute the view, in the Object Explorer, right-click Rentals.PaymentsForUnit102 and click Select Top 1000 Rows
  18. Close the view

Data Maintenance Using a View


Introduction

You can use a view to perform such operations as updating records or removing records. To take care of such actions, the view must be based on only one table. Here is an example of such a view:

USE Exercise;
GO
CREATE TABLE Personnel.EmploymentStatus
(
	StatusID int identity(1, 1),
	[Status] nvarchar(30) not null,
	Constraint PK_EmploymentStatus Primary Key(StatusID)
);
GO
CREATE TABLE Personnel.Employees
(
	EmplNbr nchar(10) not null,
	FirstName nvarchar(20),
	LastName nvarchar(20),
	Salary money,
	EmplStatus int null
	Constraint FK_EmploymentStatus Foreign Key
		References Personnel.EmploymentStatus(StatusID),
	Constraint PK_Employees Primary Key(EmplNbr));
GO
INSERT Personnel.EmploymentStatus([Status])
VALUES(N'Full Time'), (N'Part Time'), (N'Contractor'), (N'Unknown');

INSERT INTO Personnel.Employees
VALUES(N'29730', N'Philippe', N'Horsford', 20.05, 1),
      (N'28084', N'Joan', N'Shepherd', 12.72, NULL),
      (N'44179', NULL, N'Shepherd', 10.59, 1),
      (N'27924', N'Gregory', N'Hope', 12.85, 1),
      (N'79272', N'Joshua', N'Anderson', 18.26, 2),
      (N'22803', N'Gregory', N'Swanson', 15.95, NULL),
      (N'39742', NULL, N'Anders', 8.95, 2),
      (N'83084', N'Josephine', N'Anderson', 20.02, 1),
      (N'51508', N'James', N'Anders', 18.26, 1),
      (N'92485', N'John', N'Anderson', 12.49, NULL);
GO

CREATE VIEW Personnel.PartTimers
AS
    SELECT FirstName, LastName, EmplStatus
    FROM   Personnel.Employees
    WHERE  EmplStatus = 2;
GO

Updating Records Using a View

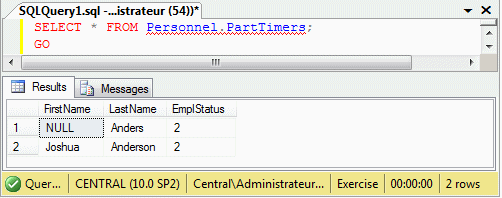
The operation of updating records using a view follows the same rules as those of a table. As you may know already, you can create a view that has a condition and only the records that follow that condition would be included in the result. The above view would produce:
Updating Records Using a View

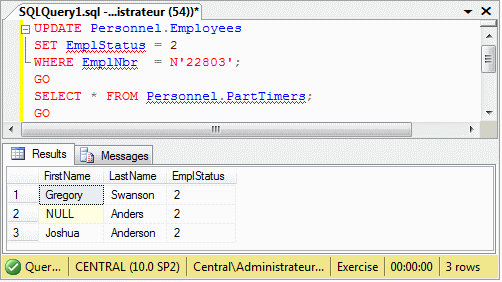
Notice the number of records. There are two ways you can update data: using a table or using a view. We have already seen how to update records using a table. If you use a table, after updating the records, the view would show the result. Consider the following example:

UPDATE Personnel.Employees
SET EmplStatus = 2
WHERE EmplNbr  = N'22803';
GO
SELECT * FROM Personnel.PartTimers;
GO

This would produce:
Updating Records Using a View

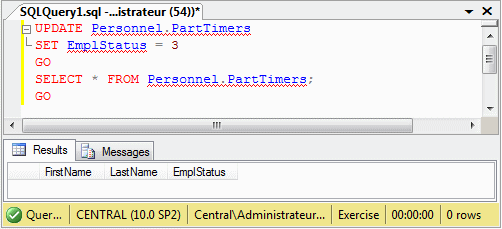
Notice that, this time, the view has a different number of records. In the same way, you can update records using a view. The advantage is that the view already contains a condition. You can simply SET the desired value. Here is an example:

UPDATE Personnel.PartTimers
SET EmplStatus = 3;
GO
SELECT * FROM Personnel.PartTimers;
GO

This would produce:
Updating Records Using a View

Checking the Condition on a View Before Updating

As mentioned already, if you update records using a view, the table would be updated. Consequently, based on the criteria set in the view, the view's result may not show the record(s) that was (were) lost. If you decide to update one or more records using a view, you can ask the database engine to first check whether one or more records in the view would be lost.

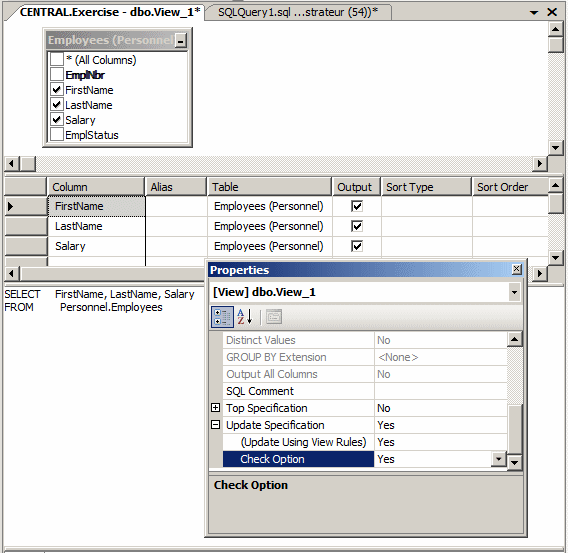
To visually specify the checking, if you are creating the view, in the Properties window, expand the Update Specification field. Set the (Update Using View Rules) field to Yes. Then set the Check Option to Yes:
Checking the Condition on a View Before Updating

To programmatically apply a check, add a WITH CHECK OPTION flag before the end of the statement. The formula to follow would be:

CREATE VIEW [SchemaName.]ViewName
AS
SELECT Statement
WITH CHECK OPTION

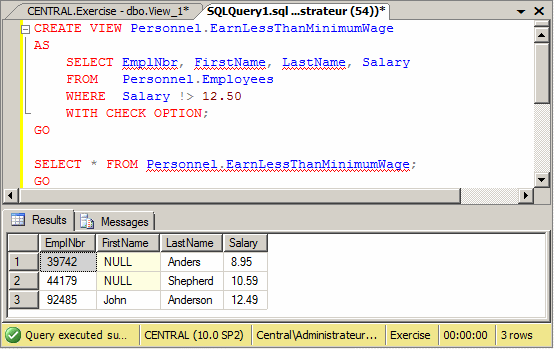
Here is an example:

CREATE VIEW Personnel.EarnLessThanMinimumWage
AS
    SELECT EmplNbr, FirstName, LastName, Salary
    FROM   Personnel.Employees
    WHERE  Salary !> 12.50
    WITH CHECK OPTION;
GO
Checking the Condition on a View Before Updating

If the view was created already and you want to visually add the checking process to it, in the Object Explorer, right-click the view and click Design. In the Properties window, expand the Update Specification field. Set (Update Using View Rules) to Yes. Then set the Check Option to Yes. To do the same thing with code, ALTER the view and add a WITH CHECK OPTION flag at the end of the statement. The formula to follow would be:

ALTER VIEW [SchemaName.]ViewName
AS
SELECT Statement
WITH CHECK OPTION

Here is an example:

ALTER VIEW Personnel.PartTimers
AS
    SELECT EmplNbr, FirstName, LastName, EmplStatus
    FROM   Personnel.Employees
    WHERE  EmplStatus = 2
    WITH CHECK OPTION;
GO

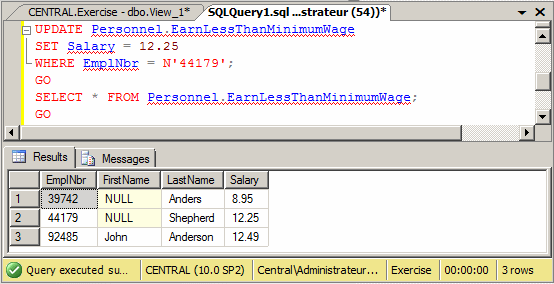
After adding this flag, if you update one or more records using the view, if the updated record(s) is under the condition specified in the view, the update will work just fine. Here is an example:

UPDATE Personnel.EarnLessThanMinimumWage
SET Salary = 12.25
WHERE EmplNbr = N'44179';
GO
Checking the Condition on a View Before Updating

On the other hand, if you call the view to update the record(s) and if at least one record that must be changed is outside the condition specified in the condition of the view, the update will be dismissed. Here is an example:

UPDATE Personnel.EarnLessThanMinimumWage
SET Salary = 14.05
WHERE EmplNbr = N'92485';
GO
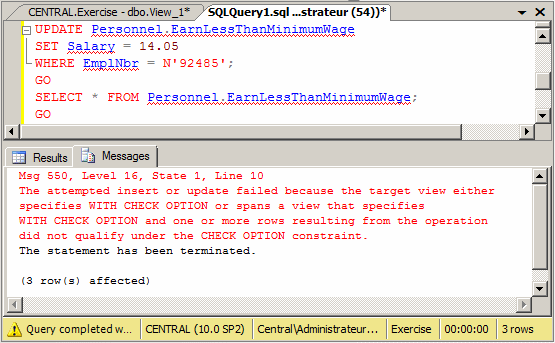
Checking the Condition on a View Before Updating

If you perform the same operation using a table, it would work fine and there would not be an error.

Deleting Records Using a View

You can remove records from a database using either a table or a view. We already know how to delete records using a table. Whe it comes to a view, you can first create one that includes a condition that isolates one or more records.

If you delete a record using a table, a view that depends on that table who not show that record anymore. As seen for updating records, if you create a view that has a condition and you decide to delete the record(s) that follow the condition(s) in that view, you can simply call DELETE on that view and all of the records that view shows would be removed from the table.


Previous Copyright © 2007-2013, FunctionX, Inc. Next