|
After creating and executing a view, you can change its
name with little worries with regards to its functionality.
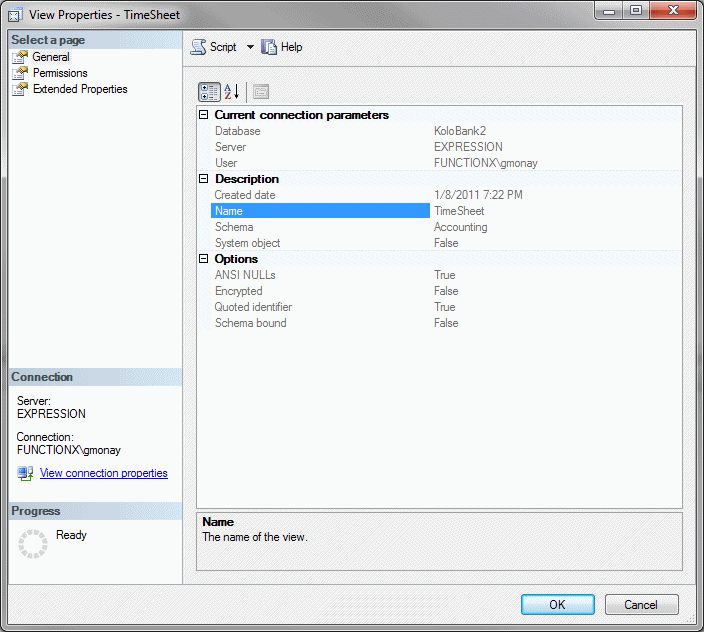
To visually rename a view, in the Object Explorer,
right-click the name of the view and click Rename. the name of the view will
be highlighted without its schema. You can then type the new name.
To programmatically rename a view, open a Query window
and use the following formula:
sp_rename CurrentViewName, NewName;
If the view uses a schema other than dbo, you must
include it in the CurrentViewName. Here is an example:
sp_rename N'Personnel.StaffMembers', N'EmployeesNames';
GO
When renaming a view, you must take care of the
permissions associated with it because those permissions will be lost.
After a view has been created, either by you or someone
else, you may find out that it has an unnecessary column, it needs a missing
column, it includes unnecessary records, or some records are missing.
Fortunately, you can change the structure or the code of a view. This is
referred to as altering a view.
Most of the time, normal users are never asked to modify
a view. On the other hand, a developer who has to modify a view must have at
least the ALTER permission on the view. Here is an example
that grants the ALTER permission to a login:
GRANT ALTER
ON OBJECT::Personnel.StaffMembers
TO [Orlando Perez];
GO
Here is an example of denying a developer the ability to
modify a view:
DENY ALTER
ON OBJECT::Registration.Students
TO [Raymond Kouma];
GO
Here is an example that revokes a DENY right that was
previously granted to a developer:
REVOKE ALTER
ON OBJECT::Personnel.StaffMembers
TO [Orlando Perez];
GO
There are many options to modify a view:
- To visually change the appearance of a view, in the Object Explorer,
right-click the view and click Design. From the View Designer, you can
add or remove the columns. You can also change any options in one of the
panes. After modifying the view, save and close it
- From the Object Explorer, right-click the view, position the mouse
on Script View As -> ALTER To -> New Query Editor Window
- Open a Query window and type code as we will see next
The basic formula to programmatically modify a view is:
ALTER VIEW ViewName
AS
SELECT Statement
You start the alteration with the ALTER VIEW
expression followed by the name of the view. After the name of the view, use
the AS keyword to specify that you are ready to show the change.
After the AS keyword, you can then define the view as you see fit.
For example, you can create a SELECT statement that includes a
modification of the existing code or a completely new statement.
Here is an example:
ALTER VIEW FemaleStudents
AS
SELECT FirstName,
       LastName,
       DateOfBirth,
       Gender,
       ParentsNames
FROM Registration.Students;
GO
Instead of modifying a view, if you find it altogether
useless, you can remove it from its database. You must first consider who
will have that responsibility. Obviously, users are never or hardly asked to
remove a view.
A developer who has to delete a view must have the
DELETE permission.
To delete a view:
- In the Object Explorer, in a database, right-click the name of the
view and click Delete. You would be given the opportunity to confirm
your intention or to change your mind
- In the Object Explorer, right-click the view, position the mouse on
Script View As -> DROP To New Query Editor Window
- Open an empty Query window associated with the database that has the
undesired view
- From the Template Explorer, in the View node, drag Drop View and
drop it in the Query window
- Use code as we will see next
The formula to programmatically delete a view is:
DROP VIEW ViewName
On the right side of the DROP VIEW expression,
enter the name of the undesired view. Here is an example:
DROP VIEW FemaleStudents;
GO
Then execute the statement. You will not be warned
before the interpreter deletes the view.
When creating a view, you have the option of specifying
its schema. In reality, like every object in the database, a view must be
owned by a schema. You have many options. By default, when you create a
view, if you don't specify a schema, it would be owne by dbo.
Instead of using dbo, you can use another schema of your
choice and assign it to the view. If you had already created a schema in
your database, you can use it or create a new schema.
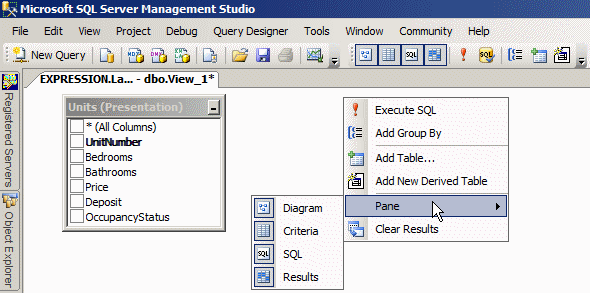
To visually assign a schem to a view:
- If you are creating a new view, start the view as you would normally
and select the necessary table(s)
- If the view exists already, in the Object Explorer, right-click it
and click Design
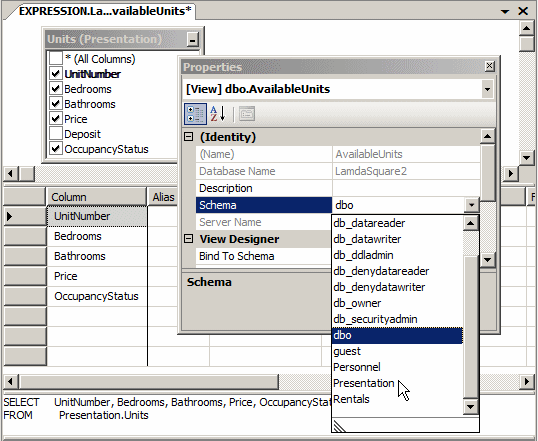
In the Properties window, click Schema, then click the
arrow of its combo box and select from the list. If you are creating a view
with code, precede the name of the view with the name of the schema.
Once/when a view belongs to a schema, in which case the
view is not using the default dbo schema, the developer
must have the ALTER permission on that schema. As mentioned
for tables, you should know how to plan the permissions among schemas and
views, namely what rights to grant, which ones to deny, and when to revoke a
permission.
|
 Practical
Learning: Assigning a View to a Schema Practical
Learning: Assigning a View to a Schema
|
|
- In the Object Explorer, under Views of the LambdaSquare2 database,
right-click dbo.AvailableUnits and click Design
- If the Properties window is not visible, on the main menu, click
View -> Properties window.
In the Properties window, click Schema.
Then click the arrow of its combo box and select Presentation
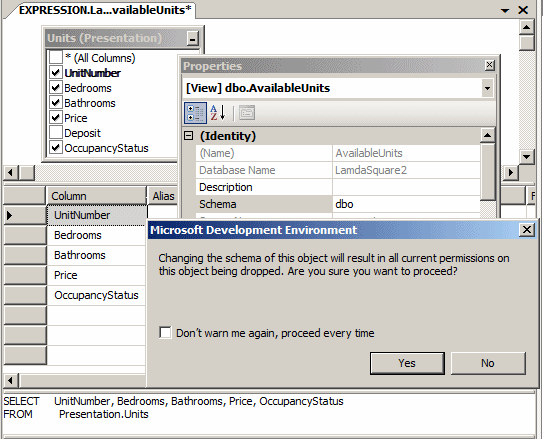
- Read the message box that appears and click Yes
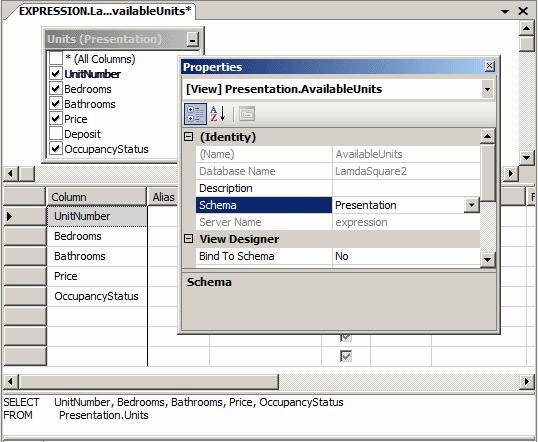
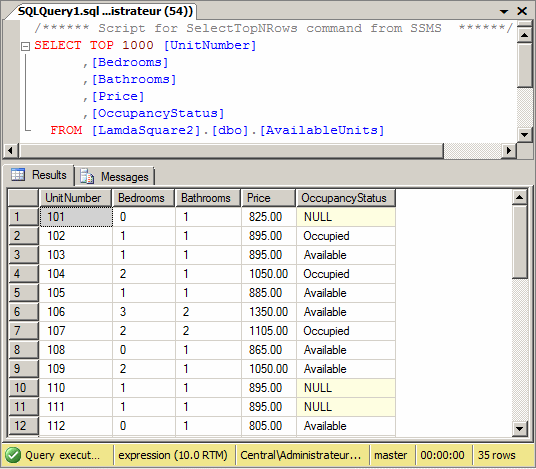
- To see the result of the view, on the main menu, click Query
Designer -> Execute SQL
- On the Standard toolbar, click the Save button

|
Binding a View to its Parent
|
|
When you have created a view, you know that the records
it displays are tied to its parent table. Consider the following example:
CREATE DATABASE Exercise8;
GO
USE Exercise8;
GO
CREATE SCHEMA Personnel;
GO
CREATE TABLE Personnel.Employees
(
	EmplNbr nchar(10),
	FirstName nvarchar(20),
	LastName nvarchar(20),
	Salary money,
	FullTime bit
);
GO
INSERT INTO Personnel.Employees
VALUES(N'524-880', N'Barbara', N'Grisby', 14.85, 1),
	  (N'688-364', N'Terrence', N'North', 22.05, NULL),
	  (N'461-852', N'Michael', N'Goldsmith', 22.14, 0),
	  (N'264-853', N'David', N'Ecker', 20.04, 1),
	  (N'207-025', N'Julie', N'Flanell', 36.55, 1),
      (N'684-946', N'Kevin', N'Rhems', 15.86, NULL);
GO
CREATE VIEW Personnel.Identifications
AS
SELECT EmplNbr, FirstName, LastName
FROM Personnel.Employees;
GO

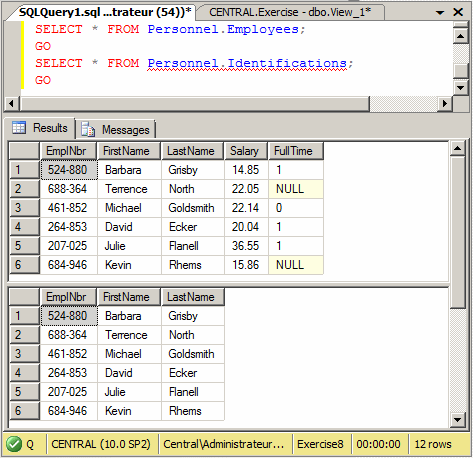
SELECT * FROM Personnel.Employees;
GO
SELECT * FROM Personnel.Identifications;
GO
This would produce:
For one reason or another, you may have to make
modifications on the parent table. For example, you may want to change the
data type and/or name of a column but without touching the view(s) that
depend on that table. What would happen? Consider the following example that
renames a column on a table:
sp_rename N'Personnel.Employees.EmplNbr', N'EmployeeNumber', N'COLUMN';
GO
This code would execute successfully and the column
would be renamed:

After renaming the column, you can use it in a SELECT
statement of the table:
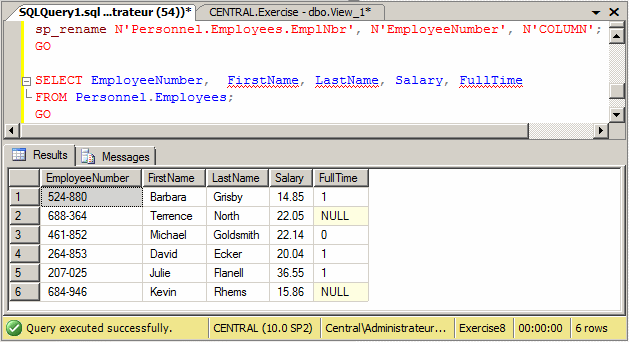
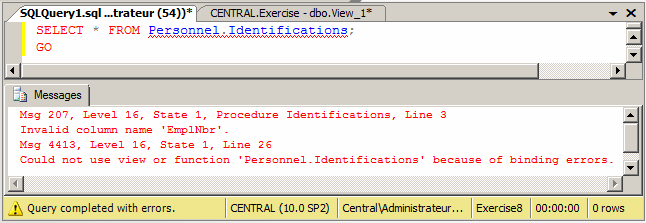
Since the view would still be using the previous
definition of the table, in this case the previous name of the column, if
the user tries executing the view, the database engine would produce an
error. Here is an example:
The solution is to prevent any changes on a parent table
if that change would affect the view(s) that depend on that table. To set
this, if you are visually creating the view, in the Properties window, set
the Bind to Schema field to Yes. It the view exists already, open it in
Design and, in the Properties window, set the Bind to Schema field to Yes.
It you are creating the view with code, before the AS
keyword, add the WITH SCHEMABINDING flag. The formula to follow is:
CREATE VIEW [SchemaName.]ViewName
WITH SCHEMABINDING
AS
SELECT Statement
Hee is an example:
CREATE VIEW Personnel.EmploymentStatus
WITH SCHEMABINDING
AS
    SELECT FirstName, LastName, FullTime
    FROM Personnel.Employees;
GO
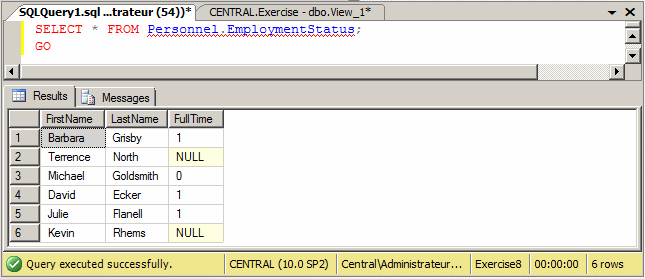
You can then execute the view when necessary. Here is an
example:
SELECT * FROM Personnel.EmploymentStatus;
GO
This would produce:
Now, imagine you want to change something on the parent
table. For this example, let's try to change the data type of the FullTime
column:
ALTER TABLE Personnel.Employees
ALTER COLUMN FullTime int;
GO
If you make the modification visually using the View
Designer, or if you try executing the code, when you execute it, you would
receive an error. Here is an example:
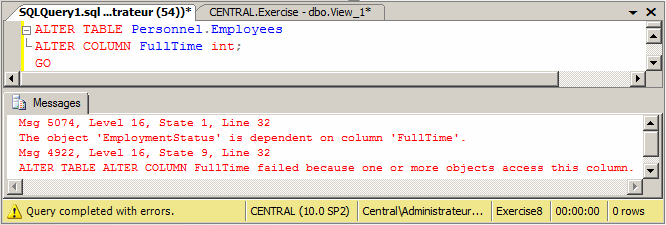
This means that the database engine will not allow you
to change something on the table if that change will make the dependent
view(s) to stop working. But, you can change anything on the parent table as
long as no dependent view would be affected.
As seen so far, a view is a selected list of records
from a table. As you may suspect, the easiest view is probably one created
from one table. Imagine you have a table of employees and you want to create
a view that lists only their names. You may create a view as follows:
CREATE DATABASE Exercise;
GO
USE Exercise;
GO
CREATE SCHEMA Personnel;
GO
CREATE TABLE Personnel.Employees
(
	EmplNbr nchar(10),
	FirstName nvarchar(20),
	LastName nvarchar(20),
	Salary money,
	FullTime bit
);
GO

CREATE VIEW Personnel.Identifications
AS
SELECT EmplNbr, FirstName, LastName
FROM Personnel.Employees;
GO
On such a view that is based on one table, you can
perform data entry, using the view, rather than the table.
|
View Data Entry and Permissions
|
|
Most of the time, it is regular users who perform data
entry. To make data entry easy, you can create one or more views so that a
certain view lists only the necessary columns. The user can then use that
view and not worry about listing the desired columns.
As mentioned for a table, a user who has to create
records using a view must be granted the INSERT permission
on that view. Of course, the user must be allowed to open the view, which is
possible if granted the SELECT permission. To resume:
- If you want a user to be able to create records using a view, you
must grant him or her both the SELECT and the
INSERT permissions
- If you want to protect the table(s) that hold(s) the records the
view displays, you should deny some permissions (mostly the
SELECT permission) on that (those) table(s) to the user
If you perform data entry using a view, the data you
provide would be entered on the base table. This means that the table would
be updated automatically. Based on this feature, you can create a view
purposely intended to update a table so that, in the view, you would include
only the columns that need to be updated.
As long as a view allows it, you can perform data entry
visually or using code.
To visually add a record, in the Object Explorer of the
SQL Server Management Studio, after expanding the Databases and the Views
nodes, right-click the view and click Edit Top 200 Rows. Once the view is
opened, you can create the records.
To create a record using a Data Definition Language
(DDL) command, use the INSERT keyword. If the view already contains
the necessary columns, add the VALUES keyword as in the following
formula:
INSERT [INTO] ViewName VALUES(Column1, Column2, Column_n);
Alternatively, after the name of the
table, put the list of columns in parentheses. In both cases, in the
parentheses of VALUES, type the necessary values.
|
 Practical
Learning: Performing Data Entry on a View Practical
Learning: Performing Data Entry on a View
|
|
- While the Presentation.AvailableUnits view is still opened, in the
Results pane, click the first NULL field under UnitNumber
- Ceate new records as follows:
| UnitNumber |
Bedrooms |
Bathrooms |
Price |
OccupancyStatus |
| 114 |
3 |
2 |
1280.00 |
Available |
| 115 |
0 |
1 |
785.00 |
Available |
| 213 |
2 |
1 |
1065.00 |
Occupied |
| 214 |
1 |
1 |
895.00 |
|
| 313 |
2 |
2 |
1165.00 |
Available |
| 315 |
2 |
1 |
1065.00 |
Occupied |
- Close the AvailableUnits window
Based on our previous description, here is an example of
creating a creating a record using a view with code:
INSERT INTO Personnel.StaffMembers
VALUES(N'29730', N'Philippe', N'Addy');
GO
Just as done with table, you can create many records
with with one INSERT ... VALUES statement.
Add each set of values in its own parentheses. Here are examples:
INSERT INTO Personnel.Identifications
VALUES(N'28084', N'Joan', N'Shepherd'),
      (N'79272', N'Joshua', N'Anderson'),
      (N'22803', N'Gregory', N'Swanson'),
      (N'83084', N'Josephine', N'Anderson');
GO
As done for a table, after creating one or more records,
if you want to see the result, add an OUTPUT.INSERTED expression after the
name of the view. If you want to show the names of columns, use the
following formula:
INSERT INTO TableName
OUTPUT INSERTED.Columns
VALUES(Value_1, Value_2, Value_X)
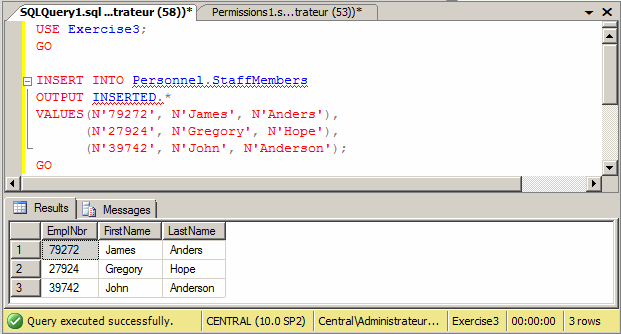
If you want to show all columns, use the asterisk. Here
is an example:
INSERT INTO Personnel.Identifications
OUTPUT INSERTED.*
VALUES(N'79272', N'James', N'Anders'),
      (N'27924', N'Gregory', N'Hope'),
      (N'39742', N'John', N'Anderson');
GO
This would produce:
|
 Practical
Learning: Outputting the Result of Data Entry Practical
Learning: Outputting the Result of Data Entry
|
|
- In the Object Explorer, right-click LambdaSquare2 and click New
Query
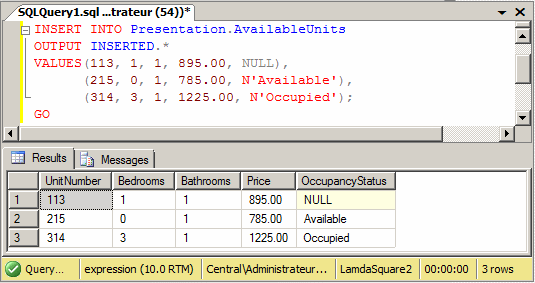
- To create new records using a view, type the following code:
INSERT INTO Presentation.AvailableUnits
OUTPUT INSERTED.*
VALUES(113, 1, 1, 895.00, NULL),
      (215, 0, 1, 785.00, N'Available'),
      (314, 3, 1, 1225.00, N'Occupied');
GO
- To execute, on the main menu, click Query -> Execute
- Click inside the Query window and press Ctrl + A
- To see all records, type the following:
SELECT * FROM Presentation.AvailableUnits;
GO
- To see the result, on the SQL Editor toolbar, click the Execute
button

It is important to know that a view is more of a table
type than any other object. This means that a view is not a function but it
can use a function. The word argument here only means that some values can
be passed to a view but these values can be specified only when creating the
view. They are not real arguments.
When structuring a view, you can create placeholders for
columns and pass them in the parentheses of the view. This would be done as
follows:
CREATE VIEW CarIdentifier([Tag #], Manufacturer, [Type of Car], Available)
. . .
If you use this technique, the names passed in the
parentheses of the view are the captions that would be displayed in place of
the columns of the view. This technique allows you to specify the strings of
your choice for the columns. If you want a column header to display the
actual name of the column, write it the same. Otherwise, you can use any
string you want for the column. If the name is in one word, you can just
type it. If the name includes various words, include them between an opening
square bracket "[" and a closing square bracket "]".
After listing the necessary strings as the captions of
columns, in your SELECT statement of the view, you must use the exact
same number of columns as the number of arguments of the view. In fact, each
column of your SELECT statement should correspond to an argument of
the same order.
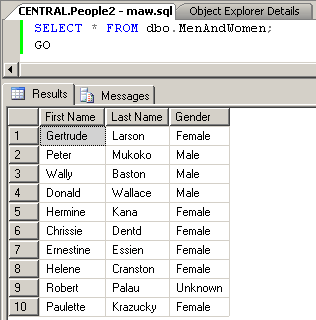
Because, as we stated already, a view is not a function
and the values passed to the view are not real arguments, when executing the
view, don't specify the names of arguments. Simply create a SELECT
statement and specify the name of the view as the source. Here is an
example:
|
 Practical
Learning: Ending the Lesson Practical
Learning: Ending the Lesson
|
|
- Close the Query window
- When asked whether you want to save, click No
- Close Microsoft SQL Server
- Which of the following is a keyword?
- ERROR
- CUSTOM
- SKIP
- PORT
- VIEW
- What's the keyword used to execute a view?
- SELECT
- EXECUTE
- WITH
- SET
- SWITCH
- If you want the entry of a view in a database to be encrypted, what
clause must you add when creating the view?
- DO ENCRYPTION
- WITH ENCRYPTION
- FOR ENCRYPTION
- SET ENCRYPTION
- ENCRYPTION WHEN DONE
- If you want the bind a view to the schema of its parent table, what
clause must you add when creating the view?
- DO SCHEMA BINDING
- WITH SCHEMA BINDING
- FOR SCHEMABINDING
- WITH SCHEMABINDING
- SET SCHEMA BINDING ON
- What's the basic formula to delete a view?
CREATE OBJECT::VIEW [SchemaName.]ViewName
AS
SELECT Statement
SET VIEW [SchemaName.]ViewName
AS
SELECT Statement CREATE [SchemaName.]ViewName
AS
SELECT Statement
AS VIEW WITH VIEW [SchemaName.]ViewName
CREATE
SELECT Statement CREATE VIEW [SchemaName.]ViewName
AS
SELECT Statement
- What's the basic formula to delete a view?
DELETE VIEW ViewName REMOVE VIEW ViewName DROP VIEW ViewName EXECUTE sp_remove ViewName KILL VIEW ViewName
- What are the permissions of a view (Select 2)?
- VIEW DATABASE STATE
- ALTER
- CREATE VIEW
- EXECUTE
- SELECT
- What are the permissions of a view (Select 2)?
- ALTER ANY AUDIT
- BACKUP LOG
- CONTROL
- TAKE OWNERSHIP
- CONNECT REPLICATION
- What are the permissions of a view (Select 2)?
- REFERENCES
- VIEW CHANGE TRACKING
- ALTER ANY VIEW
- CREATE DEFAULT
- BACKUP DATABASE
- What is the basic formula to rename a view?
RENAME OBJECT::VIEW CurrentViewName, NewName; EXECUTE sp_rename NewName FROM CurrentViewName,; sp_rename NewName FROM CurrentViewName; sp_rename CurrentViewName, NewName; RENAME VIEW CurrentViewName, NewName;
- What's the basic formula to change a view?
EDIT OBJECT::VIEW ViewName
AS
SELECT Statement
ALTER VIEW ViewName
AS
SELECT Statement CHANGE VIEW ViewName
WITH
SELECT Statement WITH VIEW ViewName
AS
SELECT Statement EXECUTE sp_update ViewName
AS
SELECT Statement
- Answers
- Wrong Answer
- Wrong Answer
- Wrong Answer
- Wrong Answer
- Right Answer
- Answers
- Right Answer
- Wrong Answer
- Wrong Answer
- Wrong Answer
- Wrong Answer
- Answers
- Wrong Answer: There is no DO operator used like that
- Right Answer: To scramble the entry of a view in a database, add the
WITH ENCRYPTION clause
- Wrong Answer: FOR is the wrong keyword
- Wrong Answer: SET is not used to encrypt a view
- Wrong Answer: That expression will cause an error
- Answers
- Wrong Answer: There is no value DO SCHEMA BINDING expression in
Transact-SQL
- Wrong Answer: The SCHEMA BINDING expression will create an error
- Wrong Answer: The FOR word will cause an error
- Right Answer: To bind a schema to its parent table, add a WITH
SCHEMABINDING clause when creating the view
- Wrong Answer: There is no valid SET SCHEMA BINDING expression
- Answers
- Wrong Answer
- Wrong Answer
- Wrong Answer
- Wrong Answer
- Right Answer
- Answers
- Wrong Answer: The DELETE operator is not valid
- Wrong Answer: There is no REMOVE operator in Transact-SQL
- Right Answer: The basic formula to delete a view is DROP VIEW Name
- Wrong Answer: There is no stored procedure named sp_remove
- Wrong Answer: There is no KILL VIEW command
- Answers
- Wrong Answer
- Right Answer
- Wrong Answer
- Wrong Answer
- Right Answer
- Answers
- Wrong Answer
- Wrong Answer
- Right Answer
- Wrong Answer
- Right Answer
- Answers
- Right Answer
- Right Answer
- Wrong Answer
- Wrong Answer
- Wrong Answer
- Answers
- Wrong Answer
- Wrong Answer
- Wrong Answer
- Right Answer
- Wrong Answer
- Answers
- Wrong Answer
- Right Answer
- Wrong Answer
- Wrong Answer
- Wrong Answer
|
|


