Home

Introduction to Application Design


Visual Control Addition


Introduction


To add a control to your application, you can select it from the Toolbox and click the desired area on the form. Once added, the control is positioned where your mouse landed. In the same way, you can add other controls as you judge them necessary for your application. Here is an example of a few controls added to a form:

Form1

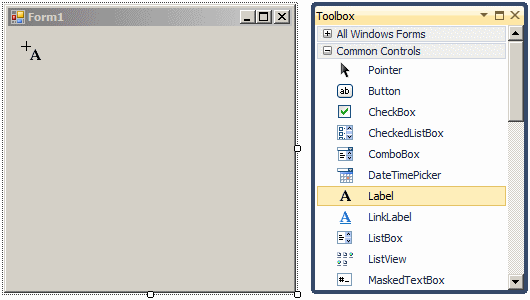
Alternatively, to add a control, you can also double-click it from the Toolbox and it would be added to the top-left section of the form.

If you want to add a certain control many times, before selecting it on the Toolbox, press and hold Ctrl. Then click it in the Toolbox. This permanently selects the control. Every time you click the form, the control would be added. Once you have added the desired number of this control, on the Toolbox, click the Pointer button to dismiss the control.

Practical LearningPractical Learning: Using the Toolbox

  1. Start Microsoft Visual Basic
  2. To create a new application, on the main menu, click File -> New Project...
  3. In the middle list, click Windows Application
  4. Set the Name to DesignPractice1 and click OK
  5. On the main menu, click View -> Toolbox.
    Position the mouse on the Toolbox word and wait for the Toolbox to expand
  6. Click the Label button Label and position the mouse on the form
     
    Form Design
  7. Click the form
  8. Click the middle of the form to select it (the form)
  9. To add another control, position the mouse again on the Toolbox word until the Toolbox has expanded
  10. Find and double-click the TextBox button TextBox
  11. To use a hidden area of the form, position the mouse on the Toolbox word. When the Toolbox has expanded, click the Auto Hide button AutoHide
  12. On the Toolbox, click the TreeView button TreeView and click the left section of the form
  13. After using the Toolbox, to hide it, click the Auto Hide button AutoHide
  14. To execute the application, on the main menu, click Debug -> Start Without Debugging
  15. After using it, close the form and return to your programming environment

Copying a Control

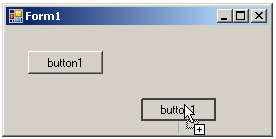
We mentioned earlier how you could add a control many times. An alternative is to copy a control. To do this, on the form:

  • Right-click the control and click Copy. Right-click another area of the form and click Paste
  • Click (once) the control you want to copy


    Press and hold Ctrl. Then drag the selected control to another area of the form. The mouse cursor would display a + plus indicating that the control is being duplicated:


    Once you get to another area of the form, release the mouse and Ctrl

You can use these two techniques to copy a group of controls.


Dynamic Control Creation


Introduction

The objects used in a Windows application are defined in various assemblies. To add one of these controls to your application, you must first know the name of its class. With this information, you can declare a variable of its class. For example, a command button is an object of type Button that is based on the Button class. The Button class is defined in the System.Windows.Forms namespace of the System.Windows.Forms.dll assembly. Based on this, to create a button, you can create a variable of type Button. Here is an example:

Imports System
Imports System.Windows.Forms

Module Exercise

    Public Class Exercise
        Inherits Form

        Private BtnSubmit As Button

        Public Sub New()

        End Sub

        Public Shared Function Main() As Integer

            Application.Run(New Exercise())
            Return 0

        End Function
    End Class
End Module

After declaring the variable, you can use the New operator to allocate memory for it:

Public Sub New()
    BtnSubmit = New Button()

End Sub

This is also referred to as dynamically creating a control. After declaring the variable and allocating memory for it, the control is available but does not have a host, which makes it invisible. A control must be positioned on a container, like a form. The Form class itself contains a member variable named Controls. This member holds a list of the objects that are placed on the form. To specify that a control you have instantiated must be positioned on a form, the Controls member has a method named Add. Therefore, to make an object part of the form, pass its variable to the Add() method. Here is an example:

Imports System
Imports System.Windows.Forms

Module Exercise

    Public Class Exercise
        Inherits Form

        Private BtnSubmit As Button

        Public Sub New()
            BtnSubmit = New Button()
            Controls.Add(BtnSubmit)
        End Sub

        Public Shared Function Main() As Integer

            Application.Run(New Exercise())
            Return 0

        End Function
    End Class
End Module

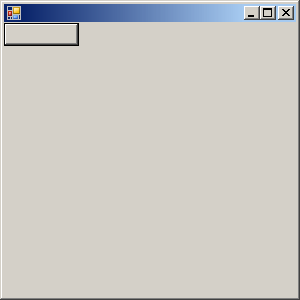
This makes it possible for  the control to appear on the form when the form displays to the user:

The two techniques of visual addition of objects and dynamic creation are the most used to add Windows controls to an application. The Windows controls are also called components.

Initializing the Components

Because there can be many controls used in a program, instead of using the constructor to initialize them, the Visual Studio standards recommend that you create a sub procedure called InitializeComponent to initialize the various objects used in your application. Then simply call that method from the constructor of your form. This would be done as follows:

Imports System
Imports System.Windows.Forms

Module Exercise

    Public Class Exercise
        Inherits Form

        Private BtnSubmit As Button

        Public Sub New()
            InitializeComponent()
        End Sub

        Public Sub InitializeComponent()

            BtnSubmit = New Button()
            Controls.Add(BtnSubmit)

        End Sub

        Public Shared Function Main() As Integer

            Application.Run(New Exercise())
            Return 0

        End Function
    End Class
End Module

Notice that the control is created in the InitializeComponent() method.

Using a Partial Class

Starting in Microsoft Visual Basic 2005, and probably getting close to C++, you can use two files to create and use a form. Each file would hold a partial definition of the class. As done in a header file of a C++ application, the first file in VBasic would hold the variable  or control declarations. While in C++ a header file holds the same name (but different extensions) as its corresponding source file, because VBasic does not have the concepts of header and source file, each file must have a different name. In Microsoft Visual Basic, the name of the first file of a form starts with the name of the form, followed by a period, followed by Designer, followed by a period, and followed by the vb extension.

Components Tracking on an Application

As you add and remove components on an application, you need a way to count them to keep track of what components, and how many of them, your application is using. To assist you with this, the .NET Framework provides a class named Container. This class is defined in the ComponentModel namespace that is itself part of the System namespace. To use a variable of this class in your application, declare a variable of type Container. Because no other part of the application is interested in this variable, you should declare it private. This can be done as follows:

Imports System
Imports System.Windows.Forms

Module Exercise

    Public Class Exercise
        Partial Public Class Exercise
            Inherits Form

            Private BtnSubmit As Button

            Dim components As System.ComponentModel.Container

            Public Sub New()
                InitializeComponent()
            End Sub

            Public Sub InitializeComponent()
                BtnSubmit = New Button()
                
                Controls.Add(BtnSubmit)
            End Sub


        End Class

        Public Shared Function Main() As Integer

            Application.Run(New Exercise())
            Return 0

        End Function

    End Class
End Module

After this declaration, the compiler can keep track of the components that are part of the form.

Control Derivation

If you are using a .NET Framework control, you must know the name of the class on which the control is based (and each control is based on a particular class). If you have examined the types of classes available but none implements the behavior you need, you can first locate one that is close to the behavior you are looking for, then use it as a base to derive a new class.

To derive a class from an existing control, you can use your knowledge of inheritance. Here is an example:

Public Class Numeric
        Inherits System.Windows.Forms.TextBox

End Class

If you want to perform some early initialization to customize your new control, you can declare a constructor. Here is an example:

Public Class Numeric
        Inherits System.Windows.Forms.TextBox

        Public Sub New()

        End Sub
End Class

Besides the constructor, in your class, you can add the fields and methods as you see fit. You can also use it to globally set a value for a variable of the parent class. Once the control is ready, you can dynamically use it like any other control. Here is an example:

Imports System
Imports System.Windows.Forms

Module Exercise

    Public Class Numeric
        Inherits System.Windows.Forms.TextBox

        Public Sub New()

        End Sub
    End Class

    Public Class Exercise
        Partial Public Class Exercise
            Inherits Form

            Private BtnSubmit As Numeric

            Dim components As System.ComponentModel.Container

            Public Sub New()
                InitializeComponent()
            End Sub

            Public Sub InitializeComponent()
                BtnSubmit = New Numeric()
                
                Controls.Add(BtnSubmit)
            End Sub


        End Class

        Public Shared Function Main() As Integer

            Application.Run(New Exercise())
            Return 0

        End Function

    End Class
End Module

This produce:

Fundamentals

Control Selection


Introduction

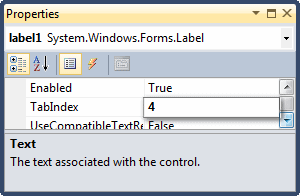
When designing an application, you will manipulate the windows controls on a form. After adding a control to a form, before performing any operation on that control, you must first select it. You can also manipulate many controls at the same time. To do that, you will have to select all those controls.

Single Control Selection

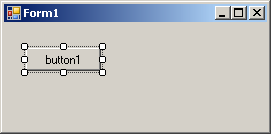
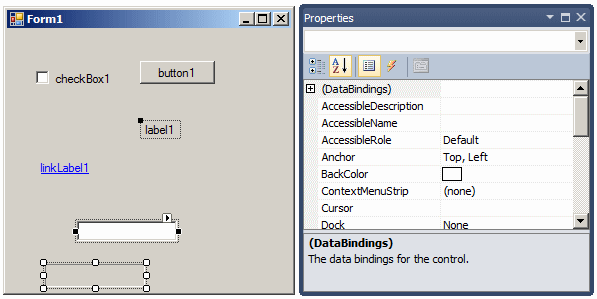
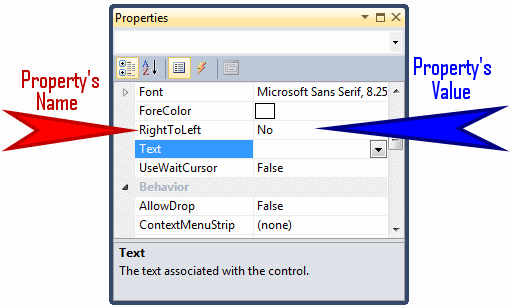
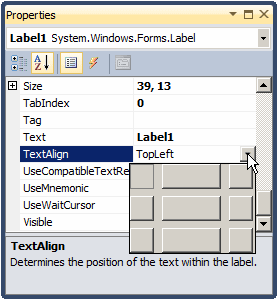
To select one control on the form, you can simply click it. A control that is selected indicates this by displaying 8 small squares, also called handles, around it. Between these handles, the control is surrounded by dotted rectangles. In the following picture, the selected rectangle displays 8 small squares around its shape:

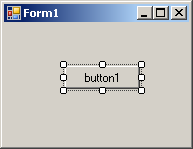
After selecting a control, you can manipulate it or change its characteristics, also called properties.

Multiple Control Selection

To select more than one control on the form, click the first. Press and hold either Shift or Ctrl. Then click each of the desired controls on the form. If you click a control that should not be selected, click it again. After selecting the group of controls, release either Shift or Ctrl that you were holding.

When a group of controls is selected, the last selected control displays 8 square handles around but its handles are white while the others are black. Another technique you can use to select various controls consists of clicking on an unoccupied area on the form, holding the mouse down, drawing a fake rectangle, and releasing the mouse:

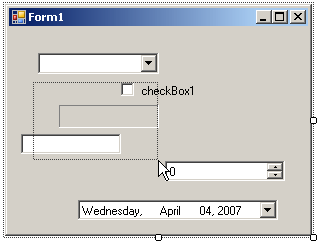
Every control touched by the fake rectangle or included in it would be selected:

Control Deletion

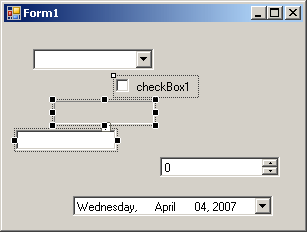
If there is a control on your form but you don't need it, you can remove it from the application. To delete a control, first select it and then click or press Delete. You can also right-click a control and click Cut. To remove a group of controls, first select them, then click or press Delete or right-click the selection and click Cut.


The Properties Window


Introduction

A property is a piece of information that characterizes or describes a control. It could be related to its location or size. It could be its color, its identification, or any visual aspect that gives it meaning. The properties of an object can be changed either at design time or at run time. You can also manipulate these characteristics both at design and at run times. This means that you can set some properties at design time and some others at run time.

To manipulate the properties of a control at design time, first select it on the form. While a control is selected, use the Properties window to manipulate the properties of the control at design time. To access the Properties window if it is not visible:

  • On the main menu, you can click View -> Properties Window
  • On the form, you can right-click anything (either the form itself or any control positioned on it) and click Properties
  • The shortcut to display the Properties window is F4

Description

The Properties window uses the behaviors we reviewed in Lesson 1 about auto-hiding, docking, floating or tabbing the tools that accompany Microsoft Visual Studio 2005. This means that you can position it on one side of the screen or to have it float on the screen as you wish.

The Properties window is divided in 5 sections:

Properties Window

The Properties window starts on top with a title bar, which displays the string Properties. If the window is docked somewhere, it displays the Window Position Window Position, the Auto-Hide Auto-Hide, and the Close Close buttons on its right side. If the window is floating, it would display only the Close button.

Under the title bar, the Properties window displays a combo box. The content of the combo box is the name of the form plus the names of the controls currently on the form. Besides the technique we reviewed earlier to select a control, you can click the arrow of the combo box and select a control from the list:

Properties Window

Under the combo box, the Properties displays a toolbar with 4 buttons.

Under the toolbar, the Properties window displays the list of properties of the selected control(s). On the right side, the list is equipped with a vertical scroll bar. The items in the Properties window display in a list set when installing Microsoft Visual Studio. In the beginning, you may be regularly lost when looking for a particular property because the list is not arranged in a strict order of rules. You can rearrange the list. For example, you can cause the items to display in alphabetic order. To do this, on the toolbar of the Properties window, click the Alphabetic button Alphabetic. To restore the list, you can click the categorized button Categorized.

Two lists share the main area of the Properties window. When the list of properties is displaying, the Properties button is clicked Properties. The second is the list of events. Therefore, to show the events, you can click the Events button Events. If the events section is displaying, to show the list of properties, you can click the Properties button Properties.

Under the list of properties, there is a long bar that displays some messages. The area is actually a help section that displays a short description of the property that is selected in the main area of the Properties window.

Accessing the Properties of One or More Controls

Based on a previous description,

  • If the Properties window is already displaying, to access the properties of the form or of a control, simply click it
  • If the Properties window is not displaying, to access the characteristics of an object, right-click either the form or a control on the form and click Properties
  • If the Properties window is not available, to access the characteristics, click either the form or a control on the form and, on the main menu, click View -> Properties

When a control is selected, the Properties window displays only its characteristics:

Properties Windows

You can also change some characteristics of various controls at the same time. To do this, first select the controls on the form and access the Properties window:

Properties Window

When various controls have been selected:

  • The Properties window displays only the characteristics that are common to the selected controls
  • The combo box on top of the Properties window is empty
  • Some fields of the Properties appear empty because the various controls that are selected have different values for those properties

Practical LearningPractical Learning: Introducing the Properties Window

  1. To create a new application, on the main menu, click File -> New Project...
  2. In the middle list, click Windows Application
  3. Set the Name to Exercise4 and click OK

Properties Categories


Introduction

Each field in the Properties window has two sections: the property�s name and the property's value:
 

Properties Names and Values

The name of a property is represented on the left column. This is the official name of the property. The names of properties are in one word. You can use this same name to access the property in code.

The box on the right side of each property name represents the value of the property that you can set for an object. There are various kinds of fields you will use to set the properties. To know what particular kind a field is, you can click its name. To set or change a property, you use the box on the right side of the property's name: the property's value, also referred to as the field's value.

Practical LearningPractical Learning: Displaying the Properties Window

  • To display the Properties windows, on the main menu, click View -> Properties Window

Empty Fields

Property Empty  

By default, these fields have nothing in their value section. Most of these properties are dependent on other settings of your program. For example, you can set a menu property for a form only after you have created a menu.

To set the property on such a field, you can type in it or select from a list. 


Practical LearningPractical Learning: Checking Empty Fields

  • Click the body of the form.
    In the Properties windows, notice that the AccessibleName and the Tag fields are empty

Text Fields

There are fields that expect you to type a value. Most of these fields have a default value. Here is an example:

Property Text

To change the value of the property, click the name of the property, type the desired value, and press Enter.

While some properties, such as the Text, would allow anything, some other fields expect a specific type of text, such as a numeric value.

Practical LearningPractical Learning: Checking Text Fields

  1. In the Properties windows, click Text and notice that it contains a string in bold characters
  2. Click (Name) and notice that it contains some bold characters

Numeric Fields

Some fields expect a numeric value. In this case, you can click the name of the field and type the desired value. Here is an example:

Numeric Property

 If you type an invalid value, you would receive a message box notifying you of the error:

Error

When this happens, click OK and type a valid value. If the value is supposed to be an integer, make sure you don't type it as a decimal number.

Practical LearningPractical Learning: Checking Numeric Fields

  1. In the Common Controls section of the Toolbox, click NumericUpDown and click the form
  2. While the control is still selected on the form, in the Properties windows, click Value and notice that it contains a number string in bold characters
  3. Click the DecimalPlaces, the Increment, the Maximum, and the Minimum fields to see that they contain numeric values

Date-Based Fields

Some fields expect you to enter a date. You must type a valid date recognized by the operating system and the Regional and Language Settings in Control Panel. If you enter an invalid date, you would receive an error.

Practical LearningPractical Learning: Checking Date and Time Fields

  1. In the Common Controls section of the Toolbox, click DateTimePicker and click the form
  2. While the control is still selected on the form, in the Properties windows, click Value and notice that it contains a date and time value
  3. Click the MinDate and the MaxDate fields to see their values:
     
    Date Time Fields

Expandable Fields

 
Expandable Property Some fields have a + button. This indicates that the property has a set of sub-properties that actually belong to the same property and are defined together. To expand such a field, click its + button and a � button will appear:
Properties

To collapse the field, click the - button.

Some of the properties are numeric based, such as the Location or the Size. With such a property, you can click its name and type two numeric values separated by a comma. Some other properties are created from an enumeration or a class. If you expand such a field, it would display various options. Here is an example from the Font property:

Expandable Fields

With such a property, you should select from a list.

Practical LearningPractical Learning: Checking Expandable Fields

  1. Click an empty area of the form to select the form
  2. In the Properties window, click the + button of the Font field to expand it and notice that it display some previously hidden items

Boolean Fields

 
Boolean Fields

Some fields can have only a True or False value. To change their setting, you can either select from the combo box or double-click the property to toggle to the other value.


Practical LearningPractical Learning: Checking Boolean Fields

  1. In the Properties window click Enabled and notice that it displays True
  2. Under Font, click Bold and notice that it displays False 

Action Fields

Some fields would require a value or item that needs to be set through an intermediary action. Such fields display an ellipsis button Ellipsis. When you click the button, a dialog box would come up and you can set the value for the field.
Property Action
 

Practical LearningPractical Learning: Checking Action Fields

  1. In the Common Controls section of the Toolbox, click PictureBox and click the form
  2. While the control is still selected on the form, in the Properties windows, click Image and notice that the field displays an ellipsis button Ellipsis Button
     
    Checking Action Fields
  3. Click the ellipsis button and notice that a dialog box comes up
  4. Click Cancel

List-Based Fields

To change the value of some of the fields, you would use their combo box to display the available values. After clicking the arrow, a list would display:

Property Selection

There are various types of list-based fields. Some of them display just two items. To change their value, you can just double-click the field. Some other fields have more than two values in the field. To change them, you can click their arrow and select from the list. You can also double-click a few times until the desired value is selected.

Practical LearningPractical Learning: Checking List-based Fields

  1. Click an empty area of the form to select the form
  2. In the Properties window, click FormBorderStyle and notice that it displays an arrow button of a combo box
  3. Press Alt and the down arrow key to display the list
  4. Press Esc

Area-Selection Fields

Some properties provide a window from where you can select the desired option. The field primarily displays the arrow of a combo box. To use the field, you click the arrow of the combo box and the window appears. Here are examples:

Alignment Back Color

After expanding the window, you can select the desired option. We will eventually review them.

Practical LearningPractical Learning: Checking Area-Selection Fields

  1. On the form, click one of the controls
  2. In the Properties window, click Dock and click the arrow of its combo box
  3. Notice the window that comes up and press Esc


Previous Copyright © 2004-2010 FunctionX, Inc. Next