|
A dialog box is a rectangular object that hosts other
controls necessary for an application. To created a dialog box In a Visual
C++ .Net application, you can use the Form class, set the MinimizeBox
and the MaximizeBox properties to false, and set the FormBorderStyle
property to either FixedSingle or FixedDialog values.
One of the best ways to create or add a dialog box to
an application is to create its own class instead of adding it to the main
source file. |
- Start Microsoft Visual Studio .NET
- On the Start Page, click New Project (alternatively, on the main menu, you can
click File -> New -> Project...)
- On the New Project dialog box, in the Project Types tree list, click
Visual C++ Projects
- In the Templates list, click Managed C++ Empty Project
- In the Name edit box, replace the <Enter name> content with Dialog
Box Example
- In the Location combo box, accept the suggestion or type your own.
If you are confused, type C:\Programs\MSVC.NET
- Click OK
- On the main menu, click Project -> Add Class...
- In the Add Class dialog box, in the Categories section, make sure
that Visual C++ is selected. In the Templates list, click Generic C++
Class and click Open
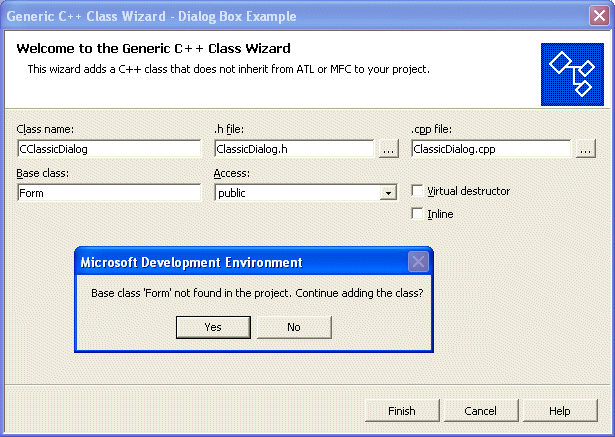
- In Generic C++ Class Wizard, in the Class Name, type CClassicDialog
- In the Base Class, type Form and
click Finish

- You may/should receive a message box stating that the base class is
not found in the project and asking you if you want to continue. Click
Yes
- To make the form a managed object, change its creation in the header
file as follows:
#pragma once
#using <mscorlib.dll>
#using <System.dll>
#using <System.Windows.Forms.dll>

using namespace System;
using namespace System::Windows::Forms;

__gc class CClassicDialog : public Form
{
public:
	CClassicDialog(void);
	~CClassicDialog(void);
};
|
- To implement the object as a dialog box, in its source file, change
its constructor as follows:
#include "classicdialog.h"
#using <mscorlib.dll>

CClassicDialog::CClassicDialog(void)
{
	this->MinimizeBox = false;
	this->MaximizeBox = false;
	this->FormBorderStyle = FormBorderStyle::FixedDialog;
}

CClassicDialog::~CClassicDialog(void)
{
}
|
- To finalize the application, on the main menu, click Project ->
Add New Item...
- In the Add New Item dialog box, in the Templates list, click C++
File
- In the Name box, replace <Enter name> with Main and click OK:
#include "ClassicDialog.h"

int __stdcall WinMain()
{
	CClassicDialog *Dlg = new CClassicDialog();
	Application::Run(Dlg);

	return 0;
}
|
- Press Ctrl + F5 to test the form

- Close the dialog box
- To change some properties of the dialog box, change the header file
as follows:
#pragma once
#using <mscorlib.dll>
#using <System.dll>
#using <System.Drawing.dll>
#using <System.Windows.Forms.dll>

using namespace System;
using namespace System::Drawing;
using namespace System::Windows::Forms;

__gc class CClassicDialog : public Form
{
public:
	CClassicDialog(void);
	~CClassicDialog(void);
};
|
- To change the caption and the dimensions of the dialog box, change
the source file as follows:
#include "classicdialog.h"
#using <mscorlib.dll>

CClassicDialog::CClassicDialog(void)
{
	this->MinimizeBox = false;
	this->MaximizeBox = false;
	this->FormBorderStyle = FormBorderStyle::FixedDialog;

	// The caption for the dialog box
	this->Text = S"Classic Dialog";
	// The dimensions of the dialog box
	this->Size = Drawing::Size(420, 345);
}

CClassicDialog::~CClassicDialog(void)
{
}
|
- Press Ctrl + F5 to test the application
|
|
|

