|
Introduction |
A cursor is a small picture that represents the position of the mouse on a screen. To help in your applications development, Microsoft Visual Studio .Net ships with two sets of cursors: those readily available and those stored in the installed files.
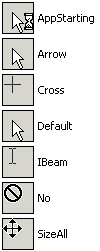
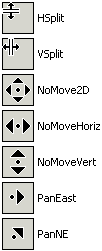
Everyone of the cursors in MSVC .Net can be easily used simply by referring to its name once you know the cursor you want to use. Those cursors already available to you are:
 |
 |
 |
 |
These cursors are stored in the Cursors namespace. To use one of the available cursors, call the Cursors namespace followed by the exact name of the above list.
| In order to effectively use this lesson, you should have learned how to create a panel, a group box, a check box, and radio buttons. |
- Start Microsoft Visual Studio .NET
- On the Start Page, click New Project (alternatively, on the main menu, you can click File -> New -> Project...)
- On the New Project dialog box, in the Project Types tree list, click Visual C++ Projects
- In the Templates list, click Managed C++ Empty Project
- In the Name edit box, replace the <Enter name> content with Cursors
- In the Location combo box, accept the suggestion or type your own. If you don't have any, type C:\Programs\MSVC.NET
- Click OK
- On the main menu, click Project -> Add New Item...
- In the Add New Item dialog box, in the Templates list, click C++ File
- In the Name box, replace <Enter name> with Main and click OK
- Replace the contents of the empty file with the following:
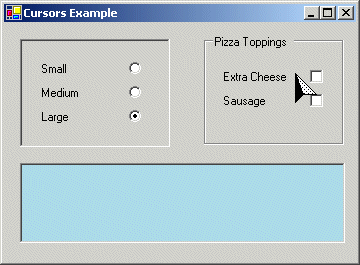
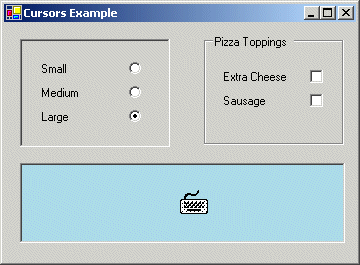
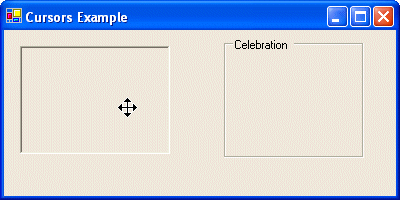
#using <mscorlib.dll> #using <System.dll> #using <System.Drawing.dll> #using <System.Windows.Forms.dll> using namespace System; using namespace System::Drawing; using namespace System::Windows::Forms; __gc class SimpleForm : public Form { public: SimpleForm(); private: Panel *pnlRectangle; GroupBox *GBox; }; SimpleForm::SimpleForm() { this->Text = S"Cursors Example"; this->Size = Drawing::Size(400, 200); pnlRectangle = new Panel; pnlRectangle->Location = Point(16, 16); pnlRectangle->Size = Drawing::Size(150, 108); pnlRectangle->BorderStyle = BorderStyle::Fixed3D; pnlRectangle->Cursor = Cursors::SizeAll; this->Controls->Add(pnlRectangle); GBox = new GroupBox; GBox->Location = Point(220, 8); GBox->Text = S"Celebration"; GBox->Size = Drawing::Size(140, 120); GBox->Cursor = Cursors::NoMoveHoriz; Controls->Add(GBox); } int __stdcall WinMain() { SimpleForm *FM = new SimpleForm; Application::Run(FM); return 0; } - Test the application:
- Return to MSVC
|
Creating Cursors |
Besides the cursors available in the studio, Microsoft Visual Studio .Net installs additional cursors
in the
C:\Program Files\Microsoft Visual
Studio .Net\Common7\Graphics\cursors accommodate more scenarios. The
technique for using these cursors involves more than just knowing their name.
Over all, you will sometimes use either an existing cursor or a custom one. For
this reason and others, you can create your own cursors.
To create your own cursor, on the main menu of MSVC, you can click Project -> Add New Item... or Project -> Add Resource. A starting but empty cursor would be displayed. After designing a cursor, you must save it. It has an extension of .cur.
Essentially, a cursor uses only two colors, black or white. This is because a cursor is only used as an indicator of the presence or position of the mouse pointer on the screen. Based on this (limitation), you ought to be creative. The minimum you can give a cursor is a shape. This can be a square, a rectangle, a circle, an ellipse, a triangle, or any shape of your choice. You can make the cursor fully black by painting it with that color. If you decide to make the cursor completely white, make sure you draw the borders of the cursor. By playing with the frequency of pixels and varying the frequencies of black and white, you can create variances of gray.
Between the black and white colors, two gray degrees are provided to you. In reality these two colors are used to give a transparency to the cursor so the background can be seen when the mouse passes over a section of the document.
After creating a cursor, you must (in reality you should) define the area that serves as the actual pointer of the mouse. Such an area, actually a point, is called the hot spot of the cursor. If you don't define the hot spot, the resource editor will define or pick one for you, and you might not like it. Therefore, you should know where the hot spot of your cursor, or of any cursor your application is using, is.
|
|
- On the main menu of MSVC, click Project -> Add Resource�
- On the Add Resource dialog box, click Cursor and click New
- While the new cursor is still selected, on the Properties window, click Filename, type ThePoint and press Enter. Notice that an extension was added to the file name.
- If the Image Editor toolbar is not displaying, on the main menu, click
View -> Toolbars -> Image Editor
If the Colors window is not displaying, on the main menu, click Image -> Show Colors Window
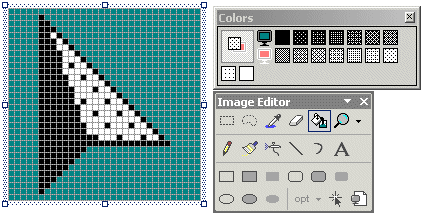
On the Image Editor toolbar, click the Line tool .
. - In the Colors window, click the black button to select the black color.
- Draw a vertical line from the pixel on the 6th column and 2nd row from top
- Draw a diagonal line at 45˚ from the top border of the new line to the lower-right until the line is at 5 pixels from the right border of the drawing area
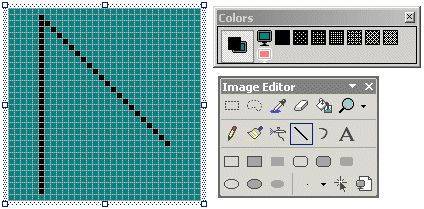
- Draw a horizontal line from the lower border of the dialog line to half-left
- Draw a diagonal line from the lower border of the vertical line to the left border of the horizontal line:
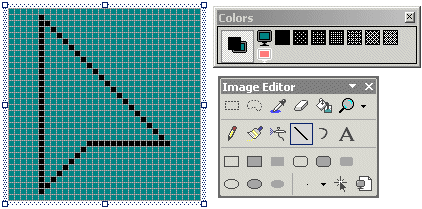
- Draw another diagonal line from the top corner of the current shape to the intersection of
the horizontal and the left diagonal lines:
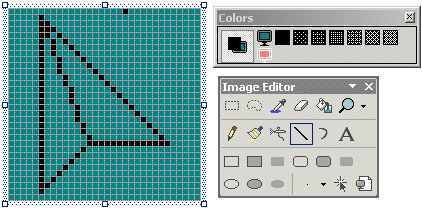
- On the Tools Palette, click Fill Tool

- On the Colors window, if you don't see a white button (as on the above
pictures) drag the lower border of the Colors window.
On the Colors window, click the last button of the second row and, on the Image Editor toolbar, click the Fill Tool - On the drawing area, click the right triangle.
- On the Colors window, click the button with the black color
- On the drawing area, click in the left triangle
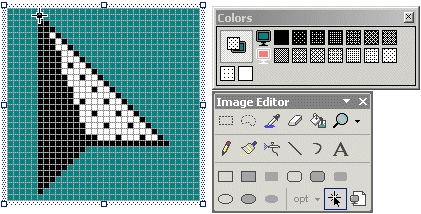
- To set the position of the cursor pointer, on the Image Editor toolbar,
click the Set Hot Spot Tool button
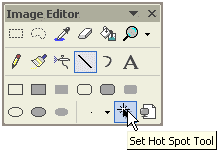
- In the drawing area, click the most top black point of the cursor
- Save the cursor by click the Save All button
- To create another cursor, on the main menu, click Project -> Add Resource...
- On the Add Resource dialog box, double-click Cursor
- In the Properties window, click Filename, type AKeyboard and press Enter
- On the Image Editor toolbar, click the Text Tool button
- On the Text Tool window, click the Font... button
- In the Font combo box, as System is selected in the Font combo box, type win and select Wingdings. In the Font Style combo box, click Regular. In the Size combo box, click 24 and click OK
- Type 7
- This should produce the picture of a keyboard. As the keyboard is still selected, drag it to position it in the middle and center of the drawing area.
- Close the Text Tool window
- On the Colors window, click the last button of the second row and, in the
Image Editor toolbar, click the Fill Tool button. Change all green colors
inside the keyboard to white by clicking them:
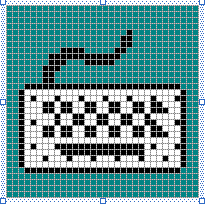
- On the Image Editor toolbar, click the Set Hot Spot Tool button and, in the drawing area, click the end of the keyboard cord on top.
|
Using Custom Cursors |
After creating your own cursor, you can use a constructor of the Cursor class, which is defined in the Forms namespace.