|
The Unique Value of a Column |
|
|
|
When performing data entry, there are various ways you
can either assist the user or impose some behaviors on your application. You
can:
|
- Configure some columns of a table to accept only some types of
value and reject others
- You can create a scenario that would make sure that each value
under a column is unique
- You can create an expression that would specify the value of a
column rather than the user entering it
- Using the data grid view or some other controls of the Toolbox,
you can present a list of values to the user who would only select
from that list instead of typing a value
All these functionalities are already available,
either in the classes of the data set system or built-in the available
Windows controls.
|
 Practical
Learning: Assisting With Data Entry Practical
Learning: Assisting With Data Entry
|
|
- Start Microsoft Visual Studio and create a Windows Application
named WattsALoan1
- To create a new form, in the Solution Explorer, right-click
WattsALoan1 -> Add -> Windows Forms...
- Set the Name to LoansAllocations and click Add
- From the Data section of the Toolbox, click DataSet and click the
form
- Select the Untyped Dataset radio button and click OK
- In the Properties window, change the following characteristics:
DataSetName: dsLoansAllocations
(Name): LoansAllocations
- Click Tables and click its ellipsis button
- To create a new table, click Add and change the properties as
follows:
TableName: Loan
(Name): tblLoan
- Click Columns and click its ellipsis button
- Click Add 10 times and change the properties as follows:
| ColumnName |
(Name) |
| DateAllocated |
colDateAllocated |
| LoanNumber |
colLoanNumber |
| PreparedBy |
colPreparedBy |
| PreparedFor |
colPreparedFor |
| Principal |
colPrincipal |
| InterestRate |
colInterestRate |
| Periods |
colPeriods |
| InterestEarned |
colInterestEarned |
| FutureValue |
colFutureValue |
| MonthlyPayment |
colMonthlyPayment |
|
Controlling the Unique Value
|
|
During data entry, the user is expected to enter
various values under each column and each value would belong to a
particular record. As a result, it is not unusual to have the same value
belonging to different records. For example, it is not surprising to have
two employees holding the same first or last name, just as it is not
unusual to have two customers living in the same city. On the hand, there
are values that should be unique among the records. For example, two
employees should not have the same employee number and two customer orders
from two different customers should not have the same receipt number. In
these cases, you would want each record to hold a different value under
the same column. This is referred to as a unique value.
To support unique values, the DataColumn class
is equipped with a Boolean property named Unique. The default value
of this property is false, which means various records can have the same
values for a column.
To visually specify that a column would require (or
not require) unique values, in the Members list of the Columns Collection
Editor, click the name of the column and, in the Properties list, (accept
or) change the value of the Unique field. To programmatically control the
uniqueness of values, assign the desired Boolean value to the Unique
property of the column.
|
 Practical
Learning: Controlling the Uniqueness of a Column Practical
Learning: Controlling the Uniqueness of a Column
|
|
- In the Members list, click LoanNumber
- In the Properties list, double-click Unique to change its value to
True
|
Controlling the Type of Value of a Column
|
|
|
The Data Type of a Column
|
|
If you create an application that allows the user to
enter some values, you would wish the user enter the right type of data
under each column. To assist you with this, the DataColumn class
allows you to specify an appropriate or desired data type for each column.
The data type of a column allows it to accept or reject an inappropriate
value. Although we saw that the name was the most important aspect of a
column, in reality, a data type is also required.
To specify the data type of a column, if you are
visually creating the table, in the Columns Collection Editor, under
Members, create or select the name of a column. In the Properties list,
click the arrow of the DataType field and select from the list:

To supports data types for a column, the DataColumn
class relies on the following .NET Framework structures: Boolean,
Byte, Char, DateTime, Decimal, Double,
Int16, Int32, Int64, SByte, Single,
String, TimeSpan, UInt16, UInt32, and UInt64.
The DataColumn class can also support an array of Byte
values, as in Byte[], for a column.
When creating a new column, if you do not specify its
data type, it is assumed to be a string and the string data type is
automatically applied to it.
To programmatically specify the data type of a column,
you have two main alternatives. When declaring a column, to specify its
data type, you can initialize the DataColumn variable using the
third constructor of the class. Its syntax is:
public DataColumn(string columnName, Type dataType);
To specify a column's data type, select one from the
Type class of the System namespace by calling the
Type.GetType() method. The GetType() method is overloaded with
three versions. The first version has the following syntax:
public static Type GetType(string typeName);
This method expects as argument a valid data type
defined in the .NET Framework. The data type must be retrieved from the
Type class of the System namespace. The name of the data type
must be qualified with a period operator. Here is an example:
using System;
using System.Data;
using System.Drawing;
using System.Windows.Forms;

public class Exercise : Form
{
    DataSet dsRedOakHighSchool;
    DataTable tblRegistration;
    DataColumn colStudentNumber;

    public Exercise()
    {
        InitializeComponent();
    }

    void InitializeComponent()
    {
        Text = "Students Records";
        Size = new Size(320, 160);

    colStudentNumber = new DataColumn("StudentNumber", Type.GetType("System.Int32"));

        tblRegistration = new DataTable("Student");
        tblRegistration.Columns.Add(colStudentNumber);

        dsRedOakHighSchool = new DataSet("SchoolRecords");
        dsRedOakHighSchool.Tables.Add(tblRegistration);
    }
}

public class Program
{
    static int Main()
    {
        System.Windows.Forms.Application.Run(new Exercise());
        return 0;
    }
}
If you used the default constructor to create a
DataColumn, to specify its data type, assign its qualified type to the
DataColumn.DataType property. Here is an example:
public class Exercise : Form
{
    DataColumn colStudentNumber;
    DataColumn colFirstName;
    DataColumn colLivesInASingleParentHome;

    public Exercise()
    {
        InitializeComponent();
    }

    void InitializeComponent()
    {
        Text = "Students Records";
        Size = new Size(320, 160);

        colStudentNumber = new DataColumn("StudentNumber",
            Type.GetType("System.Int32"));

        colFirstName = new DataColumn("FullName");
        colFirstName .DataType = Type.GetType("System.String");

        colLivesInASingleParentHome = new DataColumn("LSPH");
        colLivesInASingleParentHome.DataType = Type.GetType("System.Boolean");
    }
}
Remember that there are various techniques you can use
to create a column by specifying its name and its data type.
|
 Practical
Learning: Applying Data Types on Columns Practical
Learning: Applying Data Types on Columns
|
|
- In the Members list, click Principal
- In the Properties list, click DataType, click the arrow of its
combo box and select System.Double
- In the same way, change the data types of the following columns:
| Member |
DataType |
| DateAllocated |
System.DateTime |
| LoanNumber |
System.String |
| PreparedBy |
System.String |
| PreparedFor |
System.String |
| Principal |
System.Double |
| InterestRate |
System.Double |
| Periods |
System.Double |
| InterestEarned |
System.Double |
| FutureValue |
System.Double |
| MonthlyPayment |
System.Double |
When performing data entry, the user is expected to
enter a value for each column. Sometimes, most values under a certain
column would be the same. For example, if you are creating an application
that would be used in a tri-state area such as MD-DC-VA and the product
would be used to dry-clean items from customers all over the region, most
customers would come from the state where the company is based. In the
column used to enter the state, you can provide a default value so that,
if the user does not enter it, it would be selected by default.
A default value is one that is automatically applied
to a column so the user can simply accept it but the user can change it if
it does not apply.
To visually create a default value on a column, in the
Column Collection Editor, select a column in the Members list. In the
Properties list, click DefaultValue and replace <DBNull> with the desired
value.
To programmatically specify the default value, assign
the desired value to the DefaultValue property of the data column
variable.
|
 Practical
Learning: Applying Data Types on Columns Practical
Learning: Applying Data Types on Columns
|
|
- In the Members list, click Principal
- In the Properties list, click DefaultValue and delete <DBNull>
- Type 0
- In the same way, change the default values of the following
columns:
| Member |
DefaultValue |
| InterestRate |
8.75 |
| Periods |
36 |
|
The Expression of a Column
|
|
So far, to perform data entry, we created the data
fields and expected the user to enter values in them. In some cases,
instead of the user typing data, you may want to specify your own constant
value or you may want to combine some values. An expression can be:
- A constant value such as 288, "Aaron Watts", or 48550.95
- A combination of two or more constants such 50 + 428,
"HourlySalary" + 25.85, or "John" + " " + "Santini",
- The name of a column such as Filename, CountryCode or DateOfBirth
- The combination of a constant and one or more column names such as
Username & "@gmail.com"
- Or a combination of two or more columns such as FirstName &
LastName
Besides the items in this list, you can also use some
functions and/or combine them with the items in the above list. The
expression then creates or represents a value. To create an expression,
there are various rules you must follow:
- If the expression is algebraic, you can use the normal math
operations (+, -, *, and /) applied to one or more constants combined
to one or more column names
- To create a combination of strings, you can use the + operator
Once you have decided about this expression, you can
use it as the value assigned to a column.
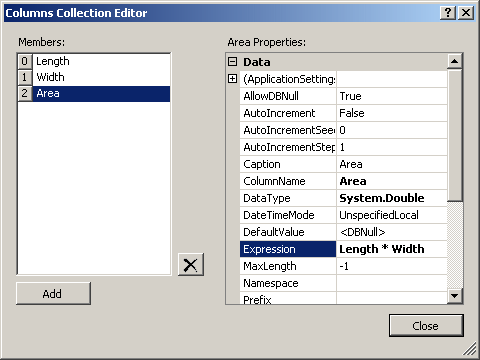
If you are visually creating a column, under the
Members list of the Column Collection Editor, select a column. To specify
an expression for it, in the Properties list, click Expression and type
the desired expression. Here is an example:

To programmatically specify the expression used on a
column, assign the expression, as a string, to its variable name. Here is
an example:
public class Exercise : Form
{
    DataSet dsRedOakHighSchool;
    DataTable tblRegistration;
    DataColumn colFirstName;
    DataColumn colLastName;
    DataColumn colFullName;

    DataGridView dgvStudents;

    public Exercise()
    {
        InitializeComponent();
    }

    void InitializeComponent()
    {
        Text = "Students Records";
        Size = new Size(550, 160);

        colFirstName = new DataColumn("FirstName");
        colFirstName.DataType = Type.GetType("System.String");

        colLastName = new DataColumn("LastName");
        colLastName.DataType = Type.GetType("System.String");

        colFullName = new DataColumn("FullName");
        colFullName.DataType = Type.GetType("System.String");
        colFullName.Expression = "FirstName + ' ' + LastName";

        tblRegistration = new DataTable("Student");
        tblRegistration.Columns.Add(colFirstName);
        tblRegistration.Columns.Add(colLastName);
        tblRegistration.Columns.Add(colFullName);

        dsRedOakHighSchool = new DataSet("StudentsRecords");
        dsRedOakHighSchool.Tables.Add(tblRegistration);

        dgvStudents = new DataGridView();
        dgvStudents.Location = new Point(12, 12);
        dgvStudents.Size = new Size(400, 100);
        dgvStudents.DataSource = dsRedOakHighSchool;
        dgvStudents.DataMember = "Student";

        Controls.Add(dgvStudents);
    }
}

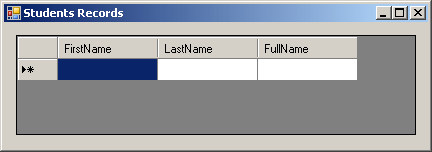
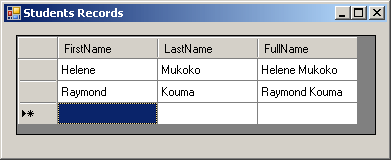
Thanks to this code, the user can type both the first
and the last names. Then two things:
- When the user moves to the next record, the expression is used to
create the value of the full name column

- The user cannot enter a value in the column that has an expression
|
 Practical
Learning: Creating Expressions on Columns Practical
Learning: Creating Expressions on Columns
|
|
- In the Members list, click FutureValue
- In the Properties list, click Expression and type Principal +
InterestEarned
- In the same way, change the data types of the following columns:
| Member |
Expression |
| InterestEarned |
Principal * (InterestRate / 100) * (Periods /
12) |
| FutureValue |
Principal + InterestEarned |
| MonthlyPayment |
FutureValue / Periods |
|
Using Operators and Expressions
|
|
To create an expression, you use the logical operators
from the Visual Basic language. Most of the operators are the same you are
already familiar with from your knowledge of C#, except as follows:
| Operator Name |
C# |
Visual Basic |
Data View |
| Equal |
== |
= |
= |
| Less Than |
< |
< |
< |
| Less Than Or Equal To |
<= |
<= |
<= |
| Greater Than |
> |
> |
> |
| Greater Than Or Equal To |
>= |
>= |
>= |
| Not Equal |
!= |
<> |
<> |
You can also use the other logical operators, such as
the negation operator, the conjunction operator, and the disjunction
operator. Once again, you must use them as they are implemented in the
Visual Basic language as follows:
| Operator Name |
C# |
Visual Basic |
Data View |
| Negation |
! |
NOT |
NOT |
| Logical Conjunction |
&& |
AND |
AND |
| Logical Disjunction |
|| |
OR |
OR |
The ADO.NET system (but remember that ADO.NET is not a
library; it is just a name) ships with various functions (because C# does
not have the concept of function, consider that a function is a type of
method but that does not belong to a (specific) class) you can use for
data filtering.
The following logical functions available are
(although the names are given here in uppercase, the language is actually
case-insensitive):
The following functions are used to evaluate the
values from one particular column. They are called aggregate functions and
they are:
- Avg: This function is used to calculate the average of a
series of values. The values would stored in one particular column
- Sum
- Min
- Max
- Count
- Var
- StdDev
- CONVERT
To manipulate strings, the following functions are
available (although the names are given here in uppercase, the language is
actually case-insensitive):