Introduction to Pens

Introduction to Pens
A Line to Draw
Introduction
A line is a junction of two points. This means that a line has a beginning and an end point. A line can be illustrated as follows:
The beginning and the end are two distinct points. Based on this, a line is represented either with two Point objects or by four numbers representing its values on the Cartesian axes.
![]() Practical Learning: Introducing Drawing Shapes
Practical Learning: Introducing Drawing Shapes
Introduction to Drawing a Line
To support lines, the Graphics class is equipped with an overloaded method named DrawLine. One of the versions of that method uses the following syntax:
public void DrawLine(. . .,
                     Point pt1,
                     Point pt2);
This version of the Graphics.DrawLine() method expects two Point objects as (the second and the third) arguments. The first point, which is actually the second argument, indicates where the line will start. The second point, which is the third argument, indicates where the line will end.
A Pen for Drawing
Introduction
The most basic tool you can use to draw a shape, such as a line is the pen. To support pens, the .NET Framework a class named Pen:
public sealed class Pen : MarshalByRefObject, ICloneable, IDisposable
As a result, the syntax of the above Graphics.DrawLine() method is actually:
public void DrawLine(Pen pen,
                     Point pt1,
                     Point pt2);
Therefore, the first argument of the above Graphics.DrawLine() method is a pen. As a matter of fact, the first argument of every version of the overloaded Graphics.DrawLine() method is a Pen object.
Creating a Pen
To obtain a pen, you can declare a variable of type Pen using one of the constructors of its class.
Pens and Colors
The Color of a Pen
The primary piece of information you must specify about a pen is its color. To support this, one of the constructors of the Pen class uses the following constructor:
public Pen(Color color);
This constructor takes a member of the Color enumeration as argument. You can first define a color and pass it to the Pen constructor. After creating the pen, you can pass it as the first argument of the Graphics.DrawLine() method we saw above. Here is an example:
namespace GraphicsAndDrawing
{
public partial class Exercise : Form
{
public Exercise()
{
InitializeComponent();
}
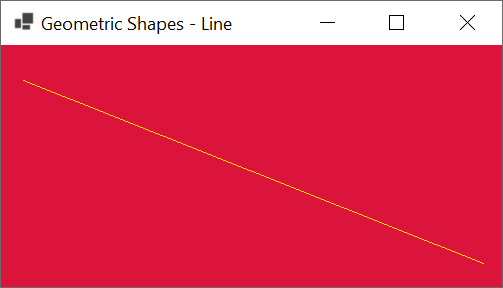
private void Exercise_Paint(object sender, PaintEventArgs e)
{
Color clrGold = Color.Gold;
Pen pnGold = new Pen(clrGold);
Point ptStart = new Point( 22, 35);
Point pnEnd = new Point(482, 218);
BackColor = Color.Crimson;
e.Graphics.DrawLine(pnGold, ptStart, pnEnd);
}
}
}
This would produce:
Instead of first declaring a Color variable, you can directly define the color in the constructor. Here are examples:
private void Exercise_Paint(object sender, PaintEventArgs e)
{
    Pen pnBlue    = new Pen(Color.Blue);
    Point ptStart = new Point(22, 355);
    Point pnEnd   = new Point(182, 20);

    e.Graphics.DrawLine(pnBlue, ptStart, pnEnd);

    ptStart   = new(182, 20);
    pnEnd     = new(342, 355);
    Pen pnRed = new Pen(Color.Red);
    e.Graphics.DrawLine(pnRed, ptStart, pnEnd);

    ptStart = new(65, 262);
    pnEnd   = new(295, 262);
    Pen pnGreen = new Pen(Color.Green);
    e.Graphics.DrawLine(pnGreen, ptStart, pnEnd);
}
This would produce:

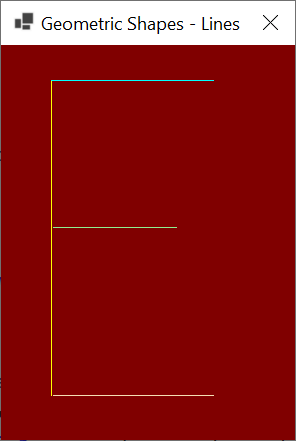
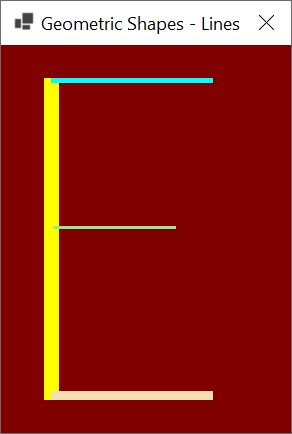
In the same way, you declare a Pen variable mostly if you are planning to use that pen many times. If you are planning to use a pen only once, you can create it directly in the parentheses of the DrawLine() method. In the same way, if you want, you can create the points directly in the placeholders of their arguments. Here are examples:
private void Exercise_Paint(object sender, PaintEventArgs e)
{
    Point ptStart = new Point(50, 35);
    Point pnEnd   = new Point(50, 350);
    Pen pnAqua    = new Pen(Color.Aqua);
    Pen pnYellow  = new Pen(Color.Yellow);

    BackColor     = Color.Maroon;

    e.Graphics.DrawLine(pnYellow, ptStart, pnEnd);
    e.Graphics.DrawLine(pnAqua, new(50, 35), new(212, 35));
    e.Graphics.DrawLine(new Pen(Color.LightGreen), new(52, 182), new(175, 182));
    e.Graphics.DrawLine(new Pen(Color.Wheat), new(52, 350), new(212, 350));
}
This would produce:
A Simple Class for a Pen
Instead of making you go through the process of creating a pen and speculating about its characteristics, the System.Drawing namespace provides a class named Pens:
public static class Pens
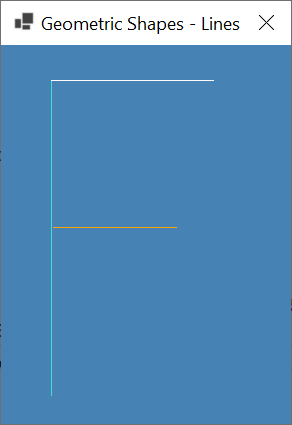
The primary, and in fact only, role of the Pens class is to define a simple pen and only specify its color. To make this possible, the Pens class is equipped with only static properties that each represents the name of a color. The names are those of common colors (such as Red, Green, Blue, Yellow, Violet, etc), the colors used on web pages (such as LightBlue, DarkGreen, Tomato, etc), the colors defined in Microsoft Windows (such as ActiveBorder, AppWorkspace, or ButtonFace, etc), and many others. When accessing a Pens property, it produces a Pen object. This means that you can access a pen to initialize a Pen variable. As a result, you can use a pen from the Pens class exactly the same way we have used pens so far. Here are examples:
private void Exercise_Paint(object sender, PaintEventArgs e)
{
    Graphics graph = e.Graphics;

    BackColor     = Color.SteelBlue;

    graph.DrawLine(Pens.Turquoise, new Point(50, 35), new Point(50, 350));
    graph.DrawLine(Pens.Snow, new(50, 35), new(212, 35));
    graph.DrawLine(Pens.Orange, new(52, 182), new(175, 182));
}
This would produce:
If you have already created a pen, to change its color, you can assign the desired color name or color value to the Pen.Color property.
Microsoft Windows System of Pens
As you are probably aware already, Microsoft Windows is a graphical operating system that heavily uses colors. If your developing your application to be used by Microsoft Windows users, and if you find it necessary, for the colors you use in your application, you can apply the same colors for your application. The reason you would do that is so that the colors that your application displays in your computer may appear the same on your user's computer. To give you access to the Microsoft Windows System colors, the System.Drawing namespace provides a static class named SystemPens:
public static class SystemPens
The SystemPens class is mostly equipped with properties that each represents a simple Pen object. In reality, each one of those properties is made to represent a color. The names of those colors are ActiveBorder, ActiveCaption, ActiveCaptionText, AppWorkspace, ButtonFace, ButtonHighlight, ButtonShadow, Control, ControlDark, ControlDarkDar, ControlLight, ControlLightLight, ControlText, Desktop, GradientActiveCaption, GradientInactiveCaption, GrayText, Highlight, HighlightText, HotTrack, InactiveBorder, InactiveCaption, InactiveCaptionText, Info, InfoText, Menu, MenuBar, MenuHighlight, MenuText, ScrollBar, Window, WindowFrame, WindowText.
Since SystemPens is a static class, you can access each of its properties from that name of the class.
Characteristics of a Pen
The Color of a Pen
As mentioned already, the primary characteristic of a pen is its color. To support this, the Pen class is equipped with a property named Color:
public System.Drawing.Color Color { get; set; }
As you can see, this is a read-write property. This means that you apply a new color to an existing Pen object or you can enquire about the color that an existing pen hold.
The Width of a Pen
The simplest pen is meant to draw a tiny line. Such a simple pen is said to have a width of 1 pixel. The Pen class allows you to control the width of a pen. When creating a pen, to let you specify its width, the Pen class is equipped with the following constructor:
public Pen(Color color, float width);
While the first argument represents the color as we saw in the previous sections, the second argument specifies the width, which must be a floating-point value. Here are examples of specifying the width of pens:
private void Exercise_Paint(object sender, PaintEventArgs e)
{
    Point ptStart = new Point(50, 33);
    Point pnEnd = new Point(50, 355);
    Pen pnAqua = new Pen(Color.Aqua, 5.279F);
    Pen pnYellow = new Pen(Color.Yellow, 15.18F);

    BackColor = Color.Maroon;

    e.Graphics.DrawLine(pnYellow, ptStart, pnEnd);
    e.Graphics.DrawLine(pnAqua, new(50, 35), new(212, 35));
    e.Graphics.DrawLine(new Pen(Color.LightGreen, 2.69F), new(52, 182), new(175, 182));
    e.Graphics.DrawLine(new Pen(Color.Wheat, 8.526F), new(50, 350), new(212, 350));
}
This would produce:
To give you the ability to support or modify the width of a pen, the Pen class is equipped with a property named Width:
public float Width { get; set; }
Using this property, to modify the width of a pen, assign a floating-point number to its Width property. Here is an example:
private void Exercise_Paint(object sender, PaintEventArgs e)
{
    Pen pnBorder = new Pen(Color.Brown);
    // Do something, if necessary
    pnBorder.Width = 3.00F;
    // Do something, if necessary
}
In the same way, you can change, increase, or decrease the width of a pen as often as you want. Here are examples that change the width of a pen:
private void Exercise_Paint(object sender, PaintEventArgs e)
{
    Pen pnLine    = new Pen(Color.DarkRed);
    Point ptStart = new Point(20, 20);
    Point pnEnd   = new Point(450, 20);

    pnLine.Width = 1.00F;
    e.Graphics.DrawLine(pnLine, ptStart, pnEnd);

    pnLine.Width = 3.528F;
    ptStart = new Point(20, 50);
    pnEnd = new Point(450, 50);
    e.Graphics.DrawLine(pnLine, ptStart, pnEnd);

    ptStart = new Point(20, 80);
    pnEnd = new Point(450, 80);
    pnLine.Width = 12.226F;
    e.Graphics.DrawLine(pnLine, ptStart, pnEnd);

    ptStart = new Point(20, 120);
    pnEnd = new Point(450, 120);
    pnLine.Width = 26.626F;
    e.Graphics.DrawLine(pnLine, ptStart, pnEnd);

    ptStart = new Point(20, 180);
    pnEnd = new Point(450, 180);
    pnLine.Width = 44.527F;
    e.Graphics.DrawLine(pnLine, ptStart, pnEnd);
}
This would produce:

If a pen has already been defined and you want to know its width, get the value of its Width property.
Drawing a Dashing Pattern
So far, we draw the lines as consecutive objects from a starting to an ending points. When drawing a line, you can segment it in various parts following a pattern of your choice. To support this, the Pen class is equipped with a property named DashPattern:
public float[] DashPattern { get; set; }
As you can see, this a read/write property that is an array of decimal numbers. Therefore, to use this property, create an array of floating-point numbers. Assign that array to the Pen.DashPattern property of your pen. This would be done as follows:
private void Exercise_Paint(object sender, PaintEventArgs e)
{
    Pen pnBlue = new Pen(Color.Blue, 14.55F);

    Point ptStart = new Point(22, 35);
    float[] pattern = { 0.01F };
    Point pnEnd   = new Point(582, 148);

    pnBlue.DashPattern = pattern;
    e.Graphics.DrawLine(pnBlue, ptStart, pnEnd);
}
This would produce:
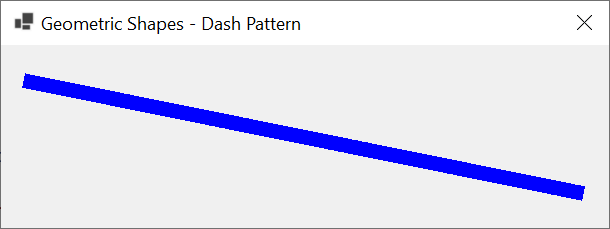
Each number of a Pen.DashPattern property will represent the width of a segment. Although you can, if you provide only one value (as done in the above example, if you will not see any change. If you provide two numbers, the first value will represent the distance from the beginning of the line to that value. The second value will represent a blank segment of that distance within the line. At the end of that segment, the line will show again with the distance of the first value, followed by the empty segment of the second value. Here is an example:
private void Exercise_Paint(object sender, PaintEventArgs e)
{
    Pen pnColor = new Pen(Color.FromArgb(148, 49, 38), 14.55F);

    Point ptStart = new Point(22, 35);
    Point pnEnd = new Point(582, 188);

    float[] pattern = { 3.00F, 1.00F };
    pnColor.DashPattern = pattern;

    e.Graphics.DrawLine(pnColor, ptStart, pnEnd);
}
This would produce:
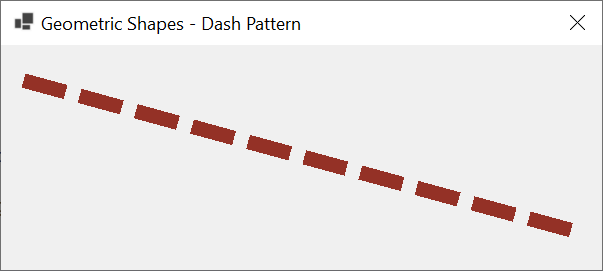
In the same way, you can provide many values for the Pen.DashPattern property. The compiler would use those values by alternating them when drawing the line: line segment, empty section, line segment, empty section, etc. Here is an example:
private void Exercise_Paint(object sender, PaintEventArgs e)
{
    Pen pnBlue = new Pen(Color.Blue, 12.55F);

    Point ptStart = new Point(22, 35);
    Point pnEnd = new Point(482, 218);

    pnBlue.DashPattern = [ 7.25F, .35F, 2.55F, .35F, 1.35F, .35F ];

    e.Graphics.DrawLine(pnBlue, ptStart, pnEnd);
}
This would produce:
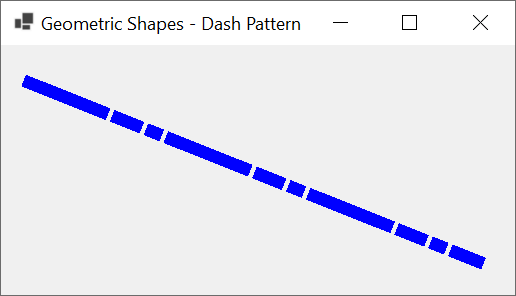
As a result, it is a good idea to provide an even number of values to the Pen.DashPattern array.
The Style of a Dashing Pattern
It can be challenging and time-consuming to create a pattern for the Pen.DashPattern property. To make its easier and provide patterns that are commonly used, the Pen class provides a property named DashStyle. This property is based on an enumeration of the same name that is defined in the System.Drawing.Drawing2D namespace:
public System.Drawing.Drawing2D.DashStyle DashStyle { get; set; }
The DashStyle enumeration has six members. When accessing this property, simply select the member you want. Here are examples:
using System.Drawing.Drawing2D;

namespace GraphicsAndDrawing
{
    public partial class Exercise : Form
    {
        public Exercise()
        {
            InitializeComponent();
        }

        private void Exercise_Paint(object sender, PaintEventArgs e)
        {
            Pen pnDrawing = new Pen(Color.Teal, 8.55F);

            Point ptStart = new Point( 22, 40);
            Point pnEnd   = new Point(560, 40);

            pnDrawing.DashStyle = DashStyle.Solid;
            e.Graphics.DrawLine(pnDrawing, ptStart, pnEnd);

            ptStart.Y = pnEnd.Y += 40;

            pnDrawing.Color = Color.Purple;
            pnDrawing.DashStyle = DashStyle.Dash;
            e.Graphics.DrawLine(pnDrawing, ptStart, pnEnd);

            ptStart.Y = pnEnd.Y += 40;

            pnDrawing.Color = Color.SlateBlue;
            pnDrawing.DashStyle = DashStyle.DashDot;
            e.Graphics.DrawLine(pnDrawing, ptStart, pnEnd);

            ptStart.Y = pnEnd.Y += 40;

            pnDrawing.Color = Color.Fuchsia;
            pnDrawing.DashStyle = DashStyle.DashDotDot;
            e.Graphics.DrawLine(pnDrawing, ptStart, pnEnd);

            ptStart.Y = pnEnd.Y += 40;

            pnDrawing.Color = Color.CadetBlue;
            pnDrawing.DashStyle = DashStyle.Dot;
            e.Graphics.DrawLine(pnDrawing, ptStart, pnEnd);
        }
    }
}
This would produce:

Offsetting a Dashing Style
We saw that, when you specify a dashing pattern, you create an array of numbers; the compiler would start drawing from the starting point of the line and apply the pattern. One of the options given to you is to indicate to the compiler at what distance it should start applying the pattern from the start point. To support this, the Pen class is equipped with a property named DashOffset:
public float DashOffset { get; set; }
This property uses a decimal number that indicates the distance from the starting from where to start applying a dashing pattern. Here is an example of applying this property to a pen:
private void Exercise_Paint(object sender, PaintEventArgs e)
{
    Pen pnDrawing = new Pen(Color.CornflowerBlue, 12.55F);

    Point ptStart = new Point(22, 35);
    Point pnEnd   = new Point(582, 235);

    pnDrawing.DashPattern = [7.25F, .35F, 2.55F, .35F, 1.35F, .35F];

    pnDrawing.DashOffset  = 3.75F;
    e.Graphics.DrawLine(pnDrawing, ptStart, pnEnd);
}
This would produce:

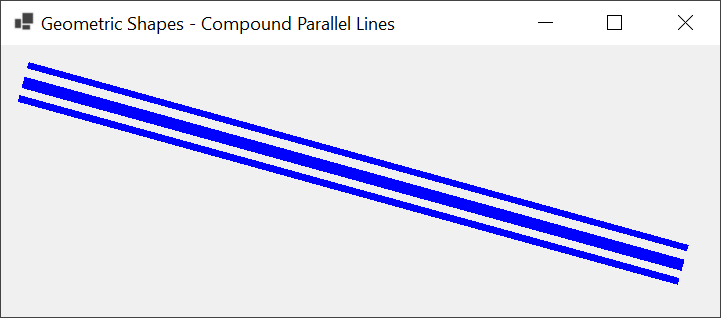
The Compound Array of a Pen
Compound drawing consists of drawing parallel lines that have some similar characteristics such as the same length and the same color. Of course, to present their parallelism, the lines must be separated by a distance between them. To support compound drawing, the Pen class is equipped with a property named CompoundArray:
public float[] CompoundArray { get; set; }
As you can see, this is a read-write property that is an array of floating-point numbers. Therefore, if you want to perform compound drawing:
After creating the array, assign it to the Pen.CompoundArray property of the pen you are using. Here is an example:
private void Exercise_Paint(object sender, PaintEventArgs e)
{
    Pen pnBlue = new Pen(Color.Blue, 48.35F);
    float[] compounding = { 0.104f, 0.237F, 0.418F, 0.657F, 0.812F, .955F };
    Point ptStart = new Point(22, 35);
    Point pnEnd = new Point(482, 218);

    pnBlue.CompoundArray = compounding;
    e.Graphics.DrawLine(pnBlue, ptStart, pnEnd);
}
This would produce:
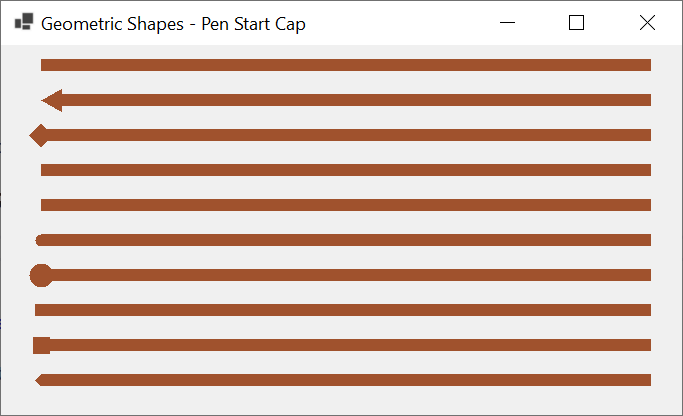
The Start Cap of a Pen
If you use a pen with a small width, such as 1 pixel, you may not notice how a line drawn where it starts but with a significantly wide pen, you would notice that the line starts with a flat shape. An alternative is to have round, square, or triangle start. This is referred to as the start cap.
To support the starting shape of a line, the Pen class is equipped with a property named StartCap:
public System.Drawing.Drawing2D.LineCap StartCap { get; set; }
The Pen.StartCap property is based on an enumeration named LineCap. The members of that enumeration are: AnchorMask, ArrowAnchor, Custom, DiamondAnchor, Flat, NoAnchor, Round, RoundAnchor, Square, SquareAnchor, and Triangle. To specify the start cap, assign the desired LineCap member to the StartCap property of the pen. Here are examples:
using System.Drawing.Drawing2D;

namespace GraphicsApplication
{
    public partial class Exercise : Form
    {
        public Exercise()
        {
            InitializeComponent();
        }

        private void Exercise_Paint(object sender, PaintEventArgs e)
        {
            Pen pnLine    = new Pen(Color.Sienna);
            Point ptStart = new Point(40, 20);
            Point pnEnd   = new Point(450, 20);

            pnLine.Width  = 12.00F;
            pnLine.StartCap = LineCap.AnchorMask;

            e.Graphics.DrawLine(pnLine, ptStart, pnEnd);

            pnLine.StartCap = LineCap.ArrowAnchor;
            ptStart.Y = pnEnd.Y += 35;
            e.Graphics.DrawLine(pnLine, ptStart, pnEnd);

            pnEnd.Y   += 35;
            ptStart.Y += 35;
            pnLine.StartCap = LineCap.DiamondAnchor;
            e.Graphics.DrawLine(pnLine, ptStart, pnEnd);

            ptStart.Y = pnEnd.Y += 35;
            pnLine.StartCap = LineCap.Flat;
            e.Graphics.DrawLine(pnLine, ptStart, pnEnd);

            ptStart.Y = pnEnd.Y += 35;
            pnLine.StartCap = LineCap.NoAnchor;
            e.Graphics.DrawLine(pnLine, ptStart, pnEnd);

            ptStart.Y = pnEnd.Y += 35;
            pnLine.StartCap = LineCap.Round;
            e.Graphics.DrawLine(pnLine, ptStart, pnEnd);

            ptStart.Y = pnEnd.Y += 35;
            pnLine.StartCap = LineCap.RoundAnchor;
            e.Graphics.DrawLine(pnLine, ptStart, pnEnd);

            ptStart.Y = pnEnd.Y += 35;
            pnLine.StartCap = LineCap.Square;
            e.Graphics.DrawLine(pnLine, ptStart, pnEnd);

            ptStart.Y = pnEnd.Y += 35;
            pnLine.StartCap = LineCap.SquareAnchor;
            e.Graphics.DrawLine(pnLine, ptStart, pnEnd);

            ptStart.Y = pnEnd.Y += 35;
            pnLine.StartCap = LineCap.Triangle;
            e.Graphics.DrawLine(pnLine, ptStart, pnEnd);
        }
    }
}
This would produce:
If none of the available members of the LineCap enumeration suits you, you can define a custom cap using the CustomStartCap class.
The End Cap of a Pen
You can control the end cap of a line. To support this, the Pen class is equipped with a property named EndCap:
public System.Drawing.Drawing2D.LineCap EndCap { get; set; }
Like StartCap, the EndCap property is based on the LineCap enumeration. This means that the EndCap property has the same values as StartCap. Here are examples:
You can control the end cap of a line. To support this, the Pen class is equipped with a property named EndCap:
using System.Drawing.Drawing2D;

namespace PensCharacteristics
{
    public partial class Exercise : Form
    {
        public Exercise()
        {
            InitializeComponent();
        }

        private void Exercise_Paint(object sender, PaintEventArgs e)
        {
            Graphics grapher = e.Graphics;
            Pen pnLine = new Pen(Color.FromArgb(36, 77, 248));
            Point ptStart = new Point(40, 20);
            Point pnEnd = new Point(625, 20);

            pnLine.Width    = 8.225F;
            pnLine.StartCap = LineCap.AnchorMask;
            pnLine.EndCap   = LineCap.AnchorMask;

            grapher.DrawLine(pnLine, ptStart, pnEnd);

            pnLine.StartCap = LineCap.ArrowAnchor;
            pnLine.EndCap   = LineCap.RoundAnchor;

            ptStart.Y = pnEnd.Y += 25;
            grapher.DrawLine(pnLine, ptStart, pnEnd);

            pnEnd.Y   += 25;
            ptStart.Y += 25;

            pnLine.StartCap = LineCap.RoundAnchor;
            pnLine.EndCap   = LineCap.DiamondAnchor;

            grapher.DrawLine(pnLine, ptStart, pnEnd);

            ptStart.Y = pnEnd.Y += 25;

            pnLine.StartCap = LineCap.DiamondAnchor;
            pnLine.EndCap   = LineCap.Flat;

            grapher.DrawLine(pnLine, ptStart, pnEnd);

            ptStart.Y = pnEnd.Y += 25;

            pnLine.StartCap = LineCap.DiamondAnchor;
            pnLine.EndCap   = LineCap.NoAnchor;

            grapher.DrawLine(pnLine, ptStart, pnEnd);

            pnLine.Width    = 22.248F;
            ptStart.Y = pnEnd.Y += 45;

            pnLine.StartCap = LineCap.ArrowAnchor;
            pnLine.EndCap   = LineCap.Round;

            grapher.DrawLine(pnLine, ptStart, pnEnd);

            pnLine.Width    = 8.225F;
            ptStart.Y       = pnEnd.Y += 45;

            pnLine.StartCap = LineCap.RoundAnchor;
            pnLine.EndCap   = LineCap.ArrowAnchor;

            grapher.DrawLine(pnLine, ptStart, pnEnd);

            ptStart.Y       = pnEnd.Y += 25;

            pnLine.StartCap = LineCap.Square;
            pnLine.EndCap   = LineCap.RoundAnchor;

            grapher.DrawLine(pnLine, ptStart, pnEnd);

            pnLine.Width    = 22.248F;
            ptStart.Y       = pnEnd.Y += 45;

            pnLine.StartCap = LineCap.DiamondAnchor;
            pnLine.EndCap   = LineCap.SquareAnchor;

            grapher.DrawLine(pnLine, ptStart, pnEnd);

            ptStart.Y       = pnEnd.Y += 55;

            pnLine.StartCap = LineCap.Triangle;
            pnLine.EndCap   = LineCap.Triangle;

            pnLine.Width    = 22.248F;
            grapher.DrawLine(pnLine, ptStart, pnEnd);
        }
    }
}
This would produce:

Using a combination of the start and end caps, you can control how a line starts and how it ends. If none of the available members of the LineCap enumeration suits you, you can define a custom cap using the CustomEndCap class.
A Pen as an Object
A Pen as an Argument
Pen is primarily a class like any other. As mentioned in the previous section, you can declare a variable of a pen object. You can also pass a pen as argument. In the body of the function or method, you can ignore or use the pen. Here is an example:
namespace GeometricShapes
{
    public partial class Exercise : Form
    {
        public Exercise()
        {
            InitializeComponent();
        }

        private void DrawLine(Graphics gph, Pen delimiter, Point start, Point end)
        {
            gph.DrawLine(delimiter, start, end);
        }

        private void pbxCanvas_Paint(object sender, PaintEventArgs e)
        {
            Pen pnDrawing = new(Color.PaleVioletRed, 17.725F);
            pnDrawing.DashStyle = DashStyle.DashDot;
            pnDrawing.StartCap = LineCap.ArrowAnchor;
            pnDrawing.EndCap = LineCap.SquareAnchor;

            Point ptStart = new Point(482, 25);
            Point pnEnd = new Point(22, 218);

            DrawLine(e.Graphics, pnColor, ptStart, pnEnd);
        }
    }
}
This would produce:

A Property of a Pen Type
In a class, you can create a property whose type is a pen. If you want, you can create a complete property that uses a private field. After doing that, when declaring a variable of the class, you can ignore or use the pen. Here is an example:
using System.Drawing.Drawing2D;

namespace GeometricFigures
{
    public partial class Exercise : Form
    {
        public Exercise()
        {
            InitializeComponent();
        }

        private void pbxCanvas_Paint(object sender, PaintEventArgs e)
        {
            Pen pnLine = new(Color.LightSlateGray, 14.875F);

            pnLine.EndCap   = LineCap.ArrowAnchor;
            pnLine.StartCap = LineCap.DiamondAnchor;
            pnLine.DashPattern = [ 3.25F, .35F, 2.55F, .35F, 1.35F, .35F];

            Point ptStart = new Point(14, 185);
            Point ptEnd = new Point(632, 25);

            Drawer drawer = new Drawer();
            drawer.Pen = pnLine;

            drawer.DrawLine(e.Graphics, ptStart, ptEnd);

            drawer.Pen.DashStyle = DashStyle.Dash;
            drawer.DrawLine(e.Graphics, ptStart, ptEnd);
        }
    }

    public class Drawer
    {
        // Privae local Pen field
        private Pen? _pn;

	  // Pen complete property
        public Pen? Pen
        {
            get
            {
                return _pn;
            }
            set
            {
                _pn = value;
            }
        }

        public void DrawLine(Graphics gph, Point start, Point end)
        {
            gph.DrawLine(_pn!, start, end);
        }
    }
}
This would produce:
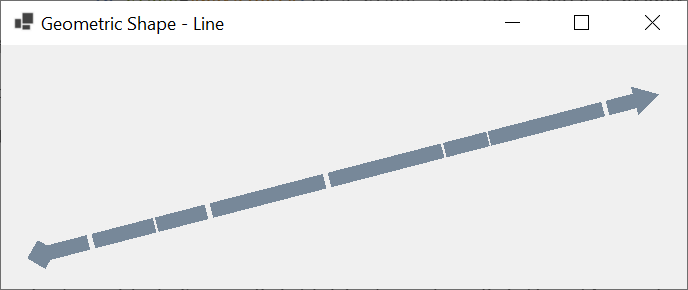
If you want a simple pen property, you can create it as an automatic one. Here is an example:
namespace GeometricFigures
{
    public partial class Exercise : Form
    {
        public Exercise()
        {
            InitializeComponent();
        }

        private void pbxCanvas_Paint(object sender, PaintEventArgs e)
        {
            Pen pnColor = new(Color.Crimson, 28.35F);

		Point ptFirst  = new Point(14, 18);
		Point pnSecond = new Point(586, 18);
		Point pnThird  = new Point(586, 228);
		Point pnFourth = new Point(14, 228);

		Drawer drawer = new Drawer(pnColor);
		float[] compounding = { 0.104f, 0.185F, 0.318F, 0.657F, 0.812F, .955F };

		drawer.Pen.CompoundArray = compounding;
		drawer.Pen.DashStyle = DashStyle.Dash;

		drawer.DrawLine(e.Graphics, ptFirst, pnSecond);
		drawer.DrawLine(e.Graphics, pnSecond, pnThird);
		drawer.DrawLine(e.Graphics, pnThird, pnFourth);
		drawer.DrawLine(e.Graphics, pnFourth, ptFirst);
        }
    }

    public class Drawer
    {
        public Drawer(Pen pen)
        {
            Pen = pen;
        }

        public Pen Pen { get; set; }

        public void DrawLine(Graphics gph, Point start, Point end)
        {
            gph.DrawLine(Pen, start, end);
        }
    }
}
This would produce:

A Line as an Object
Although the .NET Framework doesn't define a line as an object, in the world of object-oriented programming, you can create your own class to deal with lines. Since we already know various techniques to draw a line and the characteristics of a line, you can create a class and define the features you judge necessary. Here is an example:
public class Line
{
    public Line(Graphics graph, float startX, float startY, float endX, float endY, Color color, float width)
    {
        StartX  = startX;
        StartY  = startY;
        EndX    = endX;
        EndY    = endY;
        Color   = color;
        Width   = width;
        Grapher = graph;
    }

    public float    StartX      { get; set; }
    public float    StartY      { get; set; }
    public float    EndX        { get; set; }
    public float    EndY        { get; set; }
    public Color    Color       { get; set; }
    public float    Width       { get; set; }
    public LineCap  BorderStart { get; set; }
    public LineCap  BorderEnd   { get; set; }
    public Graphics Grapher     { get; set; }

    public void Draw()
    {
        Pen pn = new Pen(Color, Width);

        pn.StartCap = BorderStart;
        pn.EndCap   = BorderEnd;
        Grapher.DrawLine(pn, StartX, StartY, EndX, EndY);
    }
}
![]() Practical Learning: Ending the Lesson
Practical Learning: Ending the Lesson
|
|
|||
| Previous | Copyright © 2010-2024, FunctionX | Wednesday 24 April 2024 | Next |
|
|
|||