Options on Painting a Shape

Options on Painting a Shape
Linear Gradient Brushes
Introduction
In previous lessons, we learned to use a solid brush by applying a color to it. A gradient brush is a brush that uses two colors instead of one. A gradient brush resembles a solid brush in that it is color-based. The main characteristic of a gradient brush is that, when a gradient brush is used to paint an area, one of its colors is applied on one side of the shape and the other color is applied to the other side of the shape. In between, both colors merge to create a transition or fading effect.
There are two types of gradient brushes: linear and path.
![]() Practical Learning: Introducing .NET Framework Collections
Practical Learning: Introducing .NET Framework Collections
Creating a Linear Brush
A linear gradient brush is used to apply two colors in a closed shape but from one side of the shape, such as the left, to the other opposite side of the shape, such as the right.
To support linear gradient brushes, the .NET Framework provides a sealed class named LinearGradientBrush. It is derived from the System.Drawing.Brush class:
public sealed class LinearGradientBrush : System.Drawing.Brush
The LinearGradientBrush class defined in the System.Drawing.Drawing2D namespace. The class is equipped with various constructors.
Transitioning Between Points
To let you specify the starting and the end points inside of the shape that you want to fill, the LinearGradientBrush class is equipped with a constructor whose syntax is:
public LinearGradientBrush(Point point1,
                           Point point2,
                           Color color1,
                           Color color2);
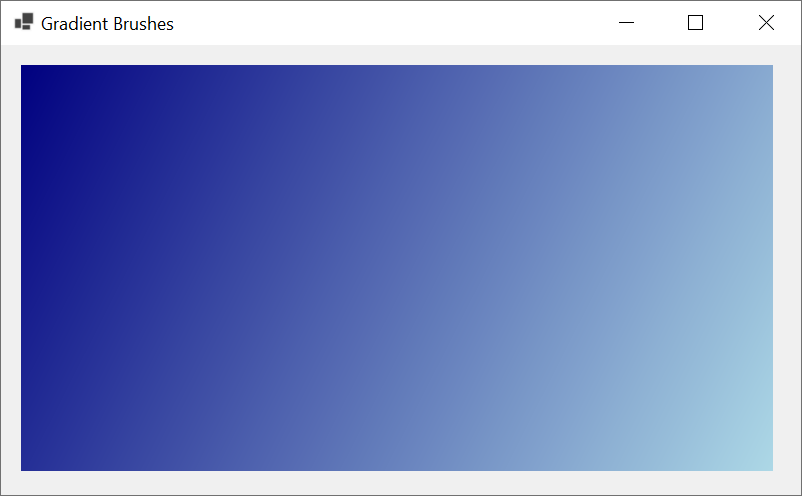
The first argument, point1, is the point where the filling operation would start. The third argument, color1, is the color that would be applied from that point. The second argument, point2, is the point where the filling operation would end by applying the color specified by the fourth argument, color2. Here is an example that uses that constructor:
using System.Drawing.Drawing2D;

namespace LinearGradientBrushes
{
    public partial class Exercise : Form
    {
        public Exercise()
        {
            InitializeComponent();
        }

        private void Exercise_Paint(object sender, PaintEventArgs e)
        {
            LinearGradientBrush lgb =
                                    new LinearGradientBrush(new Point(20, 20),
                                                            new Point(Width - 40, Height - 100),
                                                            Color.Navy,
                                                            Color.LightBlue);
            e.Graphics.FillRectangle(lgb, 20, 20, Width - 70, Height - 100);
        }
    }
}
This would produce:
In the above example, we used natural numbers for the points, if you want to use more precise values, the LinearGradientBrush class provides the following constructor:
public LinearGradientBrush(PointF point1,
                           PointF point2,
                           Color color1,
                           Color color2);
This time, you can provide decimal numbers for the points.
Controlling the Orientation of the Linear Filling
Introduction
By default, the linear gradient brush fills its associated shape based on a horizontal line. If you want, you can merge thes color using a different orientation. To support this, the LinearGradientBrush class provides the following constructor:
public LinearGradientBrush(Rectangle rect,
                           Color color1,
                           Color color2,
                           LinearGradientMode linearGradientMode);
The first argument, rect, is the rectangle inside of which the colors would be applied. The second argument, color1, is the color that would be applied from a starting point. The second argument, color2, is the color that would be applied at the other end. The linearGradientMode argument is used to determine the orientation of the merging colors. The linearGradientMode argument is based on an enumeration named LinearGradientMode:
public enum LinearGradientMode
A Horizontal Orientation for Linear Filling
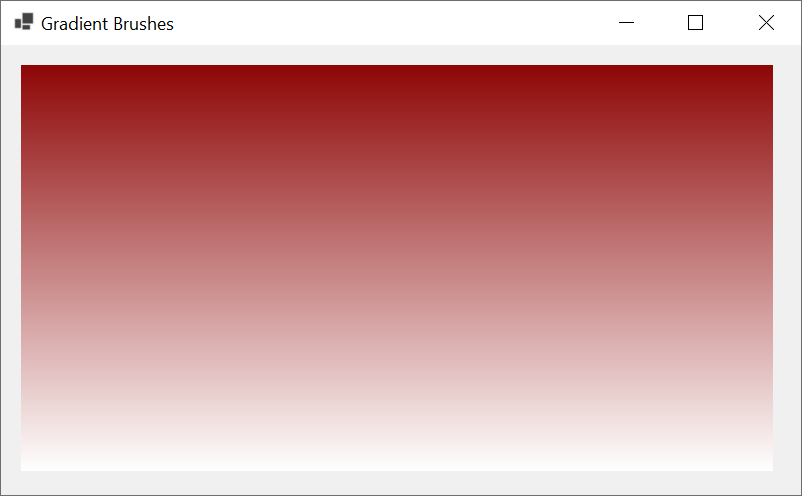
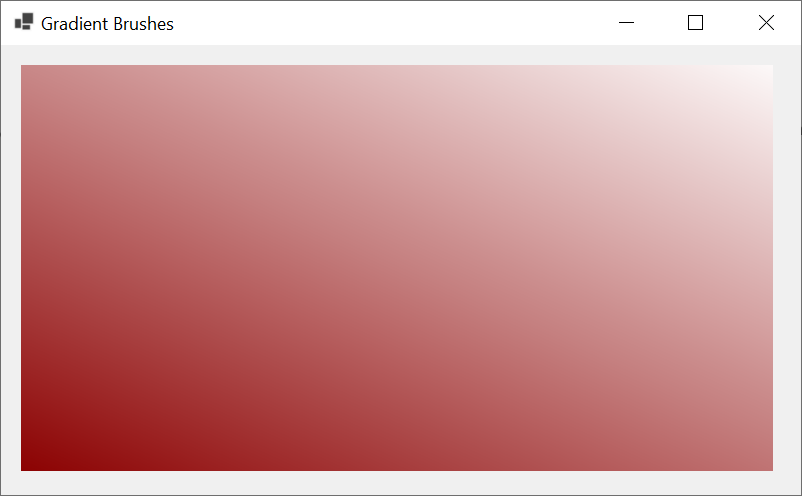
One of the members of the LinearGradientMode enumeration is named Horizontal. If you decide to use it, the first color, the color1 argument above, is applied to the left section of the rect argument. The second color, color2, is applied to the right section of the rect argument. Here is an example:
using System.Drawing.Drawing2D;

namespace GraphicsAccessories
{
    public partial class Exercise : Form
    {
        public Exercise()
        {
            InitializeComponent();
        }

        private void Exercise_Paint(object sender, PaintEventArgs e)
        {
            Rectangle rect = new Rectangle(10, 10, Width - 40, Height - 90);

            Graphics grapher = e.Graphics;

            LinearGradientBrush lgb =
                    new LinearGradientBrush(rect,
                                                Color.DarkRed,
                                                Color.White,
                                                LinearGradientMode.Horizontal);
            grapher.FillRectangle(lgb, 20, 20, Width - 70, Height - 100);

            lgb.Dispose();
        }
    }
}
This would produce:

Using Decimal Values
In the above example, we used a rectangle with natural numbers. In some cases, you may want the linear gradient to use more precise values. To assist you with this, the LinearGradientBrush class provides other constructors.
If you want the rectangle of your linear gradient brush to use decimal values, the LinearGradientBrush class provides another constructor with the following syntax:.
public LinearGradientBrush(System.Drawing.RectangleF rect,
                           System.Drawing.Color color1,
                           System.Drawing.Color color2,
                           System.Drawing.Drawing2D.LinearGradientMode linearGradientMode);
When calling this constructor, pass a rectangle that uses natural numbers or floating-point values.
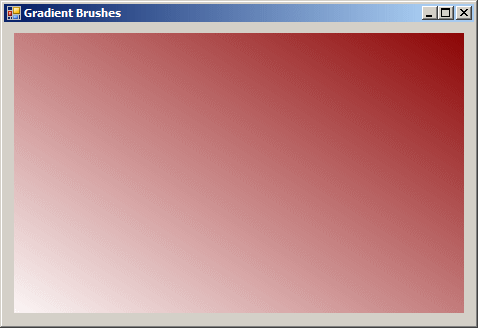
A Vertical Orientation for Linear Filling
Another member of the LinearGradientMode enumeration is named Vertical. If you use it, the first color, color1, is applied to the top section of the rect argument. The second color, color2, is applied to the bottom section of the rect argument. Here is an example:
using System.Drawing.Drawing2D;

namespace LinearGradientBrushes
{
    public partial class Exercise : Form
    {
        public Exercise()
        {
            InitializeComponent();
        }

        private void Exercise_Paint(object sender, PaintEventArgs e)
        {
            Rectangle rect = new Rectangle(10, 10, Width - 40, Height - 90);
            LinearGradientBrush lgb =
                    new LinearGradientBrush(rect,
                                            Color.DarkRed,
                                            Color.White,
                                            LinearGradientMode.Vertical);
            e.Graphics.FillRectangle(lgb, 20, 20, Width - 70, Height - 100);
        }
    }
}
This would produce:
Backward-Diagonally Orienting the Linear Filling
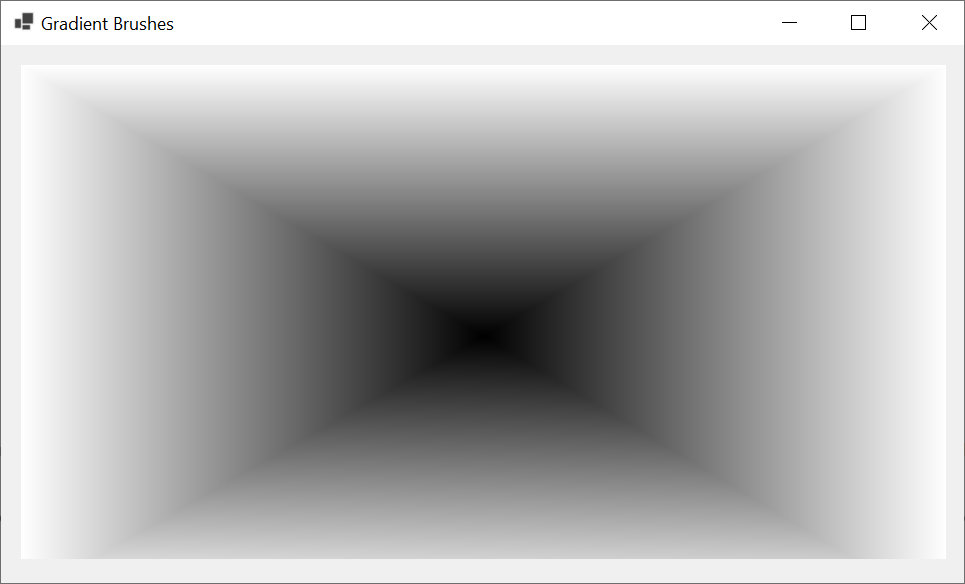
Another member of the LinearGradientMode enumeration is named BackwardDiagonal. If you decide to use it, the first color, color1, is applied to the top-right corner of the rect argument. The second color, color2, is applied to the bottom-left corner of the rect argument. Here is an example:
Forward-Diagonally Orienting the Linear Filling
The last member of the LinearGradientMode enumeration is ForwardDiagonal. In this case, the first color, color1, is applied to the top-left corner of the rect argument. The second color, color2, is applied to the bottom-right corner of the rect argument. The shape would appear as follows:
In the above examples, we used integers on the rectangle passed as argument. If you want the rectangle to use more precise values, the LinearGradientBrush class provides the following constructors:
public LinearGradientBrush(RectangleF rect,
                           Color color1,
                           Color color2,
                           LinearGradientMode factor);
Notice that the constructor takes a RectangleF argument, which uses decimal numbers.
Controlling the Angular Orientation
When filling a shape, if you can apply any angular orientation of your choice. To support that operation, the LinearGradientBrush class provides the following constructors:
public LinearGradientBrush(Rectangle rect,
                           Color color1,
                           Color color2,
                           float angle);
The first argument, rect, is the rectangle inside of which the colors would be applied. The last argument, angle, is an angle measured clockwise, that will specify the orientation of the merging colors. The second argument, color1, is the color that would be applied from the starting point. The second argument, color2, is the color that would be applied at the other end. Here is an example:
using System.Drawing.Drawing2D;

namespace LinearGradientBrushes
{
    public partial class Exercise : Form
    {
        public Exercise()
        {
            InitializeComponent();
        }

        private void Exercise_Paint(object sender, PaintEventArgs e)
        {
            Rectangle rect = new Rectangle(10, 10, Width - 40, Height - 90);
            LinearGradientBrush lgb = new LinearGradientBrush(rect,
                                                        Color.DarkRed,
                                                        Color.White,
                                                        -65.55F);
            e.Graphics.FillRectangle(lgb, 20, 20, Width - 70, Height - 100);
        }
    }
}
This would produce:
The above constructor uses natural numbers for the rectangle passed as argument. To support rectangles that use decimal numbers, the LinearGradientBrush class provides another version of the above constructor. Its syntax is:
public LinearGradientBrush(RectangleF rect,
                           Color color1,
                           Color color2,
                           float angle);
Path Gradient Brushes
The second type of gradient brush available is referred to as path gradient. This brush is applied on a path created by connecting a series of points to get a closed shape. The interior of the shape can then be filled as a gradient.
To support path brushes, the .NET Framework provides the PathGradientBrush from the System.Drawing.Drawing2D namespace. Two of the constructors of this class are:
public PathGradientBrush(Point points[]);
public PathGradientBrush(PointF points[]);
The argument passed to this constructor is an array of type Point. Here is an example:
using System.Drawing.Drawing2D;

namespace LinearGradientBrushes
{
    public partial class Exercise : Form
    {
        public Exercise()
        {
            InitializeComponent();
        }

        private void Exercise_Paint(object sender, PaintEventArgs e)
        {
            Point[] ptGraph =
            {
                new Point(        20,          20),
                new Point(Width - 40,          20),
                new Point(Width - 40, Height - 25),
                new Point(        20, Height - 40)
            };

            PathGradientBrush pgb = new PathGradientBrush(ptGraph);
            e.Graphics.FillRectangle(pgb, 10, 10, Width - 45, Height - 90);
        }
    }
}
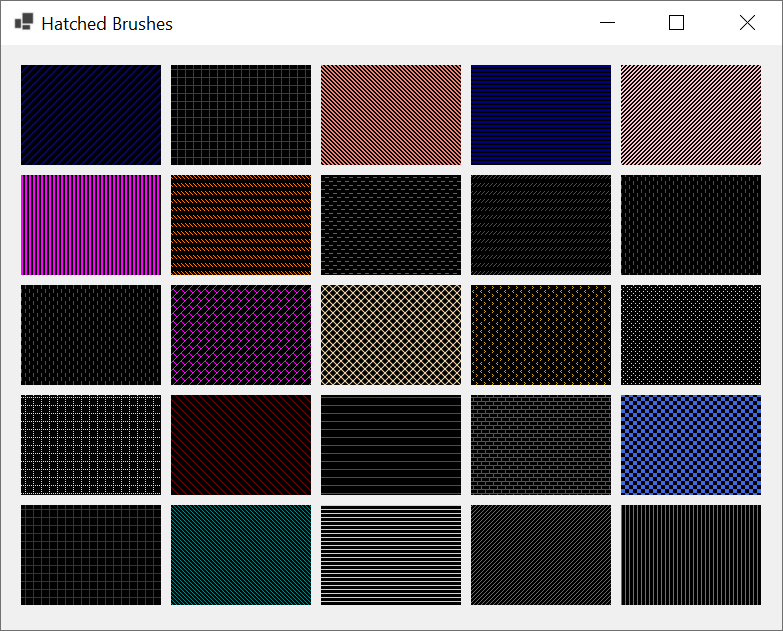
Hatched Brushes
Introduction
A hatch brush relies on a drawn or designed pattern to set its filling type. To support hatch brushes, the .NET Framework provides the patterns you can use as part of the brush. These pre-designed patterns are referred to as hatch styles.
This means that when you use a hatch brush, you must specify the type of pattern you want to use, through one of the available hatch styles. To make the filled area more interesting, you also specify the color to use when drawing the pattern.
To get a hatch brush, you use the HatchBrush class. One of its constructors has the following syntaxes:
public HatchBrush(HatchStyle style, Color foreColor);
The Style of a Hatch Brush
The foreColor argument is the color that will be used to draw the pattern. The style argument is the hatch style you want to apply. Some of the available styles are:
using System.Drawing.Drawing2D;

namespace GraphicsAccessories
{
    public partial class Exercise : Form
    {
        public Exercise()
        {
            InitializeComponent();
        }

        private void Exercise_Paint(object sender, PaintEventArgs e)
        {
            int width  = 140;
            int height = 100;

            HatchBrush brushBackDiag   = new HatchBrush(HatchStyle.BackwardDiagonal,       Color.FromArgb(0, 0, 255));
            HatchBrush brushCross      = new HatchBrush(HatchStyle.Cross,                  Color.FromArgb(200, 0, 0));
            HatchBrush brushDarkDown   = new HatchBrush(HatchStyle.DarkDownwardDiagonal,   Color.Salmon);
            HatchBrush brushDarkHorz   = new HatchBrush(HatchStyle.DarkHorizontal,         Color.Navy);
            HatchBrush brushDarkUpDiag = new HatchBrush(HatchStyle.DarkUpwardDiagonal,     Color.Pink);
            HatchBrush brushVertical   = new HatchBrush(HatchStyle.DarkVertical,           Color.FromArgb(255, 0, 255));
            HatchBrush brushDashDnDiag = new HatchBrush(HatchStyle.DashedDownwardDiagonal, Color.FromArgb(255, 128, 0));
            HatchBrush brushDashHorz   = new HatchBrush(HatchStyle.DashedHorizontal,       Color.FromArgb(0, 128, 192));
            HatchBrush brushDashUpDiag = new HatchBrush(HatchStyle.DashedUpwardDiagonal,   Color.Green);
            HatchBrush brushDashVert   = new HatchBrush(HatchStyle.DashedVertical,         Color.Firebrick);
            HatchBrush brushDiagBrisk  = new HatchBrush(HatchStyle.DiagonalBrick,          Color.Fuchsia);
            HatchBrush brushDiagCross  = new HatchBrush(HatchStyle.DiagonalCross,          Color.Moccasin);
            HatchBrush brushDivot      = new HatchBrush(HatchStyle.Divot,                  Color.Goldenrod);
            HatchBrush brushDotDiamond = new HatchBrush(HatchStyle.DottedDiamond,          Color.Gainsboro);
            HatchBrush brushDottedGrid = new HatchBrush(HatchStyle.DottedGrid,             Color.Khaki);
            HatchBrush brushForDiag    = new HatchBrush(HatchStyle.ForwardDiagonal,        Color.Maroon);
            HatchBrush brushHorz       = new HatchBrush(HatchStyle.Horizontal,             Color.Red);
            HatchBrush brushHorzBrick  = new HatchBrush(HatchStyle.HorizontalBrick,        Color.SaddleBrown);
            HatchBrush brushLgChkBoard = new HatchBrush(HatchStyle.LargeCheckerBoard,      Color.RoyalBlue);
            HatchBrush brushLgConfetti = new HatchBrush(HatchStyle.LargeConfetti,          Color.MistyRose);
            HatchBrush brushLgGrid     = new HatchBrush(HatchStyle.LargeGrid,              Color.Purple);
            HatchBrush brushLtDnDiag   = new HatchBrush(HatchStyle.LightDownwardDiagonal,  Color.DarkCyan);
            HatchBrush brushLtHorz     = new HatchBrush(HatchStyle.LightHorizontal,        Color.PowderBlue);
            HatchBrush brushUpDiag     = new HatchBrush(HatchStyle.LightUpwardDiagonal,    Color.SeaGreen);
            HatchBrush brushLtVert     = new HatchBrush(HatchStyle.LightVertical,          Color.Olive);

            e.Graphics.FillRectangle(brushBackDiag,    20,  20, width, height);
            e.Graphics.FillRectangle(brushCross,      170,  20, width, height);
            e.Graphics.FillRectangle(brushDarkDown,   320,  20, width, height);
            e.Graphics.FillRectangle(brushDarkHorz,   470,  20, width, height);
            e.Graphics.FillRectangle(brushDarkUpDiag, 620,  20, width, height);

            e.Graphics.FillRectangle(brushVertical,    20, 130, width, height);
            e.Graphics.FillRectangle(brushDashDnDiag, 170, 130, width, height);
            e.Graphics.FillRectangle(brushDashHorz,   320, 130, width, height);
            e.Graphics.FillRectangle(brushDashUpDiag, 470, 130, width, height);
            e.Graphics.FillRectangle(brushDashVert,   620, 130, width, height);

            e.Graphics.FillRectangle(brushDashVert,    20, 240, width, height);
            e.Graphics.FillRectangle(brushDiagBrisk,  170, 240, width, height);
            e.Graphics.FillRectangle(brushDiagCross,  320, 240, width, height);
            e.Graphics.FillRectangle(brushDivot,      470, 240, width, height);
            e.Graphics.FillRectangle(brushDotDiamond, 620, 240, width, height);

            e.Graphics.FillRectangle(brushDottedGrid,  20, 350, width, height);
            e.Graphics.FillRectangle(brushForDiag,    170, 350, width, height);
            e.Graphics.FillRectangle(brushHorz,       320, 350, width, height);
            e.Graphics.FillRectangle(brushHorzBrick,  470, 350, width, height);
            e.Graphics.FillRectangle(brushLgChkBoard, 620, 350, width, height);

            e.Graphics.FillRectangle(brushLgGrid,      20, 460, width, height);
            e.Graphics.FillRectangle(brushLtDnDiag,   170, 460, width, height);
            e.Graphics.FillRectangle(brushLtHorz,     320, 460, width, height);
            e.Graphics.FillRectangle(brushUpDiag,     470, 460, width, height);
            e.Graphics.FillRectangle(brushLtVert,     620, 460, width, height);
        }
    }
}
This would produce:
The Background Color of a Hatch Brush
If you use the above constructor to fill out a shape, the selected pattern would be drawn on top of a black color used as the background. If you want to use a different background, use the following constructor to initialize the brush:
public HatchBrush(HatchStyle hatchstyle, Color foreColor, Color backColor);
The backColor argument passed as a Color value will be used as the background Color. Here are examples of specifying the back color:
private void Exercise_Paint(object sender, PaintEventArgs e)
{
    HatchStyle[] hsBrush =
    {
        HatchStyle.BackwardDiagonal,
        HatchStyle.Cross, HatchStyle.Divot,
        HatchStyle.DarkDownwardDiagonal,
        HatchStyle.DarkHorizontal, HatchStyle.ForwardDiagonal,
        HatchStyle.DarkUpwardDiagonal,
        HatchStyle.DarkVertical, HatchStyle.HorizontalBrick,
        HatchStyle.DashedDownwardDiagonal,
        HatchStyle.DashedHorizontal,
        HatchStyle.DashedVertical, HatchStyle.LargeCheckerBoard,
        HatchStyle.DiagonalBrick, HatchStyle.Horizontal,
        HatchStyle.DiagonalCross, HatchStyle.DottedGrid,
        HatchStyle.DottedDiamond, HatchStyle.LightUpwardDiagonal,
        HatchStyle.LargeConfetti, HatchStyle.LargeGrid,
        HatchStyle.LightDownwardDiagonal, HatchStyle.OutlinedDiamond
        HatchStyle.LightHorizontal, HatchStyle.LightVertical
    };

    Color[] ForeColors =
    {
        Color.FromArgb(0, 0, 255), Color.FromArgb(200, 0, 0),
        Color.Salmon, Color.Navy, Color.Pink,
        Color.FromArgb(255, 0, 255), Color.FromArgb(255, 128, 0),
        Color.FromArgb(0, 128, 192), Color.Green,
        Color.Firebrick, Color.Fuchsia, Color.Moccasin,
        Color.Goldenrod, Color.Gainsboro, Color.Khaki,
        Color.Maroon, Color.DarkCyan, Color.Purple,
        Color.MistyRose, Color.RoyalBlue, Color.Red,
        Color.SaddleBrown, Color.Olive, Color.SeaGreen,
        Color.PowderBlue
    };

    Color[] BackColors =
    {
        Color.Azure, Color.DarkBlue, Color.AntiqueWhite,
        Color.Aqua, Color.DarkGray, Color.Aquamarine,
        Color.Azure, Color.Beige, Color.DarkGoldenrod,
        Color.Bisque, Color.DarkKhaki, Color.BlanchedAlmond,
        Color.Brown, Color.DarkCyan, Color.AliceBlue,
        Color.BurlyWood, Color.CadetBlue, Color.DarkMagenta,
        Color.Coral, Color.Chartreuse, Color.CornflowerBlue,
        Color.Cornsilk, Color.Crimson, Color.Cyan,
        Color.DarkGreen
    };

    Random rnd = new Random();

    HatchBrush brushBackDiag = new HatchBrush(hsBrush[rnd.Next(25)],
             ForeColors[rnd.Next(25)], BackColors[rnd.Next(25)]);
        HatchBrush brushCross =
        new HatchBrush(hsBrush[rnd.Next(25)],
                 ForeColors[rnd.Next(25)], BackColors[rnd.Next(25)]);
        HatchBrush brushDarkDown =
        new HatchBrush(hsBrush[rnd.Next(25)],
                 ForeColors[rnd.Next(25)], BackColors[rnd.Next(25)]);
        HatchBrush brushDarkHorz =
        new HatchBrush(hsBrush[rnd.Next(25)],
                 ForeColors[rnd.Next(25)], BackColors[rnd.Next(25)]);
        HatchBrush brushDarkUpDiag =
        new HatchBrush(hsBrush[rnd.Next(25)],
                 ForeColors[rnd.Next(25)], BackColors[rnd.Next(25)]);
        HatchBrush brushVertical =
        new HatchBrush(hsBrush[rnd.Next(25)],
                 ForeColors[rnd.Next(25)], BackColors[rnd.Next(25)]);
        HatchBrush brushDashDnDiag =
        new HatchBrush(hsBrush[rnd.Next(25)],
                 ForeColors[rnd.Next(25)], BackColors[rnd.Next(25)]);
        HatchBrush brushDashHorz =
        new HatchBrush(hsBrush[rnd.Next(25)],
                 ForeColors[rnd.Next(25)], BackColors[rnd.Next(25)]);
        HatchBrush brushDashUpDiag =
        new HatchBrush(hsBrush[rnd.Next(25)],
                 ForeColors[rnd.Next(25)], BackColors[rnd.Next(25)]);
        HatchBrush brushDashVert =
        new HatchBrush(hsBrush[rnd.Next(25)],
                 ForeColors[rnd.Next(25)], BackColors[rnd.Next(25)]);
        HatchBrush brushDiagBrisk =
        new HatchBrush(hsBrush[rnd.Next(25)],
                 ForeColors[rnd.Next(25)], BackColors[rnd.Next(25)]);
        HatchBrush brushDiagCross =
        new HatchBrush(hsBrush[rnd.Next(25)],
                 ForeColors[rnd.Next(25)], BackColors[rnd.Next(25)]);
        HatchBrush brushDivot =
        new HatchBrush(hsBrush[rnd.Next(25)],
                 ForeColors[rnd.Next(25)], BackColors[rnd.Next(25)]);
        HatchBrush brushDotDiamond =
        new HatchBrush(hsBrush[rnd.Next(25)],
                 ForeColors[rnd.Next(25)], BackColors[rnd.Next(25)]);
        HatchBrush brushDottedGrid =
        new HatchBrush(hsBrush[rnd.Next(25)],
                 ForeColors[rnd.Next(25)], BackColors[rnd.Next(25)]);
        HatchBrush brushForDiag =
        new HatchBrush(hsBrush[rnd.Next(25)],
                 ForeColors[rnd.Next(25)], BackColors[rnd.Next(25)]);
        HatchBrush brushHorz =
        new HatchBrush(hsBrush[rnd.Next(25)],
                 ForeColors[rnd.Next(25)], BackColors[rnd.Next(25)]);
        HatchBrush brushHorzBrick =
        new HatchBrush(hsBrush[rnd.Next(25)],
                 ForeColors[rnd.Next(25)], BackColors[rnd.Next(25)]);
        HatchBrush brushLgChkBoard =
        new HatchBrush(hsBrush[rnd.Next(25)],
                 ForeColors[rnd.Next(25)], BackColors[rnd.Next(25)]);
        HatchBrush brushLgConfetti =
        new HatchBrush(hsBrush[rnd.Next(25)],
                 ForeColors[rnd.Next(25)], BackColors[rnd.Next(25)]);
        HatchBrush brushLgGrid =
        new HatchBrush(hsBrush[rnd.Next(25)],
                 ForeColors[rnd.Next(25)], BackColors[rnd.Next(25)]);
        HatchBrush brushLtDnDiag =
        new HatchBrush(hsBrush[rnd.Next(25)],
                 ForeColors[rnd.Next(25)], BackColors[rnd.Next(25)]);
        HatchBrush brushLtHorz =
        new HatchBrush(hsBrush[rnd.Next(25)],
                 ForeColors[rnd.Next(25)], BackColors[rnd.Next(25)]);
        HatchBrush brushUpDiag =
        new HatchBrush(hsBrush[rnd.Next(25)],
                 ForeColors[rnd.Next(25)], BackColors[rnd.Next(25)]);
        HatchBrush brushLtVert =
        new HatchBrush(hsBrush[rnd.Next(25)],
                 ForeColors[rnd.Next(25)], BackColors[rnd.Next(25)]);

        e.Graphics.FillRectangle(brushBackDiag, 20, 20, 80, 60);
        e.Graphics.FillRectangle(brushCross, 120, 20, 80, 60);
        e.Graphics.FillRectangle(brushDarkDown, 220, 20, 80, 60);
        e.Graphics.FillRectangle(brushDarkHorz, 320, 20, 80, 60);
        e.Graphics.FillRectangle(brushDarkUpDiag, 420, 20, 80, 60);

        e.Graphics.FillRectangle(brushVertical, 20, 100, 80, 60);
        e.Graphics.FillRectangle(brushDashDnDiag, 120, 100, 80, 60);
        e.Graphics.FillRectangle(brushDashHorz, 220, 100, 80, 60);
        e.Graphics.FillRectangle(brushDashUpDiag, 320, 100, 80, 60);
        e.Graphics.FillRectangle(brushDashVert, 420, 100, 80, 60);

        e.Graphics.FillRectangle(brushDashVert, 20, 180, 80, 60);
        e.Graphics.FillRectangle(brushDiagBrisk, 120, 180, 80, 60);
        e.Graphics.FillRectangle(brushDiagCross, 220, 180, 80, 60);
        e.Graphics.FillRectangle(brushDivot, 320, 180, 80, 60);
        e.Graphics.FillRectangle(brushDotDiamond, 420, 180, 80, 60);

        e.Graphics.FillRectangle(brushDottedGrid, 20, 260, 80, 60);
        e.Graphics.FillRectangle(brushForDiag, 120, 260, 80, 60);
        e.Graphics.FillRectangle(brushHorz, 220, 260, 80, 60);
        e.Graphics.FillRectangle(brushHorzBrick, 320, 260, 80, 60);
        e.Graphics.FillRectangle(brushLgChkBoard, 420, 260, 80, 60);

        e.Graphics.FillRectangle(brushLgGrid, 20, 340, 80, 60);
        e.Graphics.FillRectangle(brushLtDnDiag, 120, 340, 80, 60);
        e.Graphics.FillRectangle(brushLtHorz, 220, 340, 80, 60);
        e.Graphics.FillRectangle(brushUpDiag, 320, 340, 80, 60);
        e.Graphics.FillRectangle(brushLtVert, 420, 340, 80, 60);
}
At any time, to find out the color used to paint a pattern, you can access the brush's ForegroundColor property. To know the color used as background, you can access the brush's BackgroundColor property. To know the hatch style used on the current brush, you can access its HatchStyle property.
![]() Practical Learning: Painting a Shape
Practical Learning: Painting a Shape

| Control | Name | Text | Other Properties | |
| Group Box | Current Year's Sales | |||
| Label | 1st Qtr | |||
| Label | 2nd Qtr | |||
| Label | 3rd Qtr | |||
| Label | 4th Qtr | |||
| TextBox | txtCurrentFirstQuarter | 0 | TextAlign: Right | |
| TextBox | txtCurrentSecondQuarter | 0 | TextAlign: Right | |
| TextBox | txtCurrentThirdQuarter | 0 | TextAlign: Right | |
| TextBox | txtCurrentFourthQuarter | 0 | TextAlign: Right | |
| Group Box | Previous Year's Sales | |||
| Label | 1st Qtr | |||
| Label | 2nd Qtr | |||
| Label | 3rd Qtr | |||
| Label | 4th Qtr | |||
| TextBox | txtPreviousFirstQuarter | 0 | TextAlign: Right | |
| TextBox | txtPreviousSecondQuarter | 0 | TextAlign: Right | |
| TextBox | txtPreviousThirdQuarter | 0 | TextAlign: Right | |
| TextBox | txtPreviousFourthQuarter | 0 | TextAlign: Right | |
| Button | Generate | btnGenerate | ||
| Label | lblLegend | __________Legend__________ | ||
| Label | This Year's Sales | |||
| Label | Last Year's Sales | |||
| Button | Close | btnClose | ||
using System.Drawing.Drawing2D;

namespace YearlySales1
{
    public partial class AnnualReport : Form
    {
        int curQtr1;
        int curQtr2;
        int curQtr3;
        int curQtr4;

        int prvQtr1;
        int prvQtr2;
        int prvQtr3;
        int prvQtr4;

        public AnnualReport()
        {
            InitializeComponent();

            (curQtr1, curQtr2, curQtr3, curQtr4) = (0, 0, 0, 0);

            (prvQtr1, prvQtr2, prvQtr3, prvQtr4) = (0, 0, 0, 0);
        }

        private void AnnualReport_Paint(object sender, PaintEventArgs e)
        {
            //    e.Graphics.DrawImage(bmpDrawingArea!, 0, 0);

            Rectangle rect = new Rectangle(20, 330, 490, 240);
            LinearGradientBrush linGradBrush = new LinearGradientBrush(rect,
                                                                       Color.FromArgb(204, 102, 0),
                                                                       Color.AntiqueWhite,
                                                                       LinearGradientMode.Vertical);
            e.Graphics.FillRectangle(linGradBrush, rect);
            e.Graphics.DrawRectangle(new Pen(Color.Black), rect);

            HatchBrush brushDiagCross = new HatchBrush(HatchStyle.DiagonalCross,
                                                        Color.White, Color.Blue);
            HatchBrush brushDotDiamond = new HatchBrush(HatchStyle.DottedDiamond,
                                                       Color.Fuchsia, Color.Brown);

            // Create an array of Rectangle objects for the current year
            Rectangle[] rectCurrentYear =
            {
                new Rectangle(txtCurrentFirstQuarter.Left  + 40, 570 - curQtr1, 40, curQtr1),
                new Rectangle(txtCurrentSecondQuarter.Left + 40, 570 - curQtr2, 40, curQtr2),
                new Rectangle(txtCurrentThirdQuarter.Left  + 40, 570 - curQtr3, 40, curQtr3),
                new Rectangle(txtCurrentFourthQuarter.Left + 40, 570 - curQtr4, 40, curQtr4)
            };

            // Create an array of Rectangle objects for the previous year
            Rectangle[] rectPreviousYear =
            {
                new Rectangle(txtPreviousFirstQuarter.Left  + 60, 570 - prvQtr1, 40, prvQtr1),
                new Rectangle(txtPreviousSecondQuarter.Left + 60, 570 - prvQtr2, 40, prvQtr2),
                new Rectangle(txtPreviousThirdQuarter.Left  + 60, 570 - prvQtr3, 40, prvQtr3),
                new Rectangle(txtPreviousFourthQuarter.Left + 60, 570 - prvQtr4, 40, prvQtr4)
            };

            // Draw the chart for the previous year first to send it back
            e.Graphics.FillRectangles(brushDiagCross, rectPreviousYear);
            e.Graphics.DrawRectangles(new Pen(Color.Blue, width: 2.50F), rectPreviousYear);
            // Draw the chart for the current year in front
            e.Graphics.FillRectangles(brushDotDiamond, rectCurrentYear);
            e.Graphics.DrawRectangles(new Pen(Color.Black), rectCurrentYear);

            // Draw the small rectangles of the legend
            e.Graphics.FillRectangle(brushDotDiamond,
                                           lblLegend.Left + 20, lblLegend.Top + 50, 60, 30);
            e.Graphics.DrawRectangle(new Pen(Color.Black, width: 1.50F),
                                           lblLegend.Left + 20, lblLegend.Top + 50, 60, 30);
            e.Graphics.FillRectangle(brushDiagCross,
                                           lblLegend.Left + 20,
                                           lblLegend.Top + 100, 60, 30);
            e.Graphics.DrawRectangle(new Pen(Color.Blue, width: 1.50F),
                                           lblLegend.Left + 20,
                                           lblLegend.Top + 100, 60, 30);

            e.Graphics.DrawLine(new Pen(Color.Black, 5.00F), 20, 570, 510, 570);
        }

        private void btnGenerate_Click(object sender, EventArgs e)
        {
            // Retrieve the values of the current year's sales
            try
            {
                curQtr1 = int.Parse(txtCurrentFirstQuarter.Text) / 100;
            }
            catch (FormatException)
            {
                MessageBox.Show("Current Year - Invalid 1st Quarter Value");
            }

            try
            {
                curQtr2 = int.Parse(txtCurrentSecondQuarter.Text) / 100;
            }
            catch (FormatException)
            {
                MessageBox.Show("Current Year - Invalid 2nd Quarter Value");
            }

            try
            {
                curQtr3 = int.Parse(txtCurrentThirdQuarter.Text) / 100;
            }
            catch (FormatException)
            {
                MessageBox.Show("Current Year - Invalid 3rd Quarter Value");
            }

            try
            {
                curQtr4 = int.Parse(txtCurrentFourthQuarter.Text) / 100;
            }
            catch (FormatException)
            {
                MessageBox.Show("Current Year - Invalid 4th Quarter Value");
            }

            // Retrieve the values of last year's sales
            try
            {
                prvQtr1 = int.Parse(txtPreviousFirstQuarter.Text) / 100;
            }
            catch (FormatException)
            {
                MessageBox.Show("Previous Year - Invalid 1st Quarter Value");
            }

            try
            {
                prvQtr2 = int.Parse(txtPreviousSecondQuarter.Text) / 100;
            }
            catch (FormatException)
            {
                MessageBox.Show("Previous Year - Invalid 2nd Quarter Value");
            }

            try
            {
                prvQtr3 = int.Parse(txtPreviousThirdQuarter.Text) / 100;
            }
            catch (FormatException)
            {
                MessageBox.Show("Previous Year - Invalid 3rd Quarter Value");
            }

            try
            {
                prvQtr4 = int.Parse(txtPreviousFourthQuarter.Text) / 100;
            }
            catch (FormatException)
            {
                MessageBox.Show("Previous Year - Invalid 4th Quarter Value");
            }

            Invalidate();
        }

        private void btnClose_Click(object sender, EventArgs e)
        {
            Close();
        }
    }
}
Current Year's Sales
        1st Qtr: 14860
        2nd Qtr: 10500
        3rd Qtr: 20225
        4th Qtr: 14200
Current Year's Sales
        1st Qtr: 9750
        2nd Qtr: 14500
        3rd Qtr: 15500
        4th Qtr: 8460
|
|
|||
| Previous | Copyright © 2010-2024, FunctionX | Friday 07 Jun 2024 | Next |
|
|
|||