Techniques of Painting a Shape

Techniques of Painting a Shape
Painting with a Picture
Introduction
We now know how to paint a rectangle with a solid brush. We have also been introduced to texture brushes. We also know that the .NET Framework, through the Graphics and the GraphicsPath classes, provides various ways to draw closed shapes such as a rectangle. After drawing such a closed shape, you can fill it. You have many options. For example, you can fill out a shape with a color, a pattern, or an image (bitmap, picture, etc).
![]() Practical Learning: Introducing .NET Framework Collections
Practical Learning: Introducing .NET Framework Collections
Filling a Shape with a Pattern
As we saw already in previous lessons, the primary, most common, or easiest way to fill out a shape is by painting it with a color. You can also fill a shape using a pattern. We already saw how to use a pattern to fill out a rectangle using a hatch brush and using patterns that the .NET Framework provides. Fortunately, you have many other options.
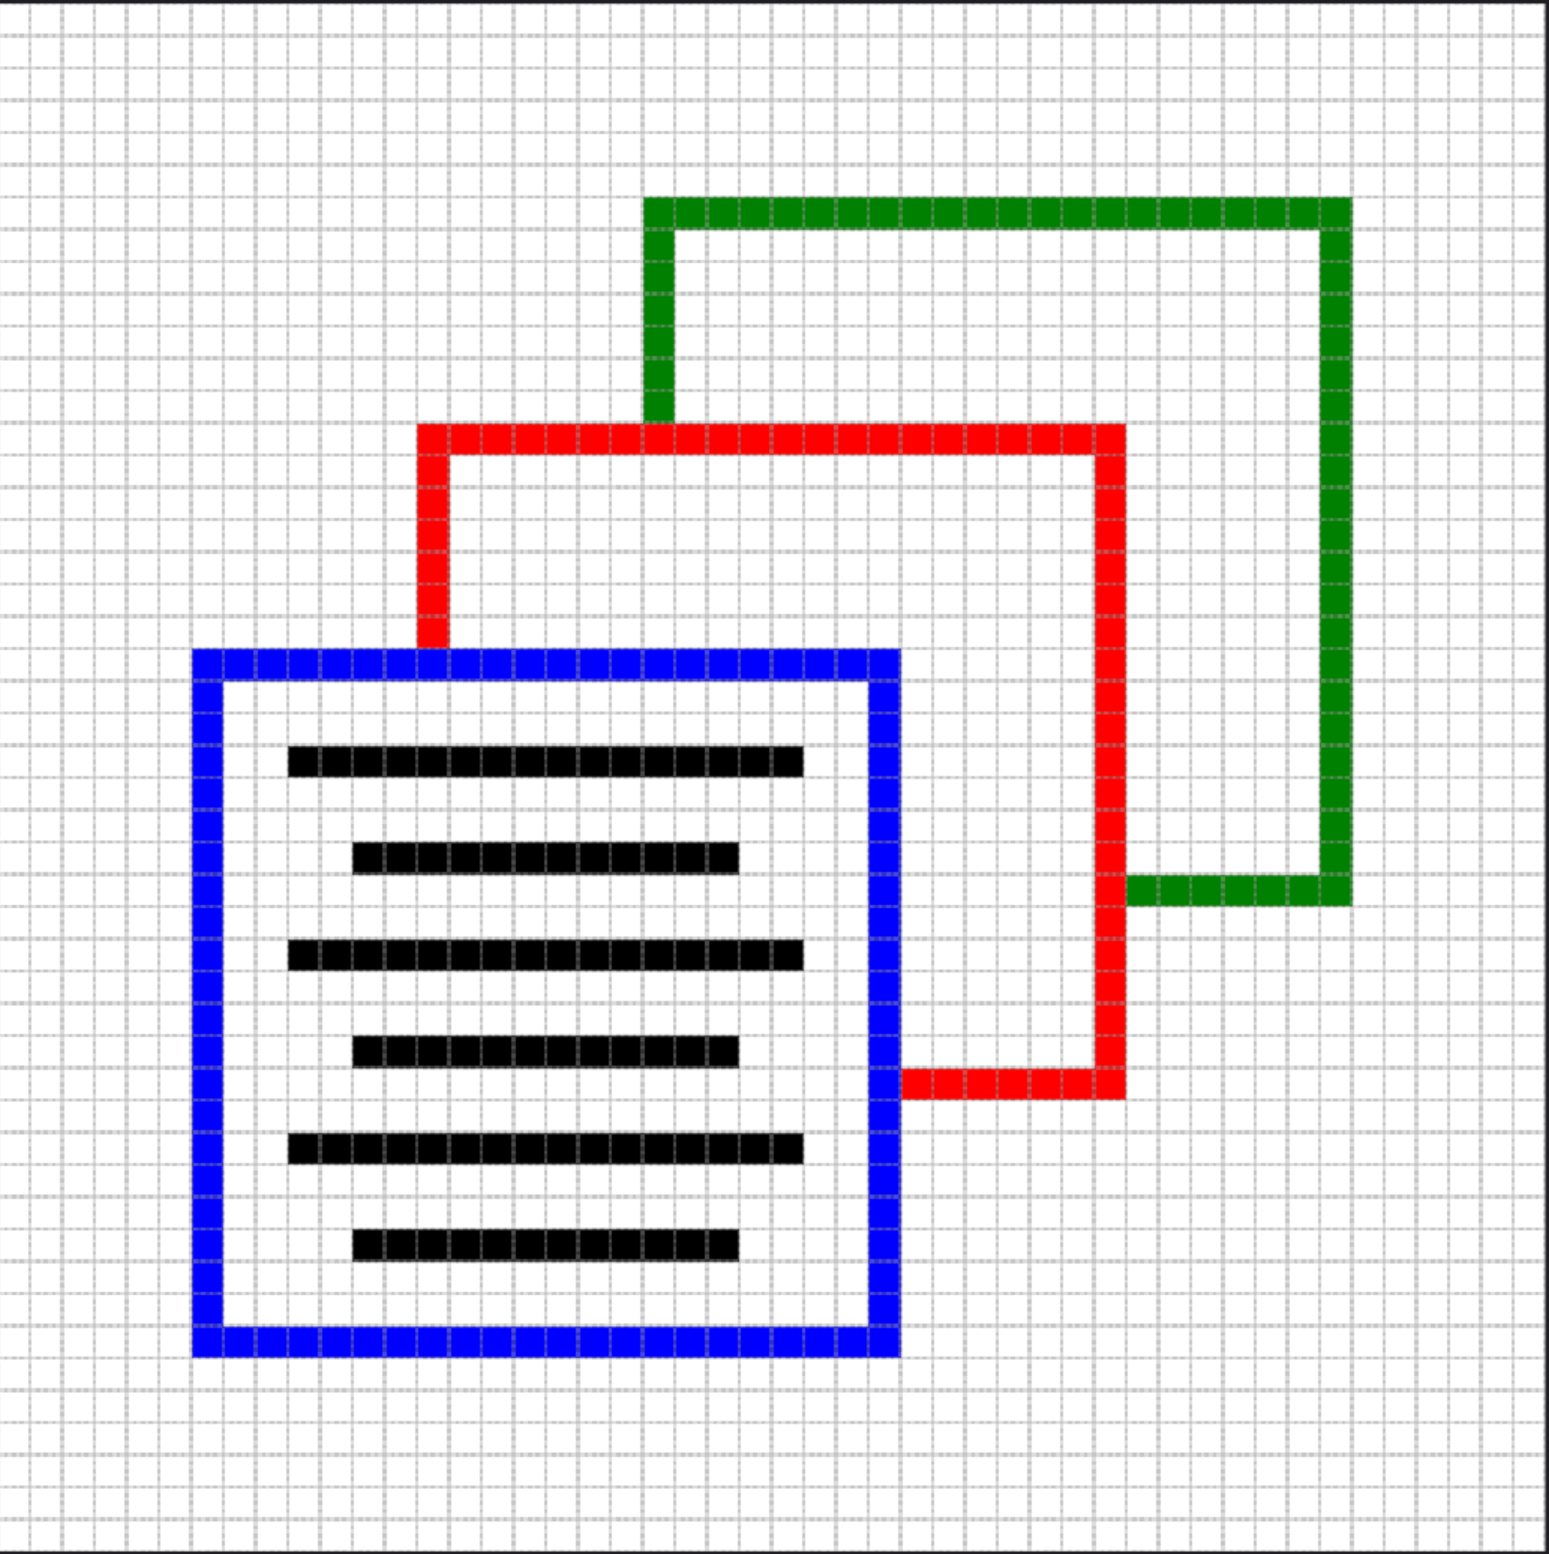
In some cases, you may want to create or design your own pattern and use it to fill an area. To do this, you must perform two main steps. First, you must design a picture and save it as a file. Then you must create a brush and pass the picture to it. You can use an existing picture designed by someone else or you can design your own picture using any normal graphics application, including Microsoft Paint that is automatically installed with Microsoft Windows. You should have the picture as a file with a normal graphics file extension, which could be .bmp, .jpg, .gif, .png, etc. Here is an example of a designed bitmap saved as Papers.bmp:
Introduction to Texture Brushes
Overview
A texture brush is an object that holds a picture and uses it to fill the interior of a closed shape. To initialize it, you can use a picture of your choice with the characteristics you want.
Creating a Texture Brush
To support texture brushes, the .NET Framework provides a sealed class named TextureBrush. That class is directly derived from the Brush class:
public sealed class TextureBrush : System.Drawing.Brush
The TextureBrush class is defined in the System.Drawing namespace. The class is equipped with various constructors that provide many options.
One of the constructors of the TextureBrush class uses the following syntax:
public TextureBrush(Image bitmap);
This constructor takes an Image object as argument. That argument can be a bitmap. This means that you can pass the name of a picture file or its path to the above constructor. Of course, remember to specify the extension of the picture file.
Displaying a Picture Using a Texture Brush
After initializing the brush, you can use it to fill the interior of a closed shape. For example, you can call a Fill... method to paint its shape. Here is an example:
namespace BitmapFillingShape
{
public partial class Exercise : Form
{
public Exercise()
{
InitializeComponent();
}
private void Exercise_Paint(object sender, PaintEventArgs e)
{
Graphics graph = e.Graphics;
Bitmap bmpPapers = new Bitmap("Papers.bmp");
TextureBrush brushPapers = new TextureBrush(bmpPapers);
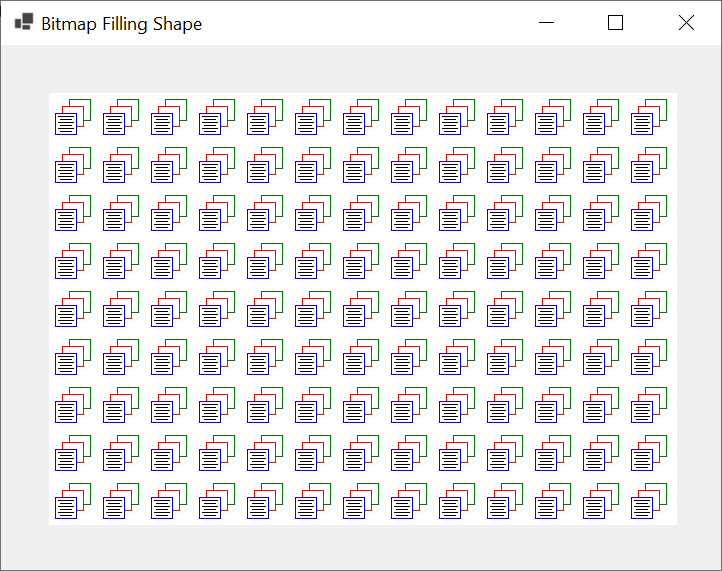
graph.FillRectangle(brushPapers, 48, 48, 628, 432);
}
}
}
This would produce:
Wrapping a Textured Picture
Introduction
You can draw a bitmap in a rectangle you allocate, doing this in a tiled fashion. To support this, the TextureBrush class is equipped with a property named WrapMode:
public System.Drawing.Drawing2D.WrapMode WrapMode { get; set; }
The WrapMode property is from an enumeration of the same name. The WrapMode enumeration is defined in the System.Drawing.Drawing2D namespace. The wrapping mode specifies how the tiling must be performed. To support this characteristic, the WrapMode enumeration is equipped with various members.
Clamping a Picture
One technique of displaying a picture consists of drawing it once in the rectangle that is allocated for it. To support this operation, the WrapMode enumeration is equipped with a member named Clamp. Here is an example of accessing it:
private void Exercise_Paint(object sender, PaintEventArgs e)
{
Graphics graph = e.Graphics;
Bitmap bmpPapers = new Bitmap("Papers.bmp");
TextureBrush brush = new TextureBrush(bmpPapers);
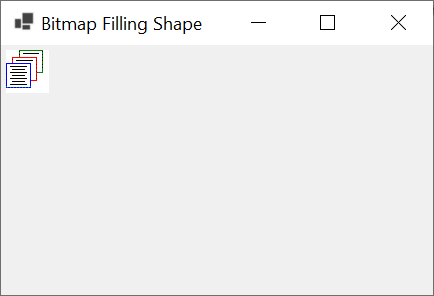
brush.WrapMode = System.Drawing.Drawing2D.WrapMode.Clamp;
graph.FillRectangle(brush, 5, 5, 628, 432);
}
This would produce:
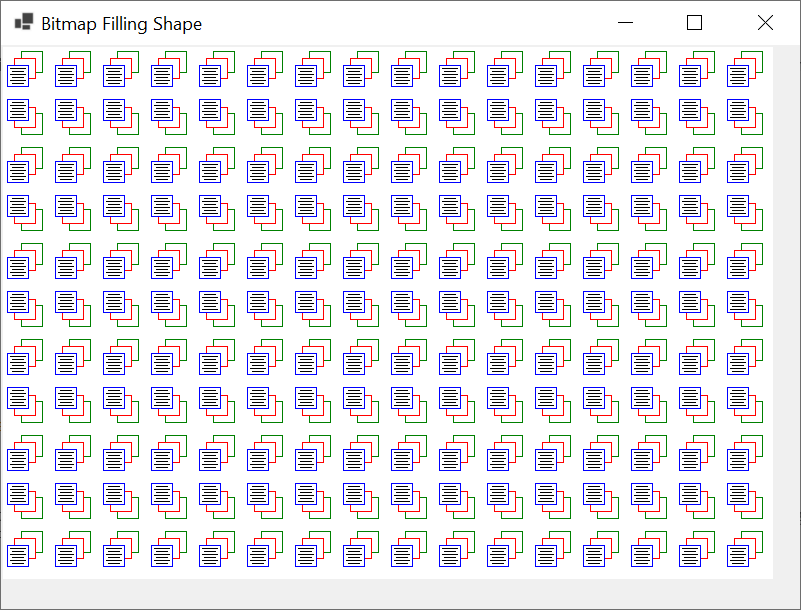
Tiling a Picture
Another way to present a picture is to draw it once, then draw it again, and continue drawing it within the rectangle allocated for the operation. To support this operation, the WrapMode enumeration is equipped with a member named Tile. Here is an example of using it::
private void Exercise_Paint(object sender, PaintEventArgs e)
{
Graphics graph = e.Graphics;
Bitmap bmpPapers = new Bitmap("Papers.bmp");
TextureBrush brush = new TextureBrush(bmpPapers);
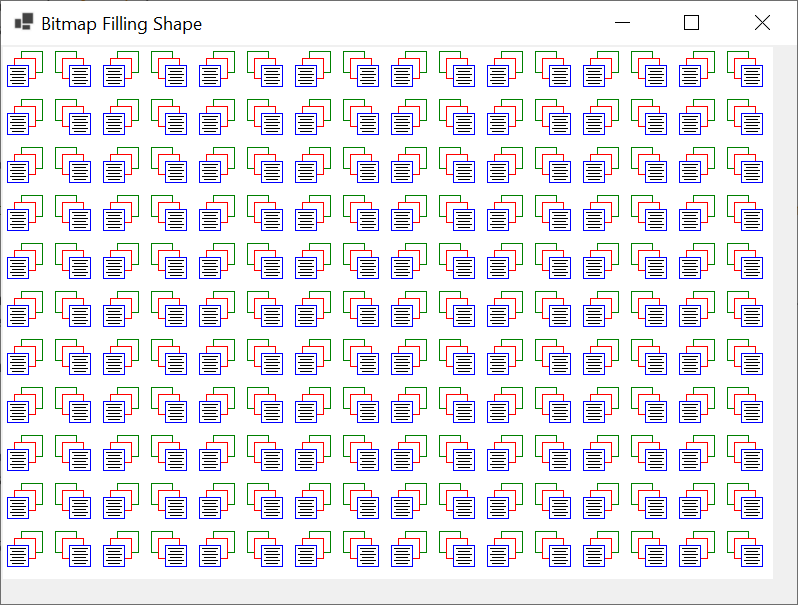
brush.WrapMode = System.Drawing.Drawing2D.WrapMode.Tile;
graph.FillRectangle(brush, 48, 48, 628, 432);
}
This would produce:
Tiling a Picture Horizontally
You can ask the compiler to draw a picture, to draw it again on its right side but flipped horizontally, and then to repeat this technique continuously in a tiled fashion and in the allocated rectangle. To support this operation, the WrapMode enumeration is equipped with a member named TileFlipX. Here is an example of applying this operation:
private void Exercise_Paint(object sender, PaintEventArgs e)
{
    Graphics graph = e.Graphics;

    Bitmap bmpPapers = new Bitmap("Papers.bmp");
    TextureBrush brush = new TextureBrush(bmpPapers);

    brush.WrapMode = System.Drawing.Drawing2D.WrapMode.TileFlipX;
    graph.FillRectangle(brush, 2, 2, 770, 532);
}
This would produce:
Tiling a Picture Vertically
You can first draw a picture, then draw it again under the first but flip the new representation vertically, and then repeat this technique continuously in a tiled fashion and in the allocated rectangle. To support this operation, the WrapMode enumeration is equipped with a member named TileFlipY. Here is an example that uses it:
private void Exercise_Paint(object sender, PaintEventArgs e)
{
    Graphics graph = e.Graphics;

    Bitmap bmpPapers = new Bitmap("Papers.bmp");
    TextureBrush brush = new TextureBrush(bmpPapers);

    brush.WrapMode = System.Drawing.Drawing2D.WrapMode.TileFlipY;
    graph.FillRectangle(brush, 2, 2, 770, 532);
}
This would produce:
Tiling a Picture Horizontally and Vertically
You may want to draw a picture, to draw it again on its right side but flipped horizontally, then to draw both the original and the right copy under each other but flipped vertically. The four pictures can be redrawn in a tiled fashion and in the rectangle allocated for the operation. As one way to perform this operation, you can bitwise add the TileFlipX and the TileFlipY members. Here is an example:
private void Exercise_Paint(object sender, PaintEventArgs e)
{
    Graphics graph = e.Graphics;

    Bitmap bmpPapers = new Bitmap("Papers.bmp");
    TextureBrush brush = new TextureBrush(bmpPapers);

    brush.WrapMode = System.Drawing.Drawing2D.WrapMode.TileFlipX | System.Drawing.Drawing2D.WrapMode.TileFlipY;
    graph.FillRectangle(brush, 2, 2, 770, 532);
}
This would produce:
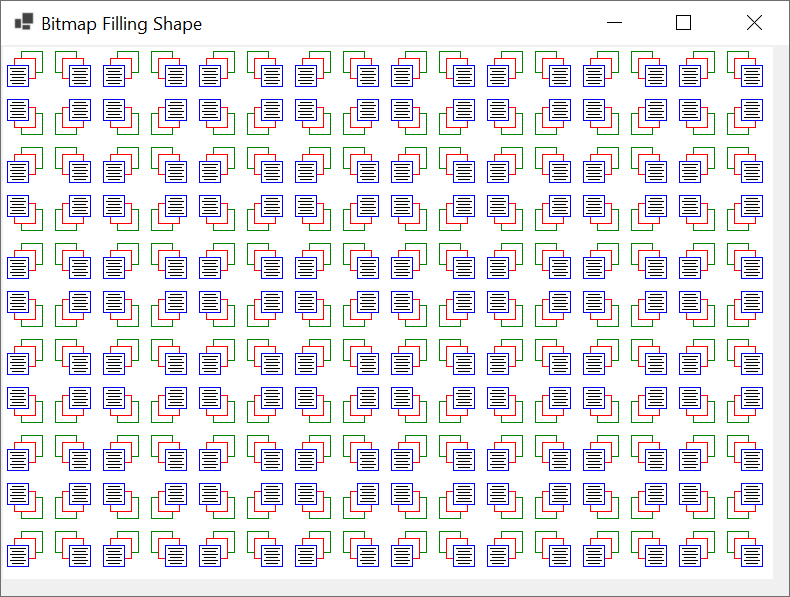
To support this operation, the WrapMode enumeration is equipped with a member named TileFlipXY.
Constructing a Wrapping Operation
As another way to support picture wrapping, the TextureBrush class is equipped with the following constructor:
public TextureBrush(Image bitmap, WrapMode wrapMode);
When creating a texure brush using this constructor, pass a second argument from the WrapMode enumeration. Here is an example:
private void Exercise_Paint(object sender, PaintEventArgs e)
{
    Graphics graph = e.Graphics;

    Bitmap bmpPapers = new Bitmap("Papers.bmp");
    TextureBrush brush = new TextureBrush(bmpPapers, System.Drawing.Drawing2D.WrapMode.TileFlipXY);

    graph.FillRectangle(brush, 2, 2, 770, 532);
}
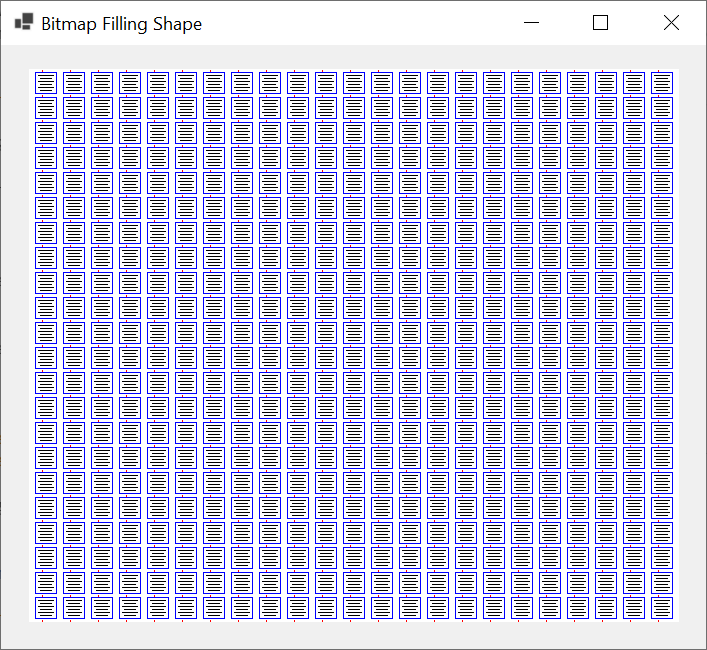
Controlling the Rectangular Confinement of a Picture
Allocating a Rectangle to a Brush
When displaying a picture, you can control the size in which to display the picture. You have some options and restrictions. To start, the TextureBrush class provides the following constructor:
public TextureBrush(Image image, Rectangle dstRect);
To let you use a rectangle whose values are decimal numbers, the TextureBrush class provides another constructor whose syntax is:
public TextureBrush(Image image, RectangleF dstRect);
When using one of these constructors, pass a second argument as a rectangle that specifies the location, the width and the height of the picture. The rectangle must follow some rules:
Here is an example of calling one of the above constructors:
namespace BitmapFillingShape
{
    public partial class Exercise : Form
    {
        public Exercise()
        {
            InitializeComponent();
        }

        private void Exercise_Paint(object sender, PaintEventArgs e)
        {
            Graphics graph = e.Graphics;

            Bitmap bmpPapers = new Bitmap("Papers.bmp");
            TextureBrush brush = new TextureBrush(bmpPapers, new Rectangle(0, 18, 28, 25));

            graph.FillRectangle(brush, 28, 24, 650, 553);
        }
    }
}
This would produce:
If you violate any of the rules we described above, the compiler would throw an System.OutOfMemoryException exception.
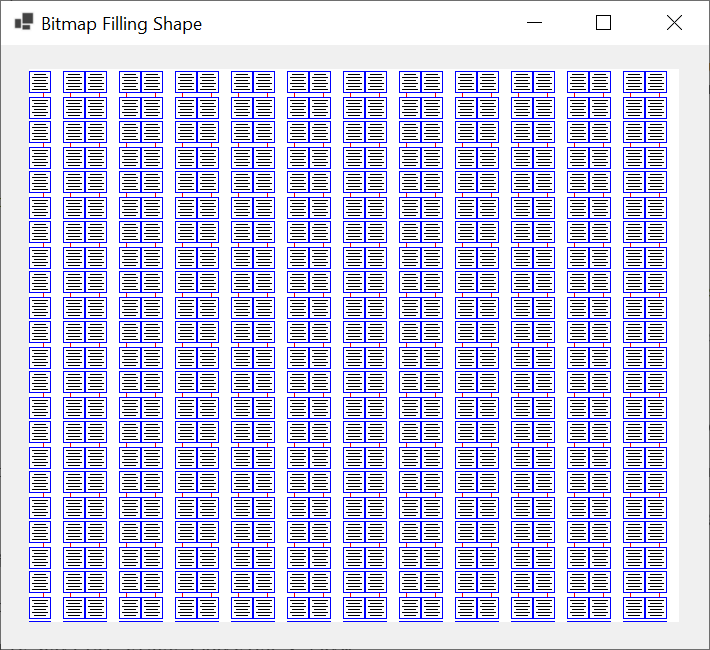
Wrapping a Picture
When creating a texture brush, instead of defining the wrapping operaton separately, the TextureBrush class allows you to specify the wrapping factor directly. To support this, the class provides another constructor whose syntax is:
public TextureBrush (System.Drawing.Image image, System.Drawing.Drawing2D.WrapMode wrapMode, System.Drawing.Rectangle dstRect);
When calling this constructor, passing a wrapping value and a rectangle as arguments. Here is an example:
using System.Drawing.Drawing2D;

namespace BitmapFillingShape
{
    public partial class Exercise : Form
    {
        public Exercise()
        {
            InitializeComponent();
        }

        private void Exercise_Paint(object sender, PaintEventArgs e)
        {
            Graphics graph = e.Graphics;

            Bitmap bmpPapers = new Bitmap("Papers.bmp");
            TextureBrush brush = new TextureBrush(bmpPapers, WrapMode.TileFlipXY, new Rectangle(0, 18, 28, 25));

            graph.FillRectangle(brush, 28, 24, 650, 553);
        }
    }
}
This would produce:
The above constructor uses a rectangle with integral values. If you want a rectangle with decimal values, the TextureBrush class another constructor whose syntax is:
public TextureBrush (System.Drawing.Image image, System.Drawing.Drawing2D.WrapMode wrapMode, System.Drawing.RectangleF dstRect);
Painting Other Shapes
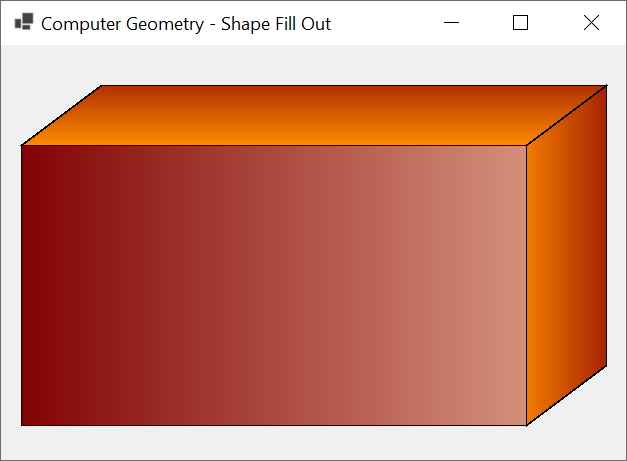
Painting a Polygon
In previous lessons, we saw how to fill a polygon, which is done by calling a version of the overloaded Graphics.FillPolygon() method. In previous sections, we painted the polygons with a simple brush that presents only a color; this was done by using a solid brush. To enhance the appearance of a polygon, you can paint it with other types of brushes. For example, you can paint a polygon with a linear gradient brush. Here is an example:
WrapMode. Although the location must be at (0, 0), the width and the height must be lower or equal to the intended dimensions of the bitmap. For example, if you have a picture that is 48x48 pixels, the width you can use from this picture should be <= 48 and the height should be <= 48. This allows you to use only a portion of the picture if you want. To let you use a portion of the picture, the class provides the following constructor:
using System.Drawing.Drawing2D;

namespace GeometricShapes
{
    public partial class Exercise : Form
    {
        public Exercise()
        {
            InitializeComponent();
        }

        private void Exercise_Paint(object sender, PaintEventArgs e)
        {
            Graphics grapher = e.Graphics;
            Pen penBorder = new Pen(Brushes.Black, 1.855F);

            RectangleF rectf = new RectangleF(12.225F, 14.308F, 547.147F, 393.792F);
            LinearGradientBrush lgb = new LinearGradientBrush(rectf,
                                                              Color.Maroon,
                                                              Color.PeachPuff,
                                                              LinearGradientMode.Horizontal);

            // The points for the the polygons
            PointF[] ptsFace  = { new( 22.428F, 112.488F),
                                  new(524.974F, 112.488F),
                                  new(524.974F, 384.716F),
                                  new( 22.428F, 384.716F) };
            PointF[] ptsTop   = { new( 22.428F, 112.488F),
                                  new(112.488F,  42.116F),
                                  new(614.886F,  42.116F),
                                  new(524.974F, 112.488F) };
            PointF[] ptsRight = { new(524.974F, 112.488F),
                                  new(614.886F,  42.116F),
                                  new(614.886F, 322.664F),
                                  new(524.974F, 384.716F) };

            grapher.FillPolygon(lgb, ptsFace);
            grapher.DrawPolygon(penBorder, ptsFace);

            rectf = new(12.225F, 14.308F, 605.554F, 98.402F);
            lgb = new LinearGradientBrush(rectf,
                                         Color.DarkRed,
                                         Color.DarkOrange,
                                         LinearGradientMode.Vertical);

            grapher.FillPolygon(lgb, ptsTop);
            grapher.DrawPolygon(penBorder, ptsTop);

            rectf = new(12.225F, 14.308F, 125.55F, 492.418F);
            lgb = new LinearGradientBrush(rectf,
                                         Color.DarkOrange,
                                         Color.DarkRed,
                                         LinearGradientMode.Horizontal);
            grapher.FillPolygon(lgb, ptsRight);
            grapher.DrawPolygon(penBorder, ptsRight);
        }
    }
}
This would produce:
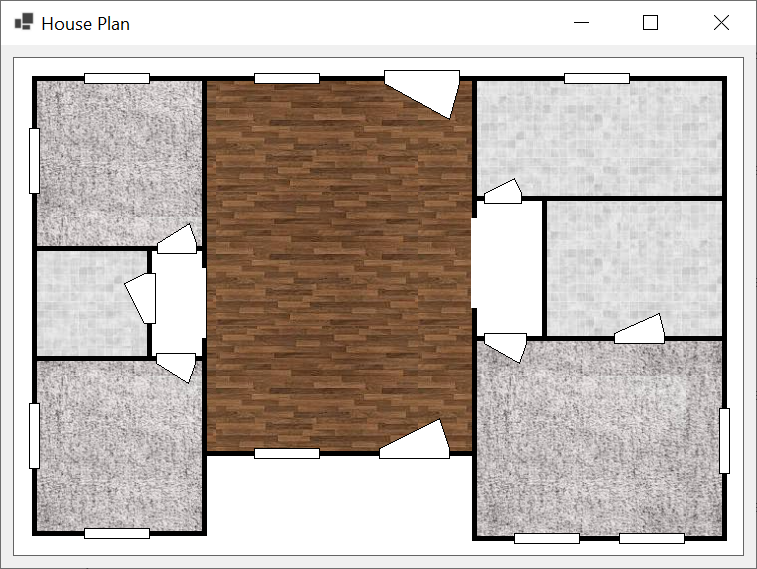
Painting a Rectangular Shape
We are also already familiar with how to paint a rectangle. In previous sections, we painted our rectangles with a solid brush. As an alternative, you can paint a rectangle with other types of brushes such as a texture brush. Here are examples:
namespace FillingOutShapes
{
    public partial class Exercise : Form
    {
        public Exercise()
        {
            InitializeComponent();
        }

        private void pbxCanvas_Paint(object sender, PaintEventArgs e)
        {
            Graphics graph   = e.Graphics;
            Pen pnWall       = new(Color.Black, 5.525F);
            Bitmap bmpCarpet = new Bitmap(Image.FromFile("C:\\Exercise\\Carpet1.png"));
            Brush brsCarpet  = new TextureBrush(bmpCarpet);
            Bitmap bmpTiles  = new Bitmap(Image.FromFile("C:\\Exercise\\Tile1.png"));
            Brush brsTiles   = new TextureBrush(bmpTiles);
            Bitmap bmpWood   = new Bitmap(Image.FromFile("C:\\Exercise\\Wood1.png"));
            Brush brsWood    = new TextureBrush(bmpWood);

            // Bedroom 1
            graph.FillRectangle(brsCarpet, 20F, 300F, 170F, 175F);
            graph.DrawRectangle(pnWall, 20, 300, 170, 175);

            // Common Bathroom
            graph.FillRectangle(brsTiles, 20F, 160F, 115F, 140F);
            graph.DrawRectangle(pnWall, 20, 160, 115, 140);

            // Bedroom 2
            graph.FillRectangle(brsCarpet, 20F, 20F, 170F, 170F);
            graph.DrawRectangle(pnWall, 20, 20, 170, 170);

            // Kitchen, Dining Room, and Living Room
            graph.FillRectangle(brsWood, 190F, 20F, 270F, 375F);
            graph.DrawRectangle(pnWall, 190, 20, 270, 375);

            // Laundry Room
            graph.FillRectangle(brsTiles, 460F, 20F, 250F, 120F);
            graph.DrawRectangle(pnWall, 460, 20, 250, 120);

            // Master Bathroom
            graph.FillRectangle(brsTiles, 530F, 140F, 180F, 140F);
            graph.DrawRectangle(pnWall, 530, 140, 180, 140);

            // Master Bedroom
            graph.FillRectangle(brsCarpet, 460F, 280F, 250F, 200F);
            graph.DrawRectangle(pnWall, 460, 280, 250, 200);

            // Windows
            Pen pnWindow = new(Color.Black);
            Brush brsWhite = new SolidBrush(Color.White);

            // Window - Bedroom 1 - Back
            graph.FillRectangle(brsWhite, 70, 15, 65, 10);
            graph.DrawRectangle(pnWindow, 70, 15, 65, 10);

            // Window - Kitchen
            graph.FillRectangle(brsWhite, 240, 15, 65, 10);
            graph.DrawRectangle(pnWindow, 240, 15, 65, 10);

            // Window - Laundry Room
            graph.FillRectangle(brsWhite, 550, 15, 65, 10);
            graph.DrawRectangle(pnWindow, 550, 15, 65, 10);

            // Window - Bedroom 1 - Left
            graph.FillRectangle(brsWhite, 15, 345, 10, 65);
            graph.DrawRectangle(pnWindow, 15, 345, 10, 65);

            // Window - Bedroom 2 - Left
            graph.FillRectangle(brsWhite, 15, 70, 10, 65);
            graph.DrawRectangle(pnWindow, 15, 70, 10, 65);

            // Window - Bedroom 1 - Front
            graph.FillRectangle(brsWhite, 70, 470, 65, 10);
            graph.DrawRectangle(pnWindow, 70, 470, 65, 10);

            // Window - Living Room - Front
            graph.FillRectangle(brsWhite, 240, 390, 65, 10);
            graph.DrawRectangle(pnWindow, 240, 390, 65, 10);

            // Window - Master Bedroom - Front - 1
            graph.FillRectangle(brsWhite, 500, 475, 65, 10);
            graph.DrawRectangle(pnWindow, 500, 475, 65, 10);

            // Window - Master Bedroom - Front - 2
            graph.FillRectangle(brsWhite, 605, 475, 65, 10);
            graph.DrawRectangle(pnWindow, 605, 475, 65, 10);

            // Window - Master Bedroom 2 - Right
            graph.FillRectangle(brsWhite, 705, 350, 10, 65);
            graph.DrawRectangle(pnWindow, 705, 350, 10, 65);

            // Hallway - Left
            graph.DrawLine(new(Color.White, 6.125F), 188, 210, 188, 280);

            // Hallway - Right
            graph.DrawLine(new(Color.White, 6.125F), 460, 160, 460, 250);

            // Doors
            Pen pnDoor = new(Color.Black);
            Brush brsDoor = new SolidBrush(Color.White);

            // Door - Bedroom 1
            Point[] ptsDoor = { new(142, 305), new(142, 295), new(181, 295), new(181, 305), new(174, 325) };
            graph.FillPolygon(brsDoor, ptsDoor);
            graph.DrawPolygon(pnDoor, ptsDoor);

            // Door - Common Bathroom
            ptsDoor = new Point[] { new(130, 265), new(141, 265), new(141, 215), new(130, 215), new(110, 225) };
            graph.FillPolygon(brsDoor, ptsDoor);
            graph.DrawPolygon(pnDoor, ptsDoor);

            // Door - Bedroom 2
            ptsDoor = [ new(143, 185), new(143, 195), new(182, 195), new(182, 185), new(175, 165) ];
            graph.FillPolygon(brsDoor, ptsDoor);
            graph.DrawPolygon(pnDoor, ptsDoor);

            // Door - Kitchen - Back Door
            ptsDoor = [ new(370, 25), new(370, 12), new(445, 12), new(445, 25), new(435, 61) ];
            graph.FillPolygon(brsDoor, ptsDoor);
            graph.DrawPolygon(pnDoor, ptsDoor);

            // Door - Laundry Room
            ptsDoor = [ new(470, 135), new(470, 145), new(507, 145), new(507, 135), new(500, 120) ];
            graph.FillPolygon(brsDoor, ptsDoor);
            graph.DrawPolygon(pnDoor, ptsDoor);

            // Door - Master Bedroom
            ptsDoor = [ new(470, 285), new(470, 275), new(512, 275), new(512, 285), new(505, 305) ];
            graph.FillPolygon(brsDoor, ptsDoor);
            graph.DrawPolygon(pnDoor, ptsDoor);

            // Door - Master Bathroom
            ptsDoor = [ new(600, 275), new(600, 285), new(650, 285), new(650, 275), new(645, 255) ];
            graph.FillPolygon(brsDoor, ptsDoor);
            graph.DrawPolygon(pnDoor, ptsDoor);

            // Door - Living Room - Font Door
            ptsDoor = [ new(365, 400), new(435, 400), new(435, 390), new(425, 360), new(365, 390) ];
            graph.FillPolygon(brsDoor, ptsDoor);
            graph.DrawPolygon(pnDoor, ptsDoor);
        }
    }
}
This would produce:
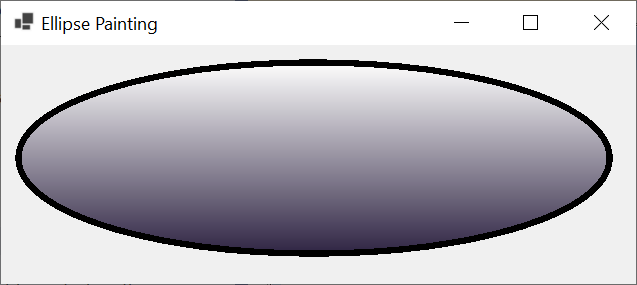
Painting an Ellipse
We already know that an ellipse is a regular round closed Shape. It is sometimes drawn as a dish, a plate, the base or interior of a cylinder, etc. As such, it can be painted to properly reflect its role. As a result, it can be painted with a linear gradient or a hatched brush. Here is an example:
using System.Drawing.Drawing2D;

namespace EllipsePainting
{
    public partial class Exercise : Form
    {
        public Exercise()
        {
            InitializeComponent();
        }

        private void Exercise_Paint(object sender, PaintEventArgs e)
        {
            Graphics grapher = e.Graphics;

            Rectangle rect = new(20, 20, 585, 185);
            Pen penCurrent = new Pen(Color.Black, 12.50F);
            LinearGradientBrush lgb = new LinearGradientBrush(rect,
                                                              Color.FromArgb(250, 250, 250),
                                                              Color.FromArgb(50, 40, 70),
                                                              LinearGradientMode.Vertical);


            grapher.DrawEllipse(penCurrent, rect);

            grapher.FillEllipse(lgb, rect);
        }
    }
}
This would produce:
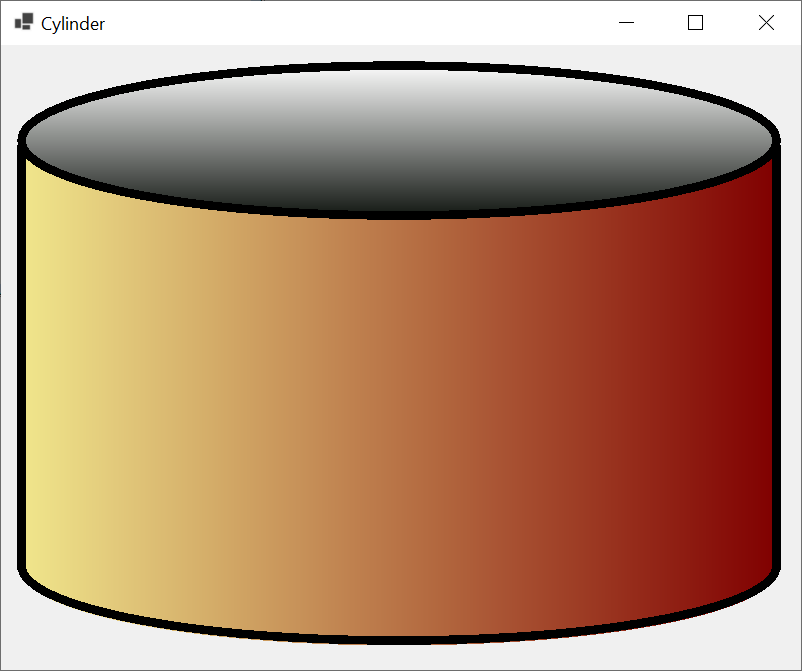
Filling Out a Path
As you may know already, a path is probably the best candidate to combine some shapes. This combination produces a closed shape that you can then paint as you see fit. Here is an example:
using System.Drawing.Drawing2D;

namespace BitmapFillingShape
{
    public partial class Exercise : Form
    {
        public Exercise()
        {
            InitializeComponent();
        }

        private void Exercise_Paint(object sender, PaintEventArgs e)
        {
            Graphics grapher = e.Graphics;

            // The primary pen, will be used to draw the path that will contain the borders of the cylinder
            Pen penBorders = new Pen(Color.Black, 1.00F);

            // The rectangle that will be used to draw the top and the bottom bases
            Rectangle rect1 = new(20, 20, 755, 150);
            // A linear gradient brush to paint the interior of the cylinder to simulate the depth of the cylinder
            LinearGradientBrush lgb = new LinearGradientBrush(rect1,
                                                              Color.FromArgb(250, 250, 250),
                                                              Color.FromArgb(20, 25, 20),
                                                              LinearGradientMode.Vertical);

            /* Draw the top of the cylinder.
             * To make it look open and simulate depth, paint it
             * with a gradient brush that fades from bottom to top. */
            grapher.FillEllipse(lgb, rect1);

            // Prepare a path to hold the parts of the cylinder
            GraphicsPath path = new GraphicsPath();

            // Create a rectangle within which the top and the bottom faces will be drawn as ellipses.
            Rectangle rect2 = new(20, 450, 755, 150);

            // The right part of the base of the cylinder
            path.AddArc(rect2, 0, 100);
            // The left part of the base of the cylinder
            path.AddArc(rect2, 100, 80);

            // Change the top-start part of the rectangle
            rect2 = new(20, 20, 755, 150);
            // Draw the top (lower side) of the cover of the cylinder
            path.AddArc(rect2, 180, -180);

            // Create a gradient brush for the body of the cylinder
            lgb = new LinearGradientBrush(rect1,
                                          Color.Khaki,
                                          Color.Maroon,
                                          LinearGradientMode.Horizontal);
            // Finally, draw and paint the cylinder as a path
            grapher.FillPath(lgb, path);

            // To make the cylinder look "real", prepare to draw some borders on it
            // First create a rectangle that will hold its bottom side
            rect2 = new(20, 445, 755, 150);
            // Create/Update a thibk pen for it
            penBorders = new Pen(Color.Black, 8.525F);

            // Draw the borders of the cylinder
            grapher.DrawEllipse(penBorders, rect1);
            grapher.DrawLine(penBorders, 20, 100, 20, 525);
            grapher.DrawLine(penBorders, 775, 100, 775, 525);
            grapher.DrawArc(penBorders, rect2, 0, 180);
        }
    }
}
This would produce:
![]() Practical Learning: Ending the Lesson
Practical Learning: Ending the Lesson
|
|
|||
| Previous | Copyright © 2010-2024, FunctionX | Friday 01 Mars 2024 | Next |
|
|
|||