
Introduction to Microsoft Visual C++ .NET

|
Introduction to Microsoft Visual C++ .NET |
The earliest implementation of the C and C++ language from Microsoft used to be called Microsoft C/C++. When graphical programming started to be considered, Microsoft released Visual C++ 1.0 which allowed performing application programming for the Microsoft Windows operating system. With the releases of Microsoft Windows 3.X versions, the operating system was using a library referred to as Win16 that contained all necessary functions, structures, and constants used to create graphical user interface (GUI) application. This library made it a little easier to "talk" to the operating system and create fairly good looking applications. After a while, Microsoft released Windows 95 followed by Windows 98. The operating system library was also updated to Win32. Win32 was (in fact is) just a library. Like most or all other libraries, it is not a programming language. It is a documentation that allows programmers to know how they can use the library to create applications that can run on a Microsoft Windows-lead computer. This means that, to use it, programmers needed a language such as C, C++, or Pascal, etc to actually create the desired applications. Win32 was written in C. Since using Win32 requires a good level of understanding and work, Microsoft released a customized version of the Win32 library to make it easier to comprehend. The library is called Microsoft Foundation Class Library (MFC). Because Win32 was written in C and MFC was written for C/C++ developers, programmers of other languages would not understand it. To accommodate others, in fact to make Windows programming accessible to everybody, Microsoft created Microsoft Visual Basic as a true graphical programming environment. Visual Basic used a different and simpler language, called Basic as its foundation. The first consequence was that Visual Basic didn't inherently "understand" Win32. To allow Visual Basic programmers to use what was available from Win32, its programmers had to import the needed functions. This resulted in Visual C++ programmers using one library and Visual Basic programmers using another; this being only one of many problems. With the growing advent of the Internet, the client/server applications, demanding databases, communication software, Microsoft decided to create a new library that can be understood and used by many different languages. The library was called the .NET Framework. This was meant to accomplish the goal of both Visual C++ and Visual Basic using the same library. Another goal was to have programmers of different languages work on the same project without having each one learning the other's language. While on the subject, Microsoft also developed other languages such as C#, J#, or JScript and other programming environments that use these languages, such as Visual C# or Visual J# to also be part of this family that share the .NET Framework library. A library called .NET Framework combines the new classes, functions, and constants that can be used to create applications to run for a Microsoft Windows computer. This library allows you to create graphical, databases, XML-based, web services, and web-based applications. Once an application has been created and is satisfactorily functional, it can be distributed to people who can use it. To make this possible, the .NET Framework is implemented in two systems: the class library and the common language runtime (CLR). The .NET Framework class library is a collection of fully functional object-oriented classes in the tradition of C++ covering all possible areas of application programming including Windows controls, file processing, XML, communication, web, databases, etc. This library is created to be used by various computer languages or programming environments. To take advantage of what this library offers, you must use a computer language that is adapted to "understand" this library. One of the languages that understands it is commonly referred to as Managed C++. That's the language we will use for the exercises in our lessons. With the language of your choice, you can create an application and get it ready. After an application has been created, it must be compiled so it can be used as necessary. Another goal of the .NET Framework is to make it possible for a library or service created from one language to be used in an application created using another language. To make this possible, code must be compiled so that an external engine, and not the environment used to create code, can compile, manage, and execute it. That's the role of the common language runtime. The CLR takes care of code execution, memory cleanup, thread management, security, etc. Such code is referred to as managed code. Code that is not compiled into the CLR is referred to as unmanaged code.
Because many programs had earlier been written using the MFC library, Microsoft decided to continue publishing it and the MFC is still part of Visual C++ .NET. This resulted in many libraries being included in Visual C++ .NET. Because of the many differences among the libraries used in Visual C++, the side of Visual C++ that takes advantage of the .NET Framework is usually referred to as Visual C++ .NET (the same distinction is made between Visual Basic and Visual Basic .NET). Our lessons will address only the .NET side of Microsoft Visual C++ .NET. In other words, these lessons deal only with the way the .NET Framework is implemented in Visual C++ .NET. In fact, because of the many differences between MFC and the .NET Framework, we published a different site for the MFC side of Microsoft Visual C++. To make the .NET Framework transparently useful to different languages, Microsoft released Visual Studio .NET that could be used to create applications using C++, Managed C++, C#, Visual C#, Visual Basic .NET, J#, Visual J#, JScript .NET, etc. When Microsoft released the first version of Visual Studio .NET in 2002, Visual C++ suffered with the lack of "designing" a form. With the new released of Visual Studio .NET in 2003, this problem was solved. Because of that aspect, when writing these lessons, we used only Microsoft Visual Studio .NET 2003.
After Microsoft Visual Studio .NET has been opened, the screen you look at is called an Integrated Development Environment or IDE. The IDE is the set of tools you use to create a program. The system icon is used to identify the application that you are using. Almost every application has its own system icon. The system icon holds its own list of actions. For example, it can be used to move, minimize, maximize or close (when double-clicked) a window. When you freshly start Visual Studio .NET, the main section of the title bar displays the name of the application as Microsoft Developer Environment. Later on, if you start a project, the title bar would display the name of your project, followed by the name of the programming environment you selected. The main section of the title bar is also used to move, minimize, maximize the top section of the IDE, or to close Visual Studio. On the right section of the title bar, there are three system buttons with the following roles:
Our lessons assume that you already know the Managed C++ language, but only the language. We assume that you have no prior knowledge of graphical application programming. In our lessons, we will create Windows applications, the type referred to as graphical user interface (GUI). To create a Visual C++ .NET project, you can display the New Project dialog box, select Visual C++ Projects, select the type of project, give it a name, specify its directory, and click OK.
As mentioned already, the instructions created for a Visual Basic project are written in plain English in a language easily recognizable to the human eye. To compile and execute a Visual C++ .NET project in one step, on the main menu, you can click Debug -> Start Without Debugging. Although there are other techniques or details in compiling (or debugging) and executing a project, for now, this is the only technique we will use until further notice.
As opposed to creating a new project, you can open a project that either you or someone else created. To open an existing project, on the main menu, you can click File -> Open -> Project... You can also click File -> Open Solution on the main menu. Alternatively, you can display the Start Page and click Open Project. In all cases, the action would display the Open Project dialog box. This allows you to select a Visual Project and open it.
Application programming primarily consists of populating a form with objects called Windows controls. These controls are what the users of your application use to interact with the computer. As the application developer, one of your jobs will consists of selecting the necessary objects, adding them to your application, and then configuring their behavior. As mentioned with the form, there are various ways you can get a control into your application. One of the techniques consists of programmatically adding a control by writing code. Another technique consists of visually selecting a control and adding it to a form. To create your applications, there are two settings you will be using. If a control is displaying on the screen and you are designing it, this is referred to as Design Time. This means that you have the ability to manipulate the control. You can visually set the control’s appearance, its location, its size, and other necessary or available characteristics. The design view is usually the most used and the easiest because you can glance at a control, have a realistic display of the control and configure its properties. The visual design is the technique that allows you to visually add a control and manipulate its display. This is the most common, the most regularly used, and the easiest technique. The other technique you will be using to control a window is with code, writing the program. This is done by typing commands or instructions using the keyboard. This is considered, or referred to, as Run Time. This is the only way you can control an object’s behavior while the user is interacting with the computer and your program.
A toolbar is an object made of buttons. These buttons provide the same features you would get from the (main) menu, only faster. Under the main menu, the IDE is equipped with an object called the Standard toolbar. For example, to create a new project, on the main menu, you could click File -> New -> Project… On the other hand, the Standard toolbar is equipped with a button to perform the same action a little faster: By default, the Standard toolbar is positioned under the main menu but you can position it anywhere else on the IDE. To move a toolbar, position the mouse on the dotted line on its left section. The mouse pointer will change into a cross:
Then you can click and drag away from that position:
In the same way, you can position the toolbar anywhere on the screen. You can also attach or "dock" it to one of the four sides of the IDE. When a toolbar is not docked to one side of the IDE, it is said to float. When a toolbar is floating, you can resize it by dragging one of its borders. If a toolbar is floating, to put it back to its previous position, you can double-click its title bar. By default, when you start Visual Studio, it is equipped with one one toolbar: Standard. To get more toolbars, on the main menu, you can click View -> Toolbars and click the toolbar of your choice. You can also right-click any available toolbar or the main menu. This displays a list of all the available toolbars. Those that are currently opened have a check mark next to them. You can get a list of the toolbars that are available if you right-click any button on any toolbar or menu. On this site, every toolbar is referred to by its name. A toolbar is equipped with buttons that could be unfamiliar. Just looking at one is not obvious. To know what a button is used for, you can position the mouse on top of it. A tool tip will come up and display for a few seconds. From now on, each button on any toolbar will be named after its tool tip. This means that, if a tool tip displays "Hungry", its button will be called the Hungry button. If a tool tip displays "Exercises and Assignments", its button will be called the Exercises and Assignments button. If you are asked to click a button, position your mouse on different buttons until one displays the referred to name. Some buttons present an arrow on their right side. This arrow represents a menu. Like the menu, the toolbars can be customized.
When creating your applications, you will use a set of windows
that each accomplishes a specific purpose. Some windows are represented with an
icon but hides the rest of the body. For example, by default, on the left of the
screen, you may see an icon made of two computers 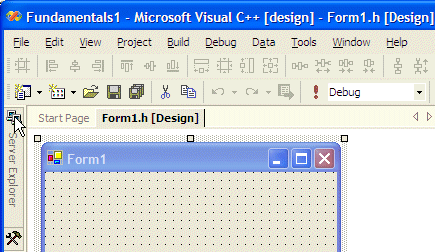 If you expand a window, it would display a title bar with two buttons. One is called Auto Hide and the other is the classic Close button: 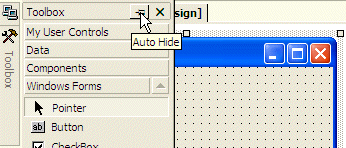 If you expand a window but find out you don't need it any more, you can just move the mouse away from it. The window would return to its previous state. Based on this functionality, if you are working with a window and move the mouse away from it, it would retract. If you need it again, you would have to reopen it using the same technique. If you are going to work with a certain window for a while, you can keep it open even if you move the mouse away. To do this, click the Auto Hide button. If clicked, the Auto Hide button changes from pointing left to pointing down. When Visual Studio .NET opens, it makes some windows necessary. These are the most regularly used windows. If you think that one of them is not regularly used in your types of assignments, you can remove it from the screen by clicking its Close button. All of the windows you can use are listed in the View menu. Therefore, if a window is not displaying, you can click View on the main menu and click a window of your choice. By its default installation, Visual Studio .NET installs some windows to the left and some others to the right of the screen. You can change this arrangement if you want. To do this, expand a window, then drag its title bar to another location on the screen. Windows can then be "coupled", that is docked together to one side of the screen. When windows are grouped, they automatically create tabs, allowing you to select the desired one by clicking its tab. The options available in windows display differently depending on the window and the items in it. Somes item are organized in a tree list equipped with + or – buttons. To expand a list, you can click its + button. To collapse a list, click its – sign. Some other items appear as buttons.
The Start Page is the first wide area that appears when Visual Studio .NET comes up. The top section of the Start Page displays three buttons labeled Projects, Online Resources, and My Profile. At any time, to display the Start Page, you can click its tab on the left side just under the Standard toolbar. Alternatively, on the main menu, you can click Help -> Show Start Page. If you have just installed Visual Studio .NET or have not previously opened a project, the Projects section would be empty. Once you start creating and using projects, they display in the Projects section by their name and the date they were created. Here is an example: 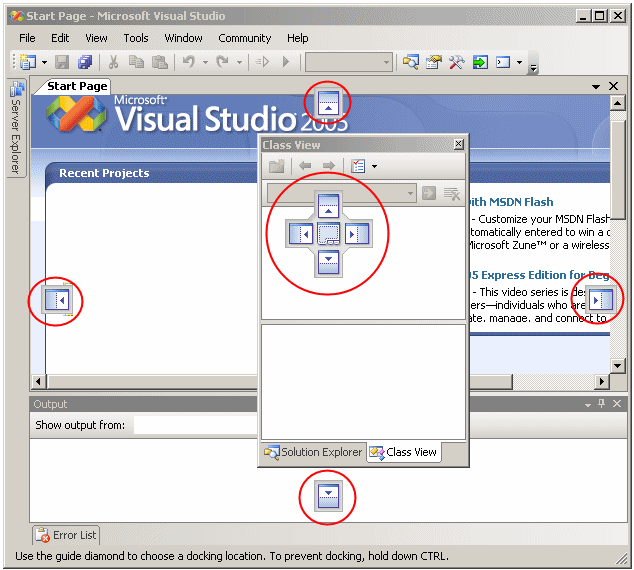 The Online Resources section allows you to check new resources from Microsoft and partners directly from Visual Studio .NET through an Internet connection. The left side of this section displays a menu with Get Started, What's New, Online Community, etc. The My Profile section allows you to configure the programming settings you are using.
There are two main ways you will manipulate an object of your application, visually or using code. In the next lessons, we will explore details of visually designing a control. As you should have found out from learning C++, code of an application is ASCII text-based, written in plain English and readable to human eyes. For a Visual C++ .NET application, you can use any text editor to write your code but one of Visual Studio's main strengths is the code editor that it has always brought. It is very intuitive. The Code Editor is a window specially designed for code writing.
To display the code editor, if you created an empty project, you can click Project on the main menu and select one of the options that would lead either to a blank text file or a a file that contains primary code. The Code Editor of Visual C++ .NET is divided in 4 sections: 
The top section of the Code Editor displays tabs of property pages. Each tab represents a file. To add a new file to the project, on the main menu, you can click
Once in the Add New Item dialog box, in the Templates section, click the type of file you want to create, type a name in the Name text box, and press Enter. After the file has been created, it is represented by a tab in the top section of the Code Editor. In the same way, you can add as many files as you judge them necessary. Because there can be different types of files, each has an extension that allows you to know the type of file the tab is holding. To access one of theses files, you can click its corresponding tab. By default, the tabs display in the order their files were created or added to the project, from left to right. If you don't like that arrangement, click and drag its tab either left or right beyond the next tab:
The top-left section of the Code Editor displays a combo box named Types. As its name indicates, the Types combo box holds a list of the types as classes and structures that are used in the current project. You can display the list if you click the arrow of the combo box:  Each item of the Types combo box displays the name of its type associated with its parent as implemented in the code. The top-right section of the Code Editor displays a combo box named Members. The Members combo box holds a list of the members of classes. The content of the Members combo box depends on the item that is currently selected in the Types combo box. This means that, before accessing the members of a particular class, you must first select that class in the Types combo box. Then, when you click the arrow of the Members combo box, the members of only that class display. If you select an item from the Members combo box, the Code Editor jumps to that member in the header file and positions the cursor to the left of the member.
Code is written in a wide area with a white background. This is the area you use the keyboard to insert code with common readable characters. The Code Editor uses some colors to differentiate categories of words or lines of text. The colors used are highly customizable. To change the colors, on the main menu, you can click Tools -> Options... In the Options dialog box, in the Environment section, click Fonts and Colors. To set the color of a category, in the Display Items section, click the category. In the Item Foreground combo box, select the desired color. If you want the words of the category to have a colored background, click the arrow of the Item Background combo box and select one: 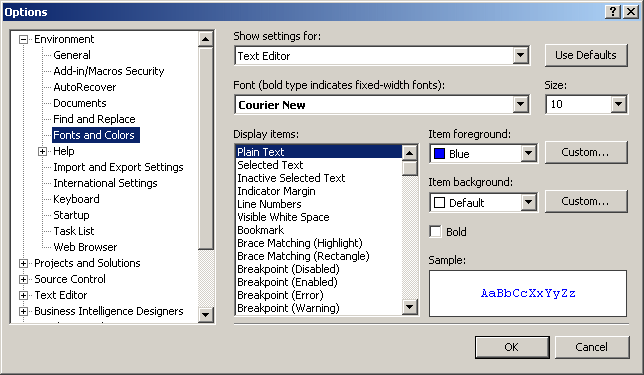 In both cases, the combo boxes display a fixed list of colors. If you want more colors, you can click a Custom button to display the Color dialog box that allows you to "create" a color.
The Solution Explorer can be used to create add a new class, a new resource, or a reference to the current project. It can also be used to add a another project to the current project. To perform any of these operations, you can right-click a folder node such as the name of the project, the Source Files, the Header Files, or the Resource Files nodes, position the mouse on Add and select the desired operation: 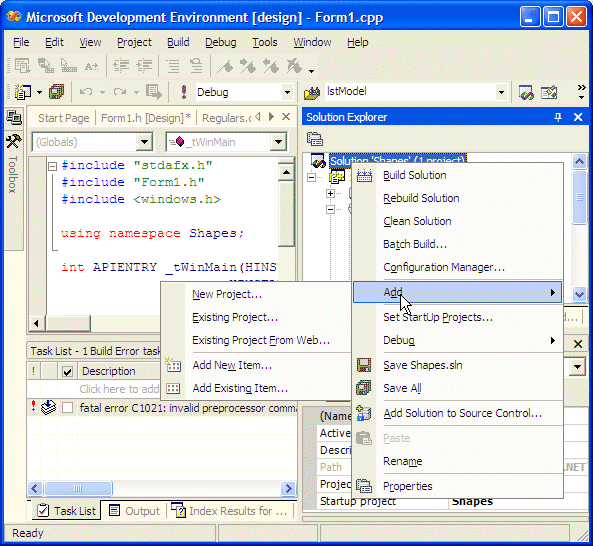 Remember that you can also perform any of these operations from the Project category of the main menu. Besides adding new items to the project, you can also use the Solution Explorer to build the project or change its properties. If you add one or more other project(s) to the current one, one of the project must be set as the default. That project would be the first to come up when the user executes the application. By default, the first project created is set as the default. If you have more than one project, to set the default, right-click the name of the desired project in Solution Explorer and click Set As StartUp Project. The Solution Explorer also you to rename or delete some of the items that belong to your project.
The Class View shares some of its functionality with the Solution Explorer. This means that you can use it to build a project, to add new class or a new resource. You can also use it to change the default project if you have more than one. While the Solution Explorer displays the items that are currently being used by your project, the Class View allows you to explorer the classes used in your applications, including their dependencies. For example, some times you will be using a control of the of the .NET Framework and you may wonder from what class that control is derived. The Class View, rather than the Solution Explorer, can quickly provide this information. To find it out, expand the class by clicking its + button. |
||||||||||||||||||||||||||||||||||||||||||||||||||||||||||||||||||||||||||||||||||||
|
|
||
| Previous | Copyright © 2004-2016, FunctionX, Inc. | Next |
|
|
||