-
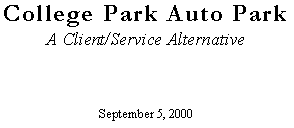
In the empty document, press Ctrl + E to center align the
cursor
-
Type College Park Auto Park
-
Press Enter and type A Client/Service Alternative
-
Press Enter five times
-
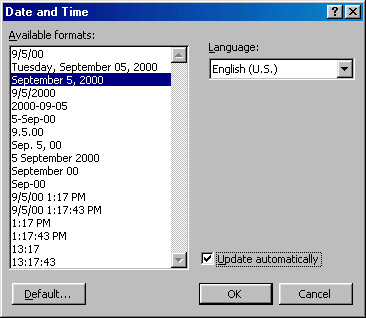
On the main menu, click Insert -> Date And Time…
-
From the Date And Time dialog, click the 3rd date. Make sure that the Update Automatically check box is checked.
-
Click
OK
-
Press Enter 4 times.
-
Highlight the first line of text, College Park Auto Park
-
On the main menu, click Format -> Font...
-
From the Font dialog change the font to Garamond (if you
don't have Garamond, select Georgia or Times New Roman) and Bold; change its size to
20. Click the Character Spacing property sheet. Change the Spacing combo box to Expanded By 1.2 pt. Click
OK
-
Select the 2nd line, A Client/Service Alternative
-
Using the Font combo box on the Formatting toolbar, change its size to 14,
Italic.
-
ssd
-
Press Ctrl + End to get to the end of the document
-
On the Formatting toolbar, click the Align Left button.
-
On the Mail Merge toolbar, click Insert Merge Field
button  and click Title
-
Press Space
-
On the Mail Merge toolbar, click Insert Merge Field
-> FirstName
-
Press Space. Click Insert Merge Field -> LastName
and press Enter
-
Click Insert Merge Field -> Address Enter
-
Click Insert Merge Field -> City
-
Type , and press Space
-
Click Insert Merge Field -> State and
press Space
-
Click Insert Merge Field
-> ZIPCode
-
Press Enter 4 times
-
Type Dear and press Space
-
Click Insert Merge Field -> FirstName , Enter
twice
-
Type I hope your recent acquisition of the
-
Click Insert Merge Field -> Make and
press Space
-
Click Insert Merge Field -> Model and
press Space
-
Continue typing is satisfying your regular needs of a reliable car. As one of our most valuable customers, I would like to invite you to our one-day event this Saturday for a test drive of our new Swing Victoria. This car has received the best reviews of this year's market. As a
-
Press Space
-
Click Insert Merge Field -> JobTitle
and press Space
-
Type at and press Space
-
Click Insert Merge Field -> Company
-
Type , I believe that your company can benefit from the pleasure you will experience with this brand new offer.
-
Press Enter twice
-
Type I hope to see you this Saturday in our regular location.
-
Press Enter 5
times
-
On the main menu, click Insert -> AutoText -> Closing
-> Sincerely,
-
Press Enter 3 times
-
Type Justine Maurice and press Enter
-
Type Director of Sales, Chief Customer Representative
and press Enter
-
Type College Park Auto Park
-
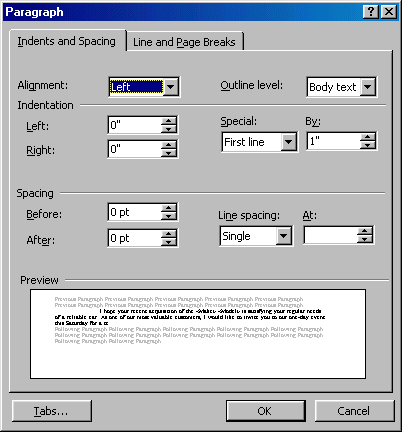
Right-click anywhere in the first big paragraph that
starts with I hope your recent... and select Paragraph from the shortcut
menu.
-
In the Paragraph dialog, make sure you are in the
Indents And Spacing property sheet. Make sure the Alignment is set to Left.
Click the Special combo box and select First Line. Set the By spin button to
1".
-
Click OK. Check your letter
to make sure it looks professional.
-
On the main menu, click View -> Header And Footer
-
From the Header And Footer toolbar, click Switch Between Header and
Footer
-
On the Formatting toolbar, click the Center button
-
Type 8602 Baltimore Ave and press Space
-
On the main menu, click Insert -> Symbol… Change the Font combo box to Monotype Sort. Click the symbol on 3rd column, 4th row and click Insert. Move the Insert dialog up
or down to make sure you can see the lower section of the
letter.
-
Click on the right side of the new diamond in the footer section of the letter.
-
Press Space and type College Park, MD 20707-3312
-
Press Shift +
Enter
-
Type Phone (301) 726-4402 and press Space
-
On the Insert dialog, double-click the same diamond symbol you added earlier, then close the Symbol
dialog.
-
Press Space and type Fax (301) 726-4412
-
Select/highlight both lines of the footer section
-
Press Ctrl + D which is a shortcut to call the Font dialog. Click the Font property sheet and change the font to Garamond, Regular, Size 10. Click the Character Spacing property sheet. Change the Spacing combo box to Expanded By 1.2 pt. Click
OK
-
While both lines in the Footer section are still selected, on the main menu, click Format
-> Change Case… Make sure that the UPPERCASE radio button is selected and click OK.

Now, our letter has been written.
-
Save the letter as Sales Promotion Letter
-
Make sure you select the C:\My Documents\Sales Contacts folder.
Click Save.
-
Read the letter.

