-
Start Microsoft Word
-
On the main menu, click Tools -> Mail Merge...
-
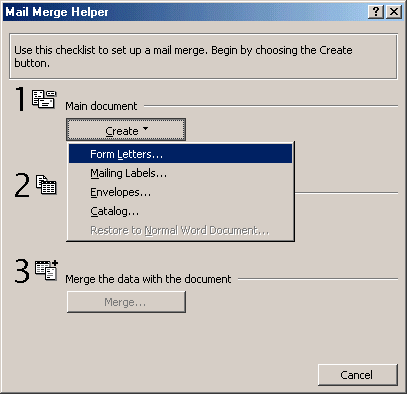
From the Mail Merge Helper click Create -> Form
Letters...
-
From the Microsoft Word dialog, click New Main Document

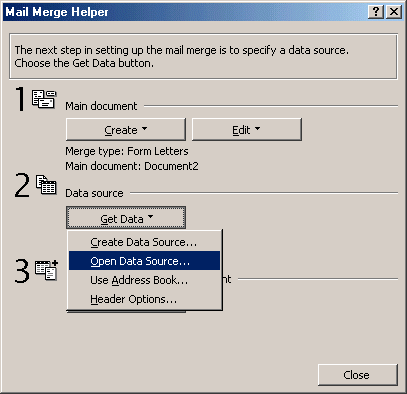
- From the Mail Merge Helper again, click Get Data and
click Open Data Source...
-
From the Open Data Source dialog, click the arrow of
the Files Of Types combo box and select MS Excel Worksheets. Using the
Look In combo box, locate the folder where the exercise files were
installed, it should be C:\My Documents\Mail Merge Files
-
Click Red Oak High School
-
And click Open.
-
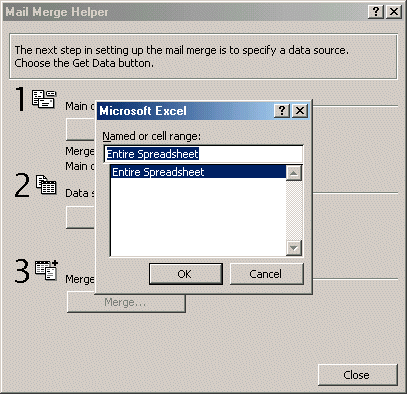
From the Microsoft Excel dialog, click Stud_Records
-
And click OK.
-
Now Microsoft Word would like you to create the
letter.

Click Edit Main Document
-
Now we will create the main letter.
Your cursor should be blinking on top of the letter.
Make sure you are working in Print Layout View (on the main menu, click
View -> Print Layout).
Make sure the font is set on the Formatting toolbar as Times New Roman,
size 10; otherwise, change it to that font and that size.
Press Enter to move the cursor down.
-
Press the up arrow key to move the cursor back to
the 1st line.
-
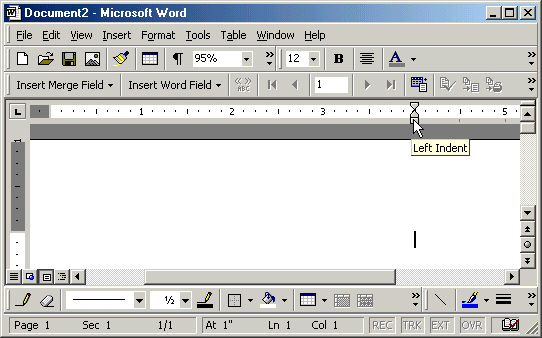
Move the Left Indent mark to the 4th mark on the
horizontal ruler
-
Make sure the cursor is still on the 1st line. On
the Formatting toolbar, make sure the font is Times New Roman. Change
the Font Size to 8
-
Type 12044 Arnolds Drive and press Enter
-
Type Wheaton, MD 20904 and press Enter
-
Type Phone: (301) 417-9401 Fax: (301) 294-8811
-
Press the down arrow key to move the cursor down to
the empty line.
-
Press Enter to gain some space.
-
Type RED OAK HIGH SCHOOL and press Enter
-
Select RED OAK HIGH SCHOOL
-
On the Formatting toolbar, change the font to
Garamond, size 24, Bold, color Gray 50%
-
Click anywhere on RED OAK HIGH SCHOOL to make sure
it is not selected but the cursor is anywhere on that line
-
If you don't have the Tables And Borders toolbar on
your screen, then on the main menu, click View -> Toolbars ->
Tables And Borders.
-
If you don't have the Drawing toolbar on your
screen, on the main menu, click View -> Toolbars -> Drawing.
Position the Tables and Borders and the Drawing toolbars at the bottom
section of your screen, position them both side by side.

-
On the Tables and Borders toolbar (which is on the
left, on my picture), click the arrow of the Fill Color button and click
Gray 10%
-
With the cursor still on that line, position the
First Line Indent marker at 0.5 and the Hanging Indent marker at -1 (in
the gray section) of the horizontal ruler.

-
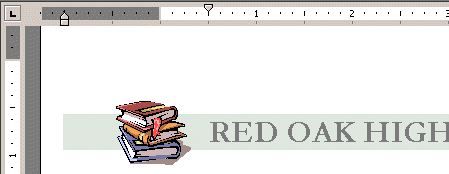
Now we will insert a picture on the letter.
On the Drawing toolbar, click Text Box, then click somewhere on the left
side of RED OAK HIGH SCHOOL
-
With the cursor inside of the text box, on the main
menu, click Insert -> Picture -> ClipArt...
-
In the picture categories, click Academic
-
If you are using Microsoft Word 2000, from the list
of academic pictures, click the first picture and click Insert
-
Close the Insert ClipArt window. (I think that if
you didn't touch anything else on the image, it should have an
acceptable size already).
-
Move the text box (with the image in it) to the left
of RED. On the Drawing toolbar, click the arrow of the Fill Color button
and click No Fill.
-
On the Drawing toolbar, click the arrow of the Line
Color and click No Line.
-
Press Ctrl + End to get to the last empty line of
the letter.
-
Position both the First Line Indent and the Hanging
Indent marks at 0.5 on the horizontal ruler.

-
With the cursor under the big title, press Enter 3
times.
-
Press the up arrow key once to move the cursor up
one line.
-
On the Standard toolbar, click the Insert Table
button and elect to create a table with 4 columns and 1 row (1 X 4
Table)
-
With the cursor in the first cell, type Student:
-
Click inside the 3rd cell and type Mail-To:
-
Change Student: and Mail-To: fonts to Tahoma, size
10.
-
Click inside the second cell.
-
On the Mail Merge toolbar, click Insert Merge Field
and click FirstName
-
Press Space
-
On the Mail Merge toolbar, click Insert Merge Field
and click LastName
-
Press Enter to move the cursor to the second line
inside the cell.
-
On the Mail Merge toolbar, click Insert Merge Field
-> MajorCode
-
Press Space and click Insert Merge Field ->
MajorName
-
Press Enter and click Insert Merge Field -> Grade
-
Click inside the last cell
-
On the Mail Merge toolbar, click Insert Merge Field
-> ParentsNames
-
Press Enter and click Insert Merge Field ->
Address
-
Press Enter and click Insert Merge Field -> City
-
Press Space and click Insert Merge Field -> State
-
Press Space and click Insert Merge Field ->
ZIPCode
-
With the cursor still inside the last cell, on the
Tables and Borders toolbar, click the arrow of the Outside Border button
and click No Border
-
Click inside of one of the other cells and press F4
(to repeat the last action).
-
Remove the borders on the other two cells.
-
Click on the empty line that is just under RED OAK.
-
Press Ctrl + R to align the cursor to the right.
-
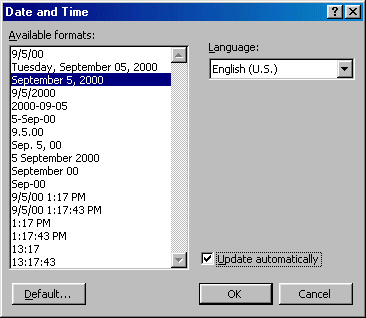
On the main menu, click Insert -> Insert Date And
Time...
-
From the Date And Time dialog, click the 3rd date
-
And click OK
-
Press Ctrl + End to get to the last line of the
letter.
-
Type Dear and click Insert Merge Field ->
ParentsNames
-
Press Enter and type
The Red Oak High School, in conjunction with the Montgomery County School System, would like you to honor us with your presence at this year-end's student award ceremony this Saturday October 24 at 7:30 PM.
The students with good and higher grades will receive the evening's special mentions. At the event, the students with the three highest grades in each matter will receive an honor, silver, or a copper awards. This year's ceremony places a strong emphasis on discipline. We certainly hope that this is a good start and that you are raising a valuable young kid.
The ceremony will start at 7:30 PM with a live session of international and ethnic dances. Although the awards ceremony will start at 8:00 PM, the high level of attractions prepared for the opening door is an entertainment session we encourage you to attend.
We thank you in advance for your participation and attention.
Bernard Glott
ROSH Principal
-
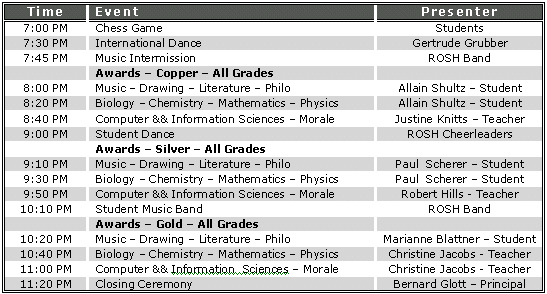
Press Enter twice and create a table that
illustrates the evening program. Here is an example:
-
All you have to do now is to read
the letter


